Setting up a Source Workflow in CustomerLabs
Workflow allow you to create server-side events in CustomerLabs. This is different from the client-side events that are created when a user interacts with your website.
While setting up a server-side event in sources, you will be required to map the incoming data from the other platform to the CustomerLabs fields.
Setting up the workflow
Section titled “Setting up the workflow”-
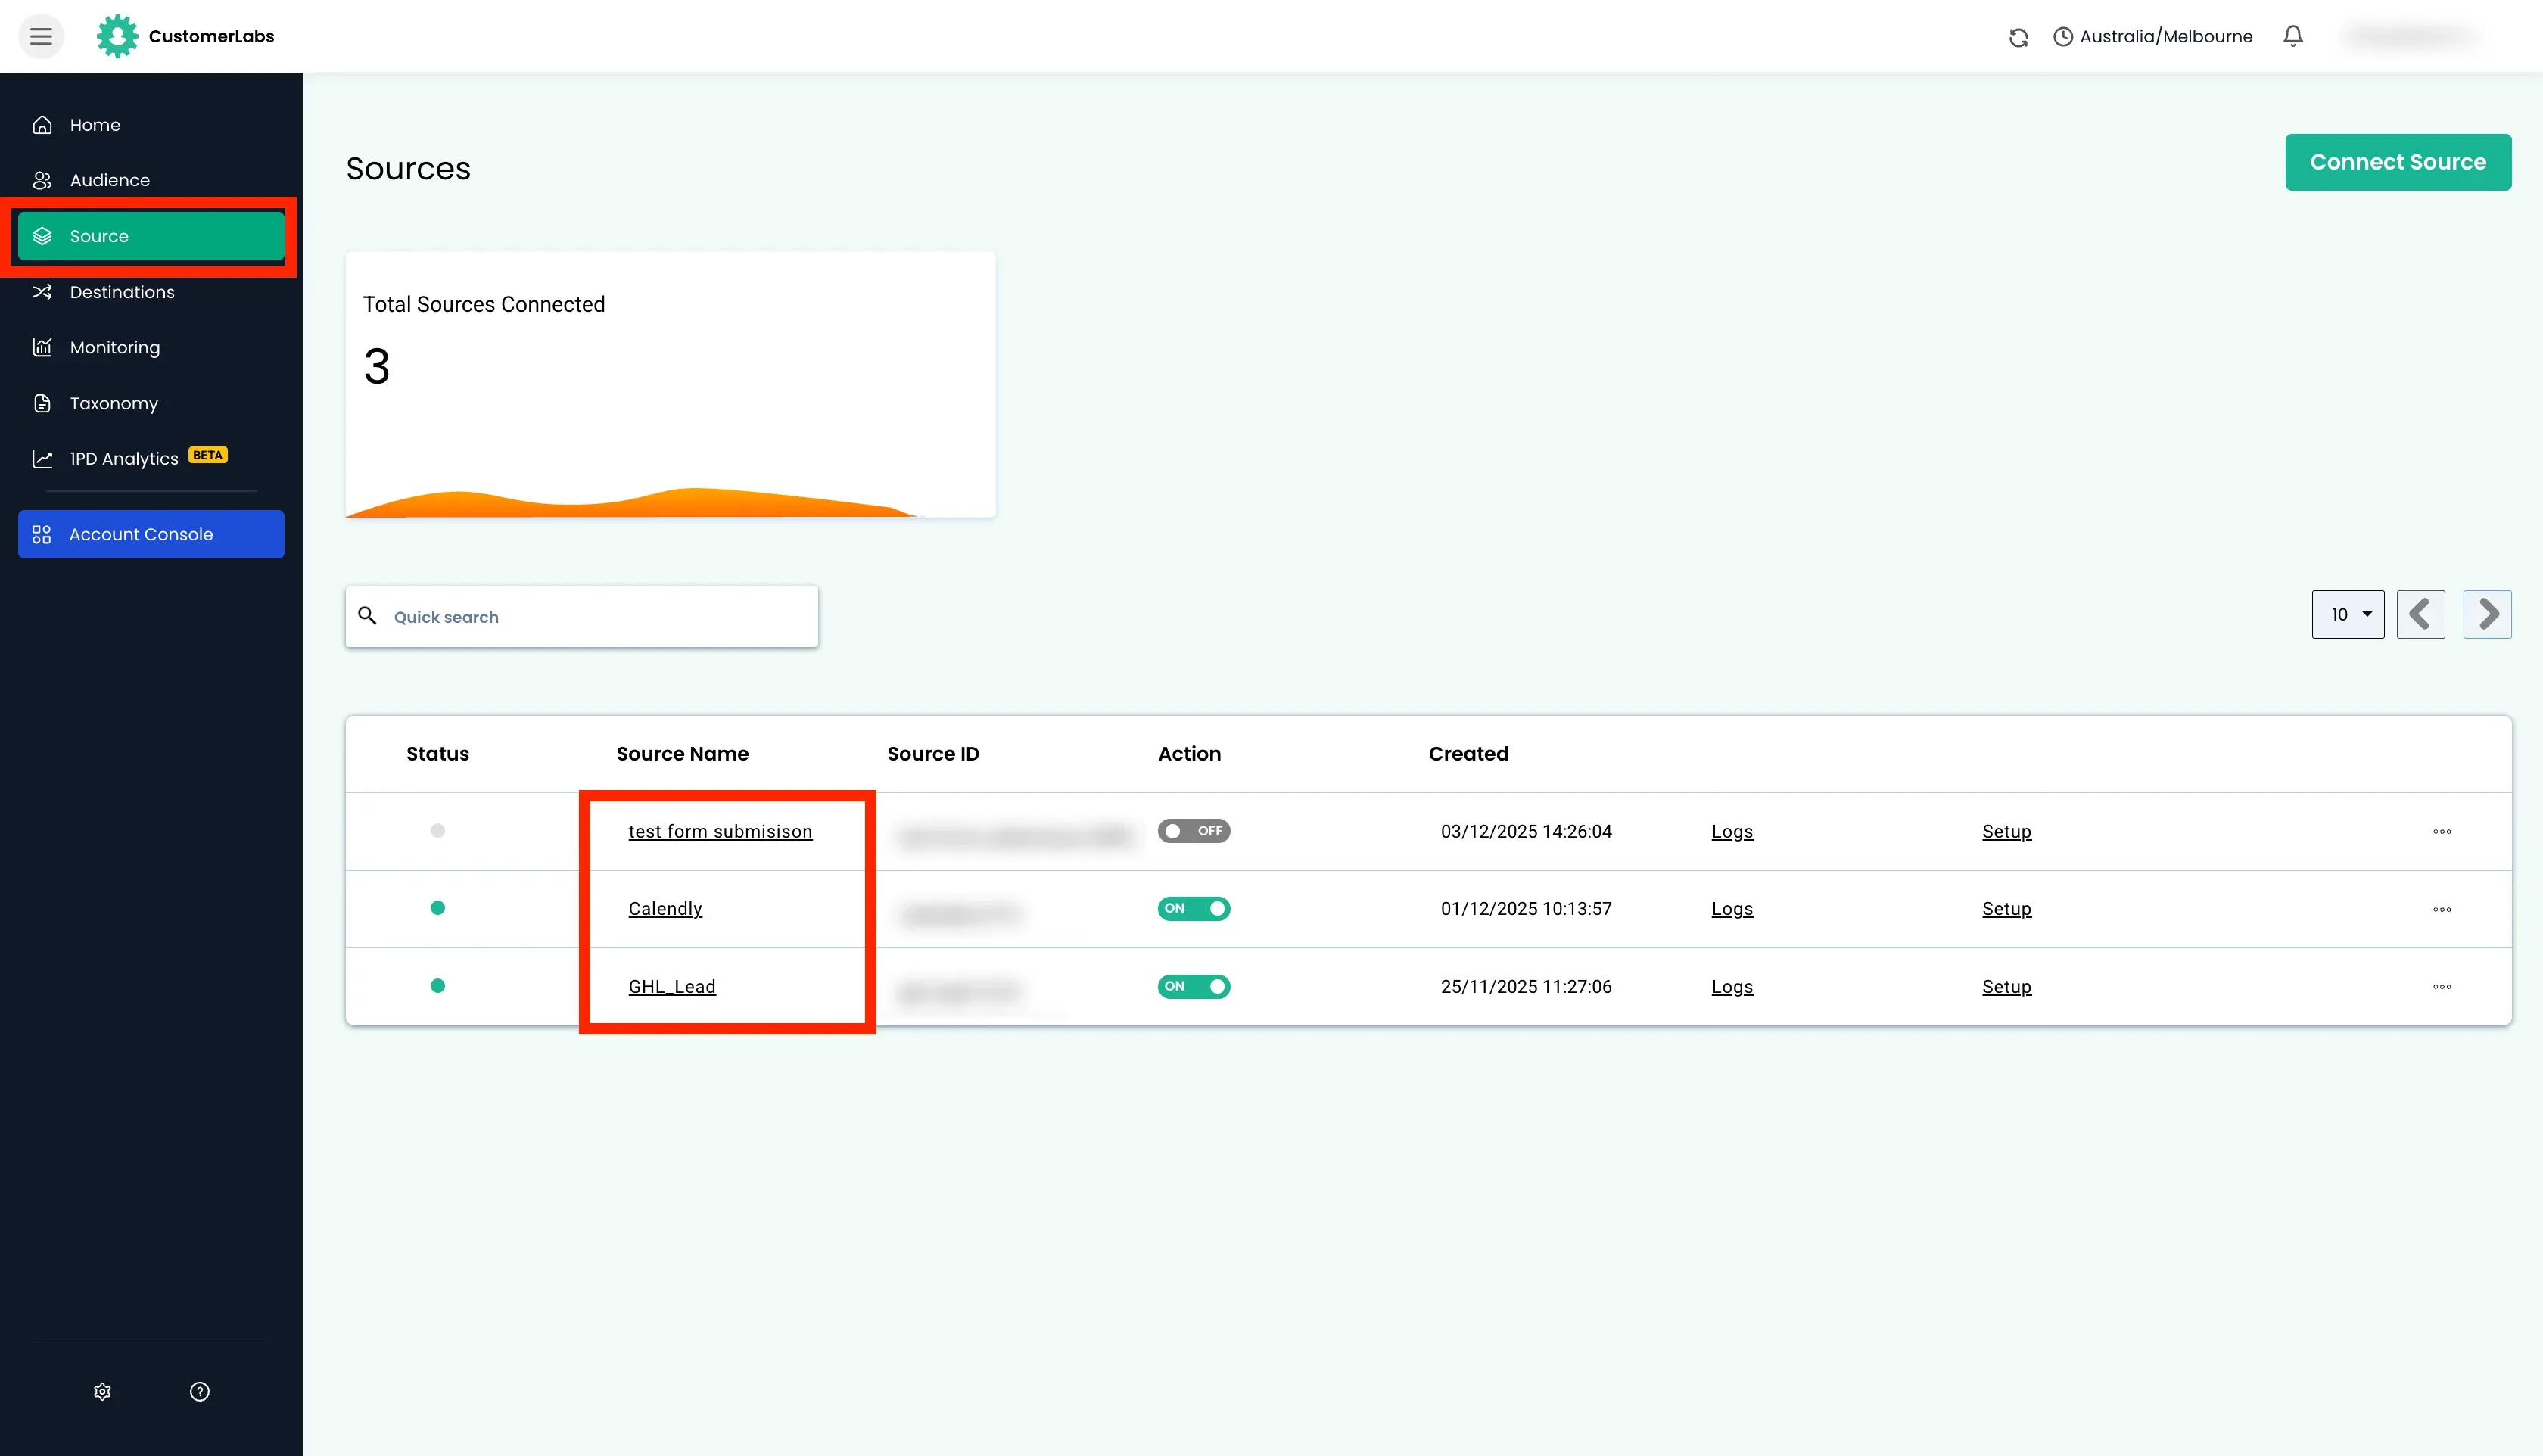
Log in to the CustomerLabs account → Click Sources on the left sidebar → Click on the Source name
-
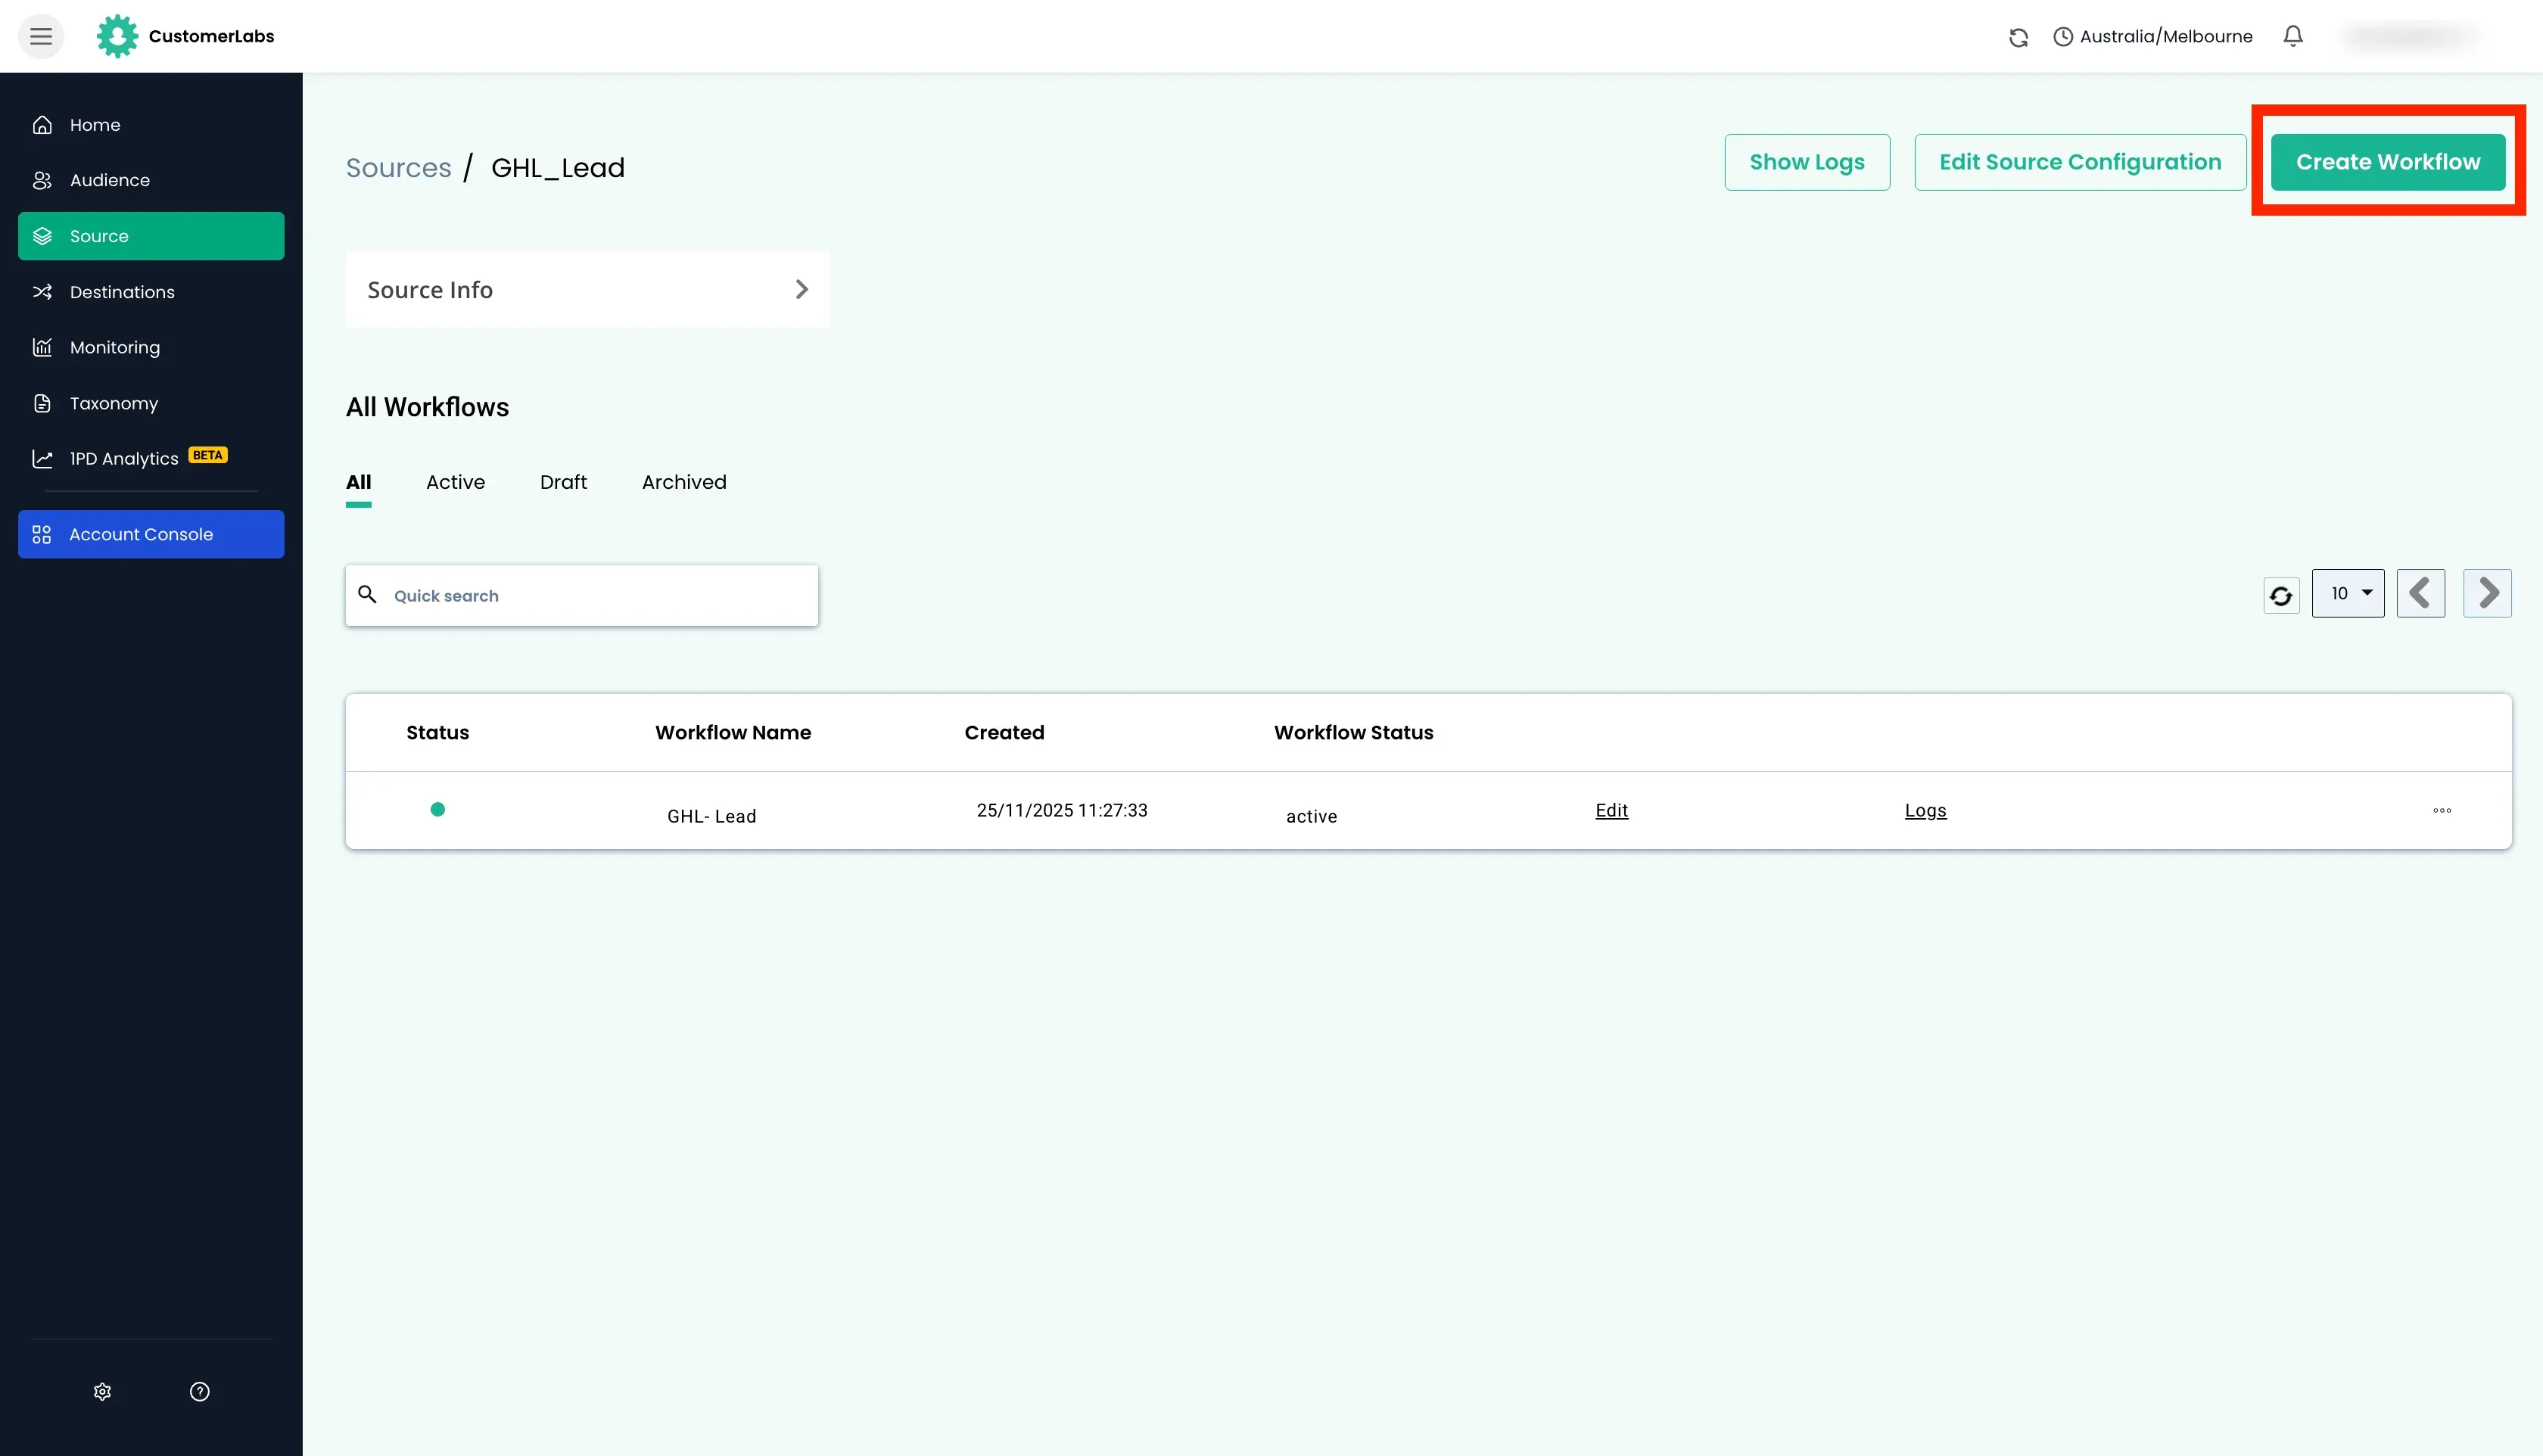
Click “Create Workflow” button in the top right corner.
-
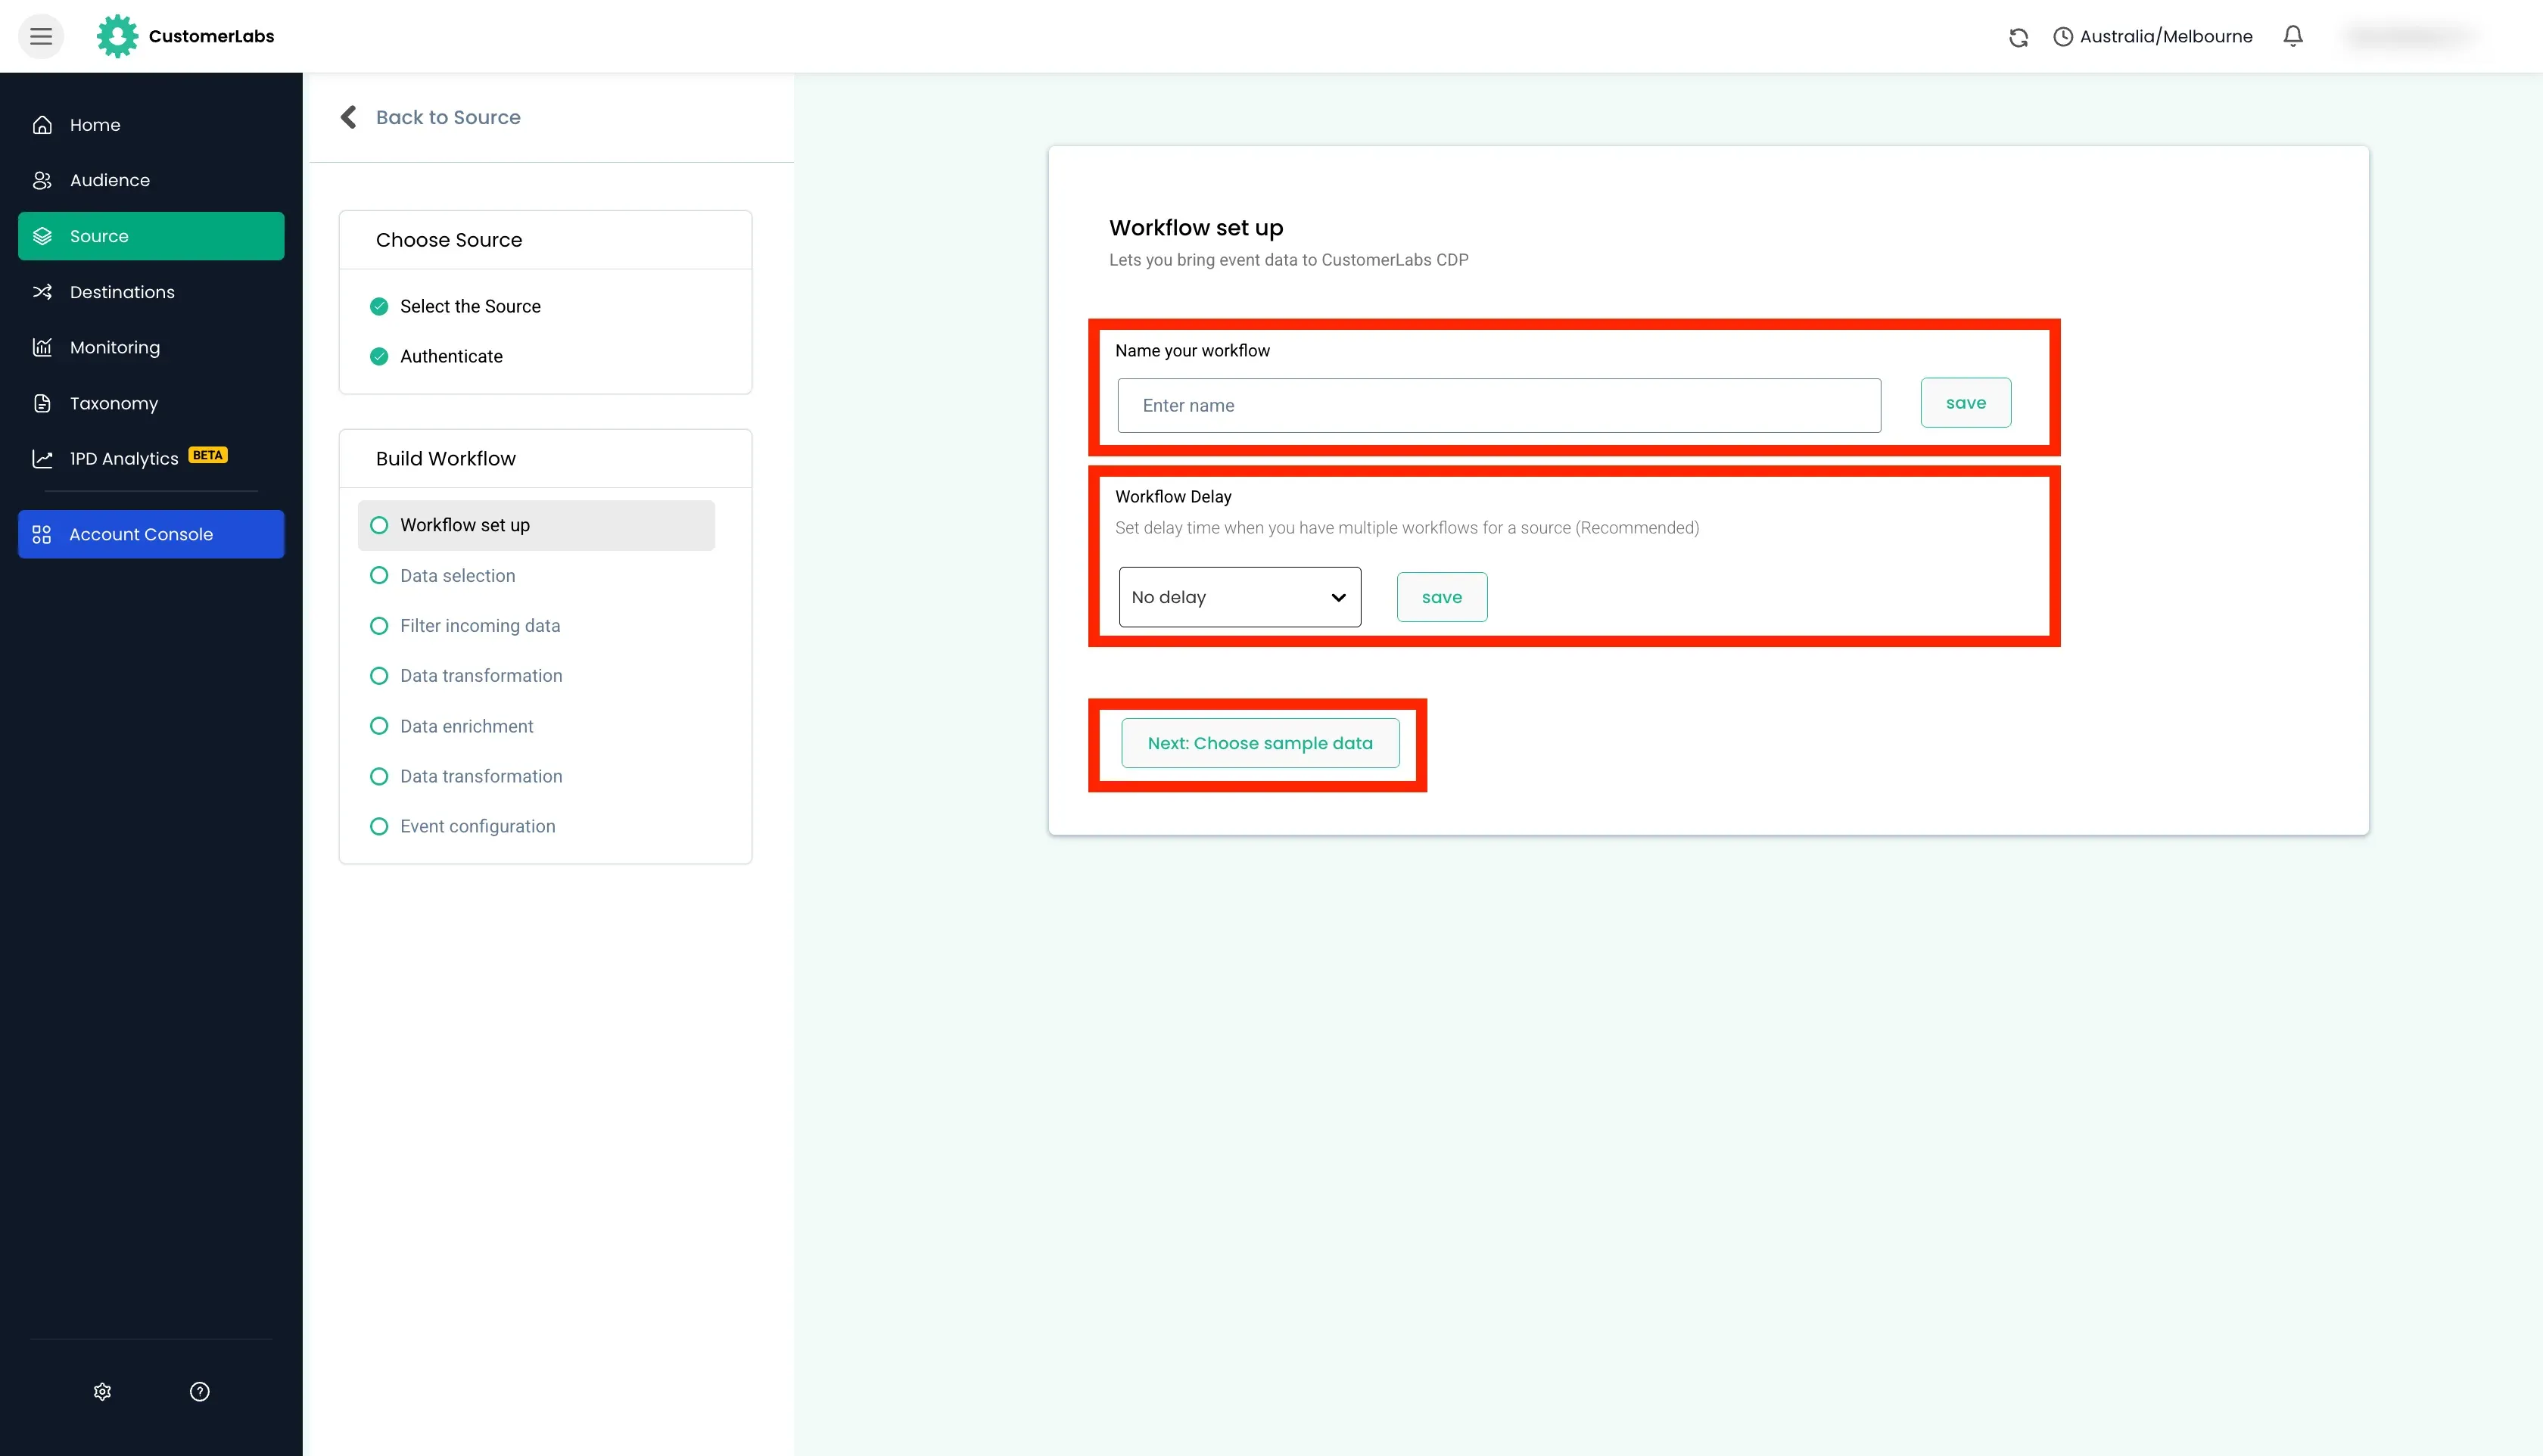
In the workflow setup,
- Enter the name for the workflow and click save
- Set up a delay (recommended) and click save
- Click “Choose sample data” button.
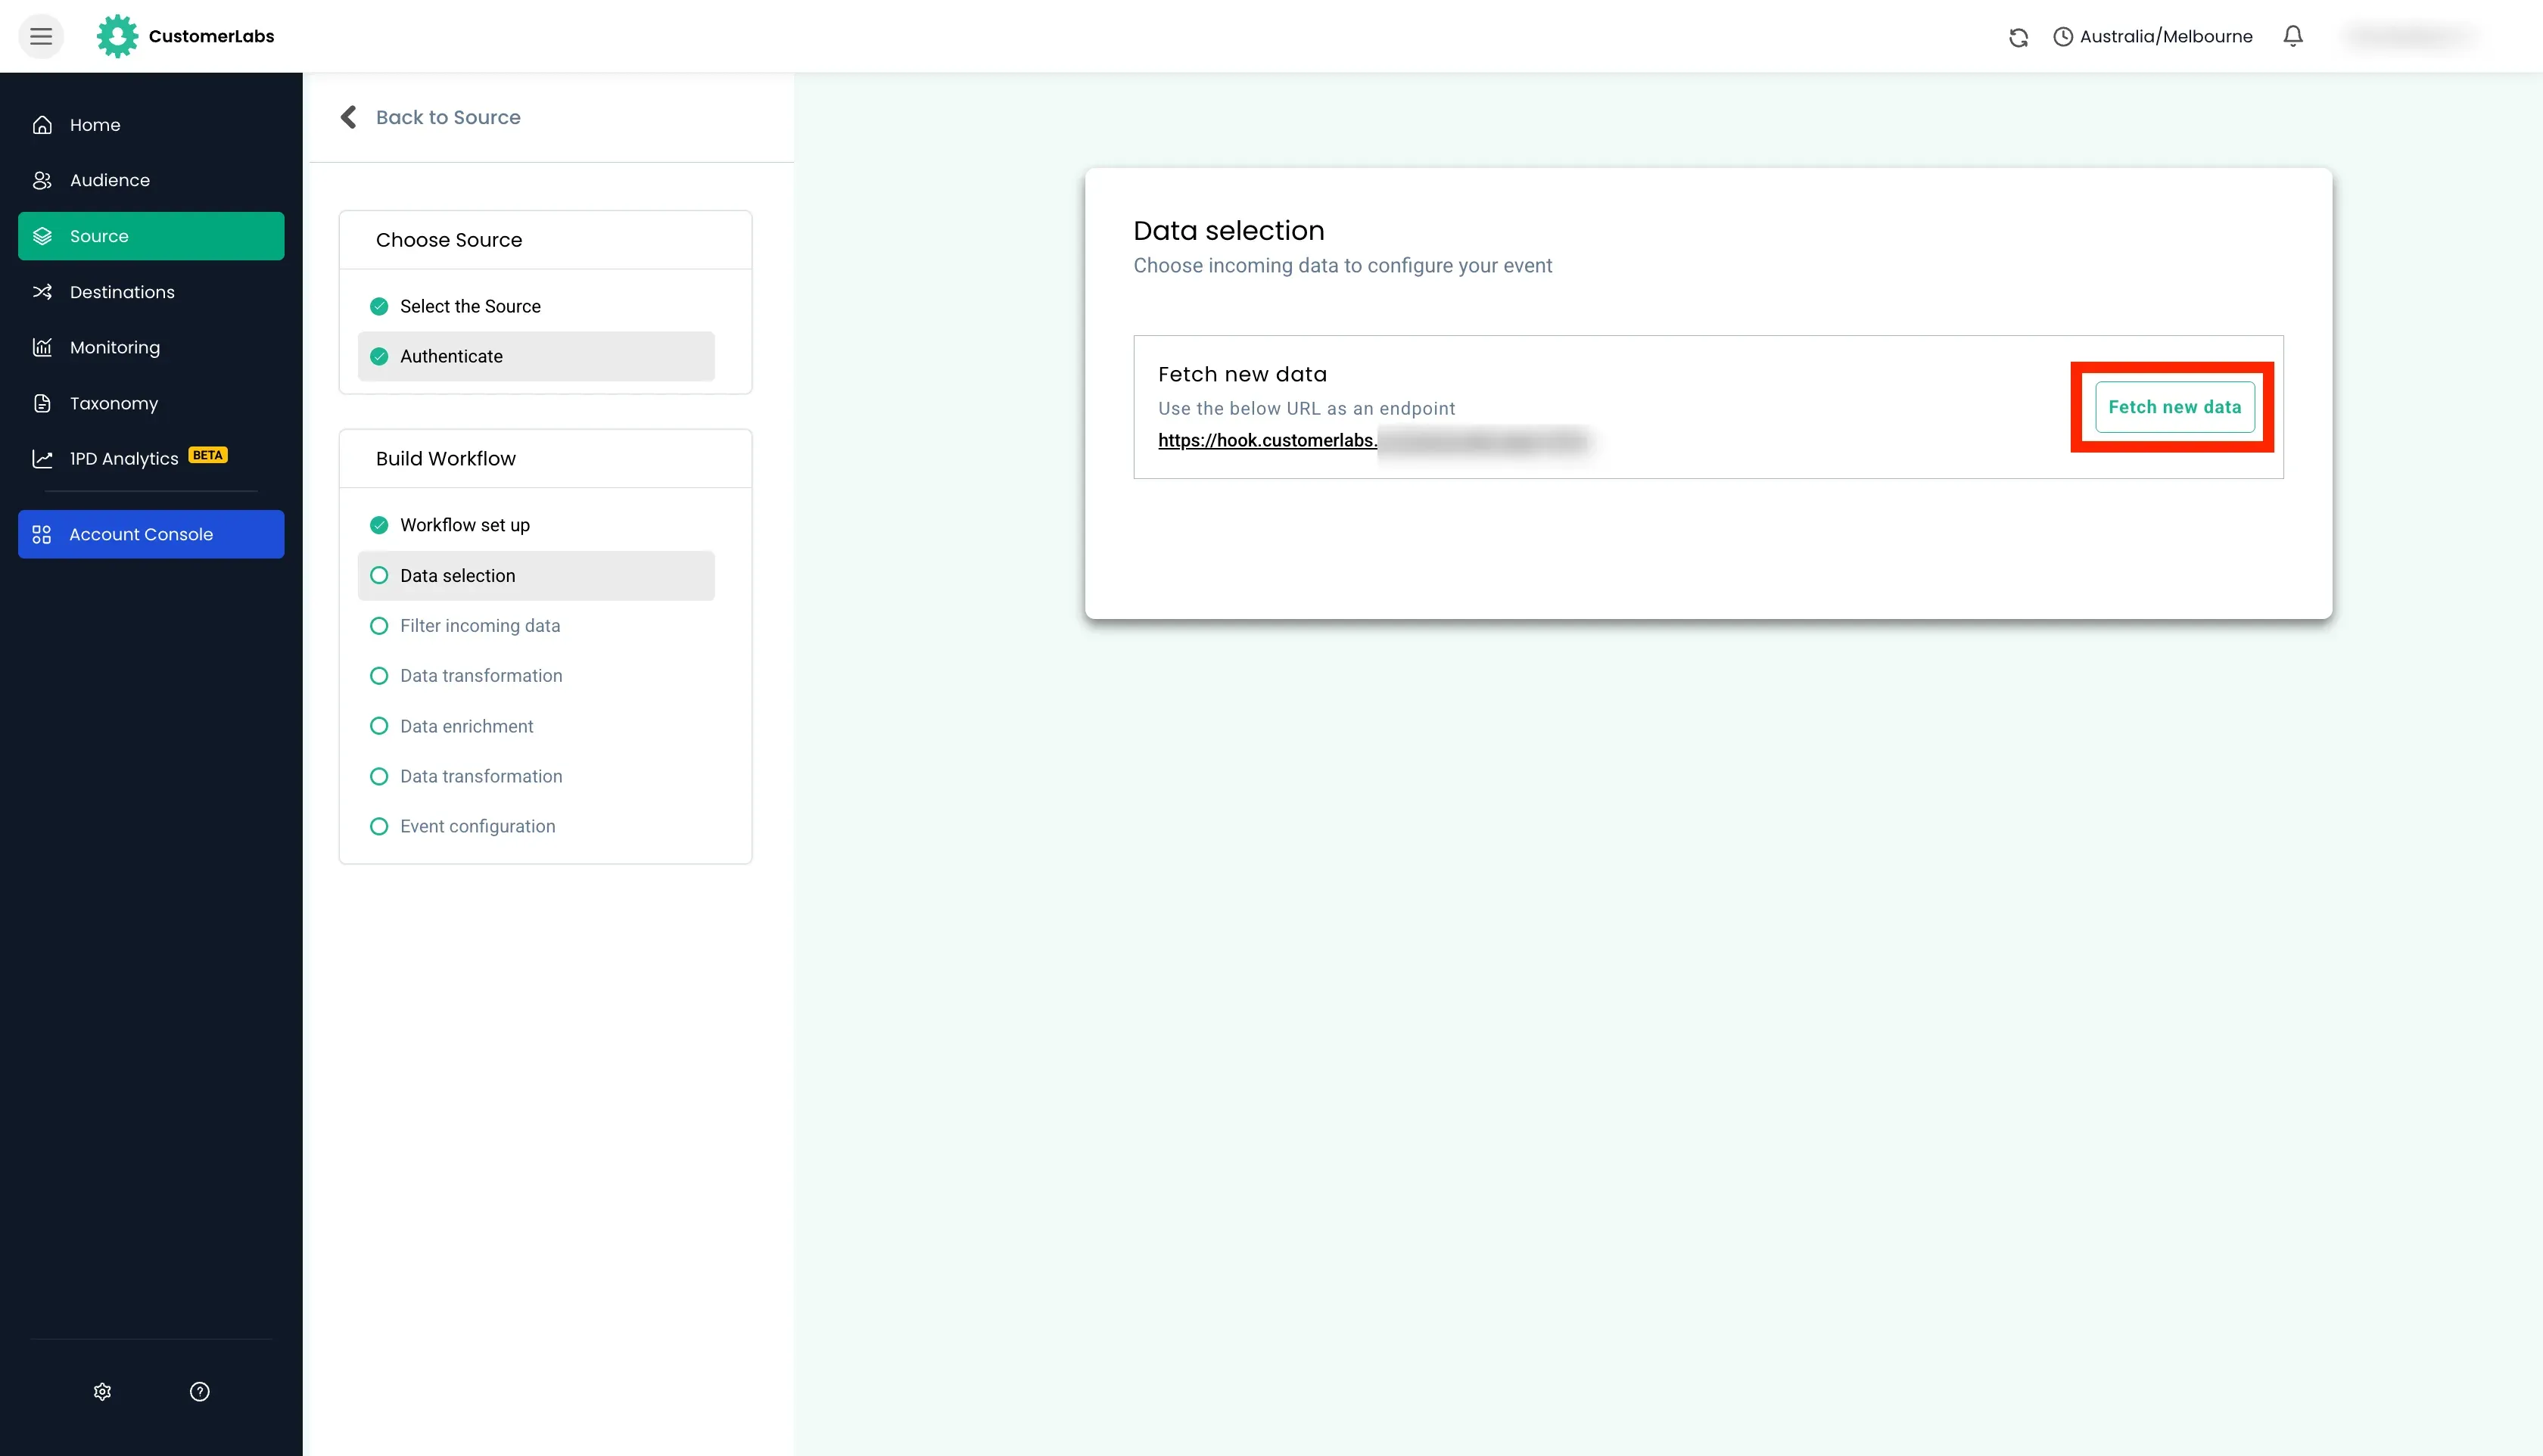
Choosing the Sample Data
Section titled “Choosing the Sample Data”-
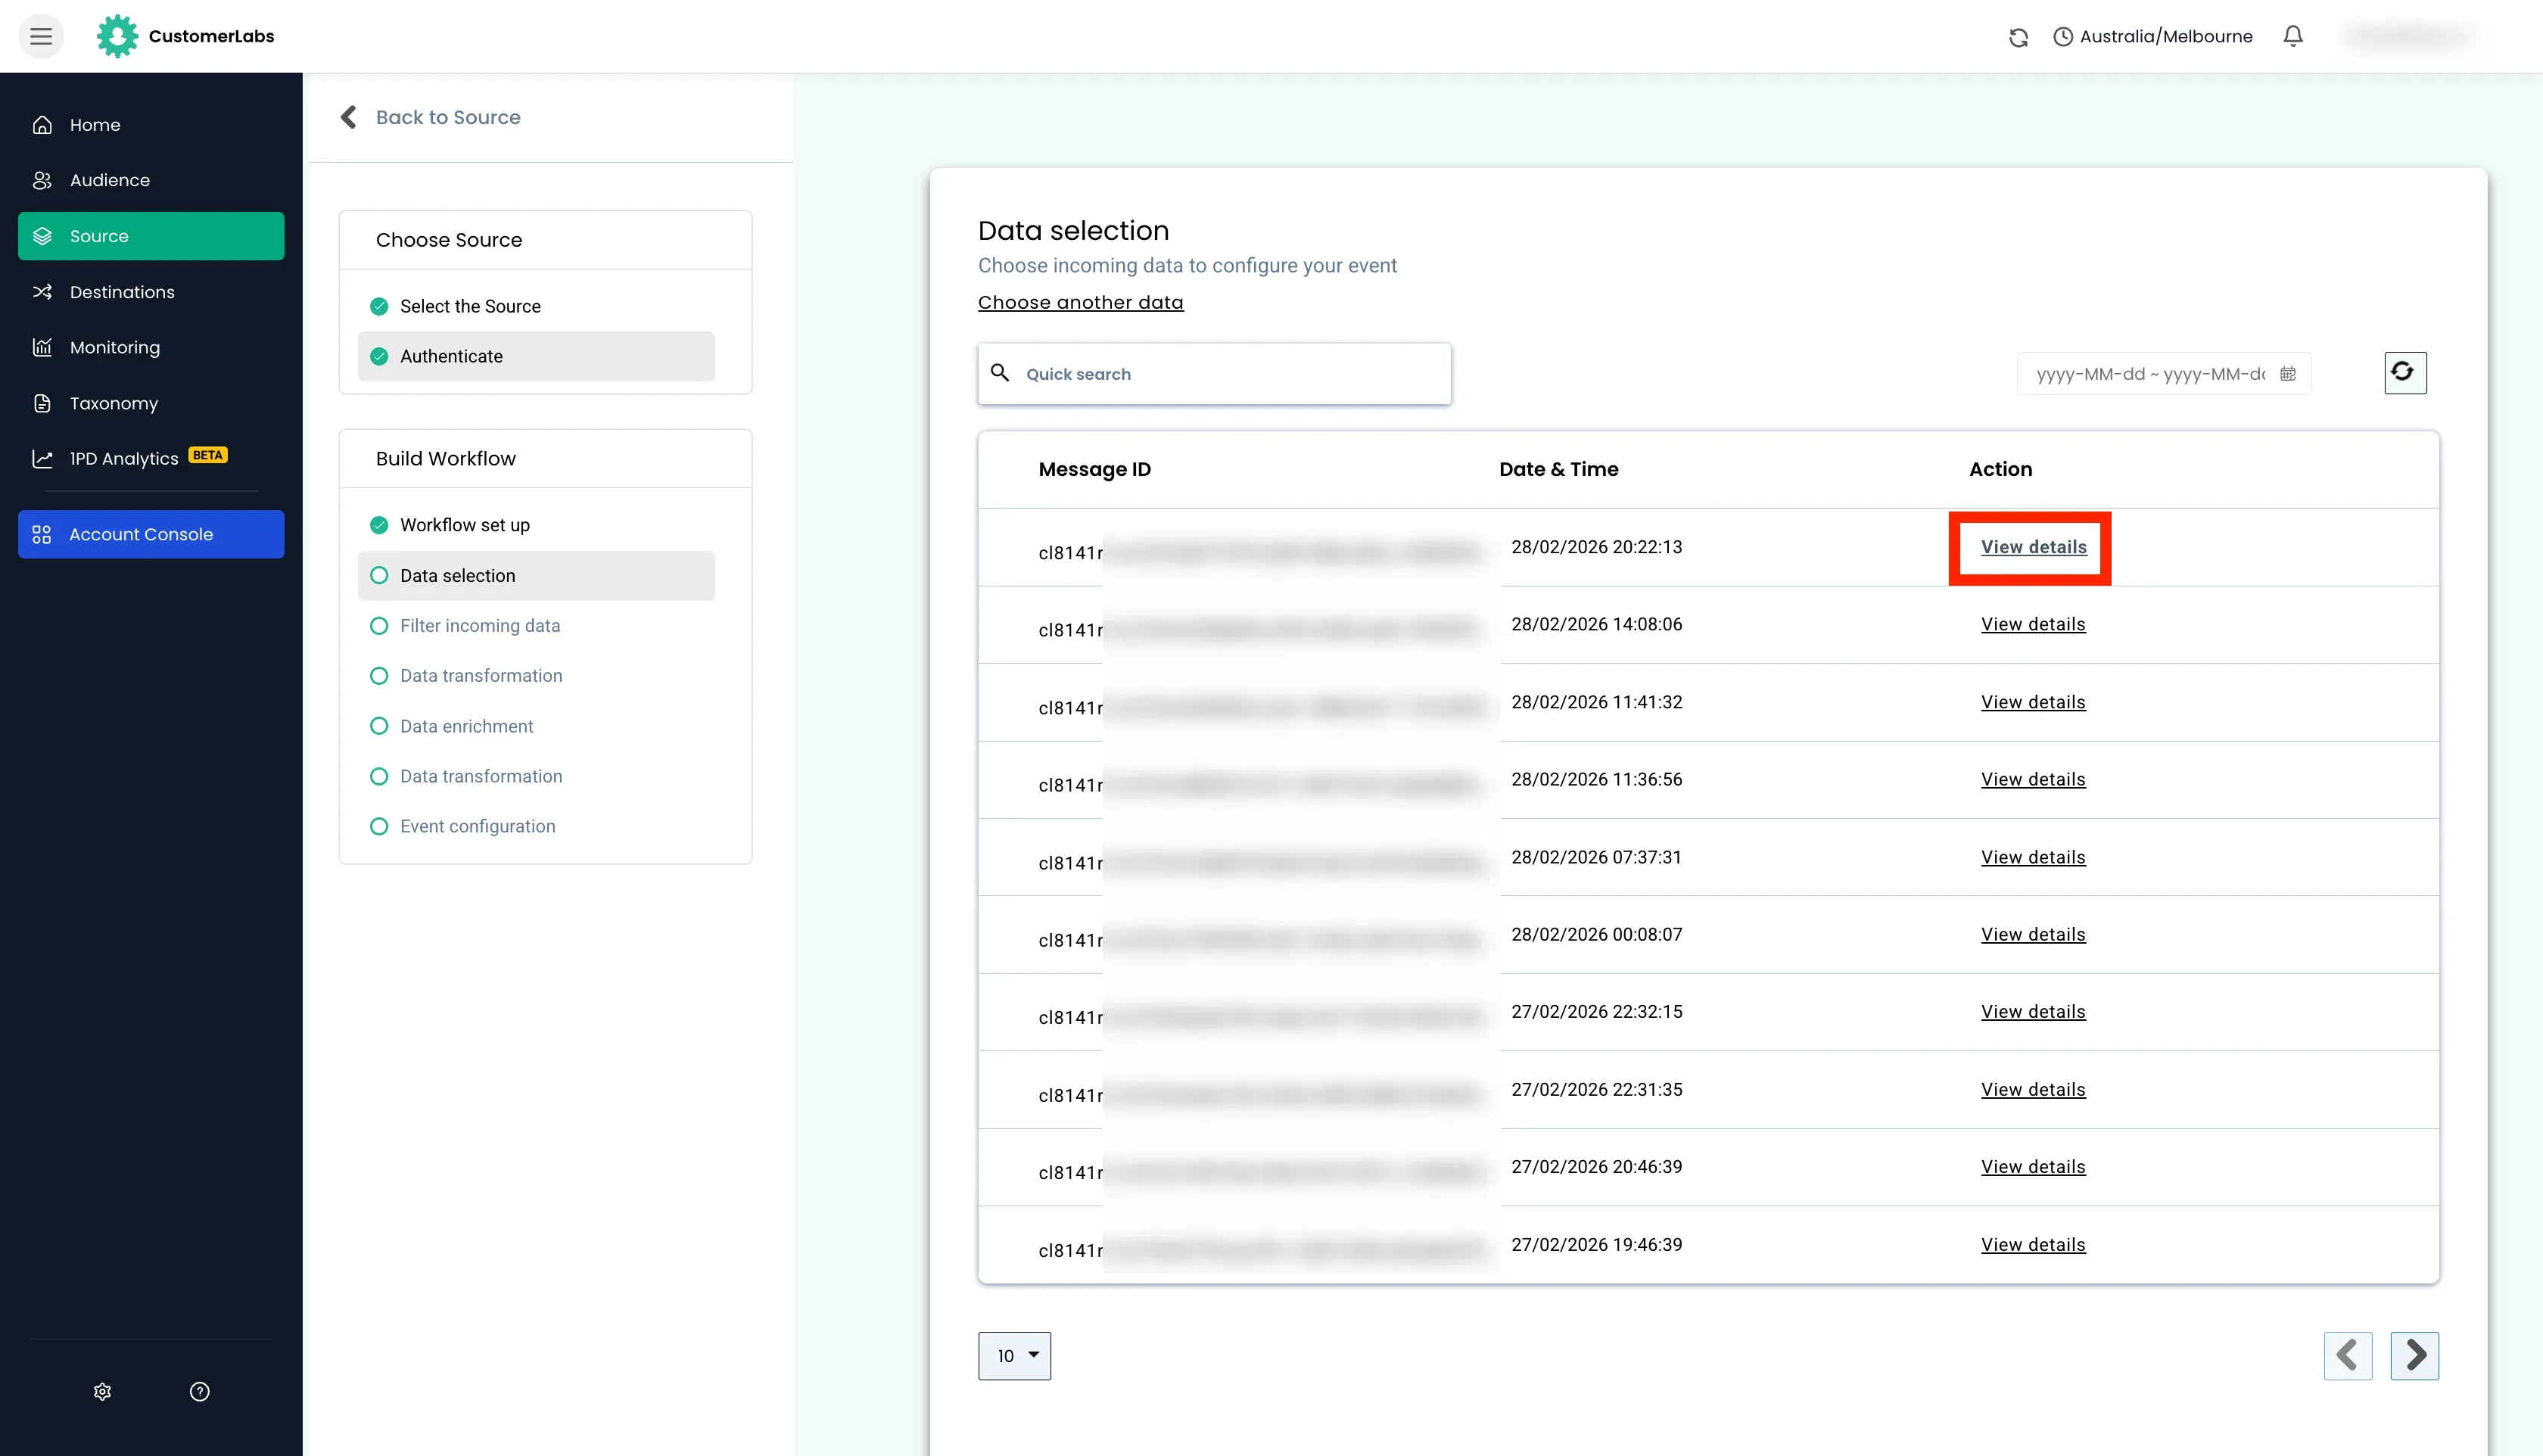
Click “Fetch New Data”. This populates all the recent events after the Source was created and added.
-
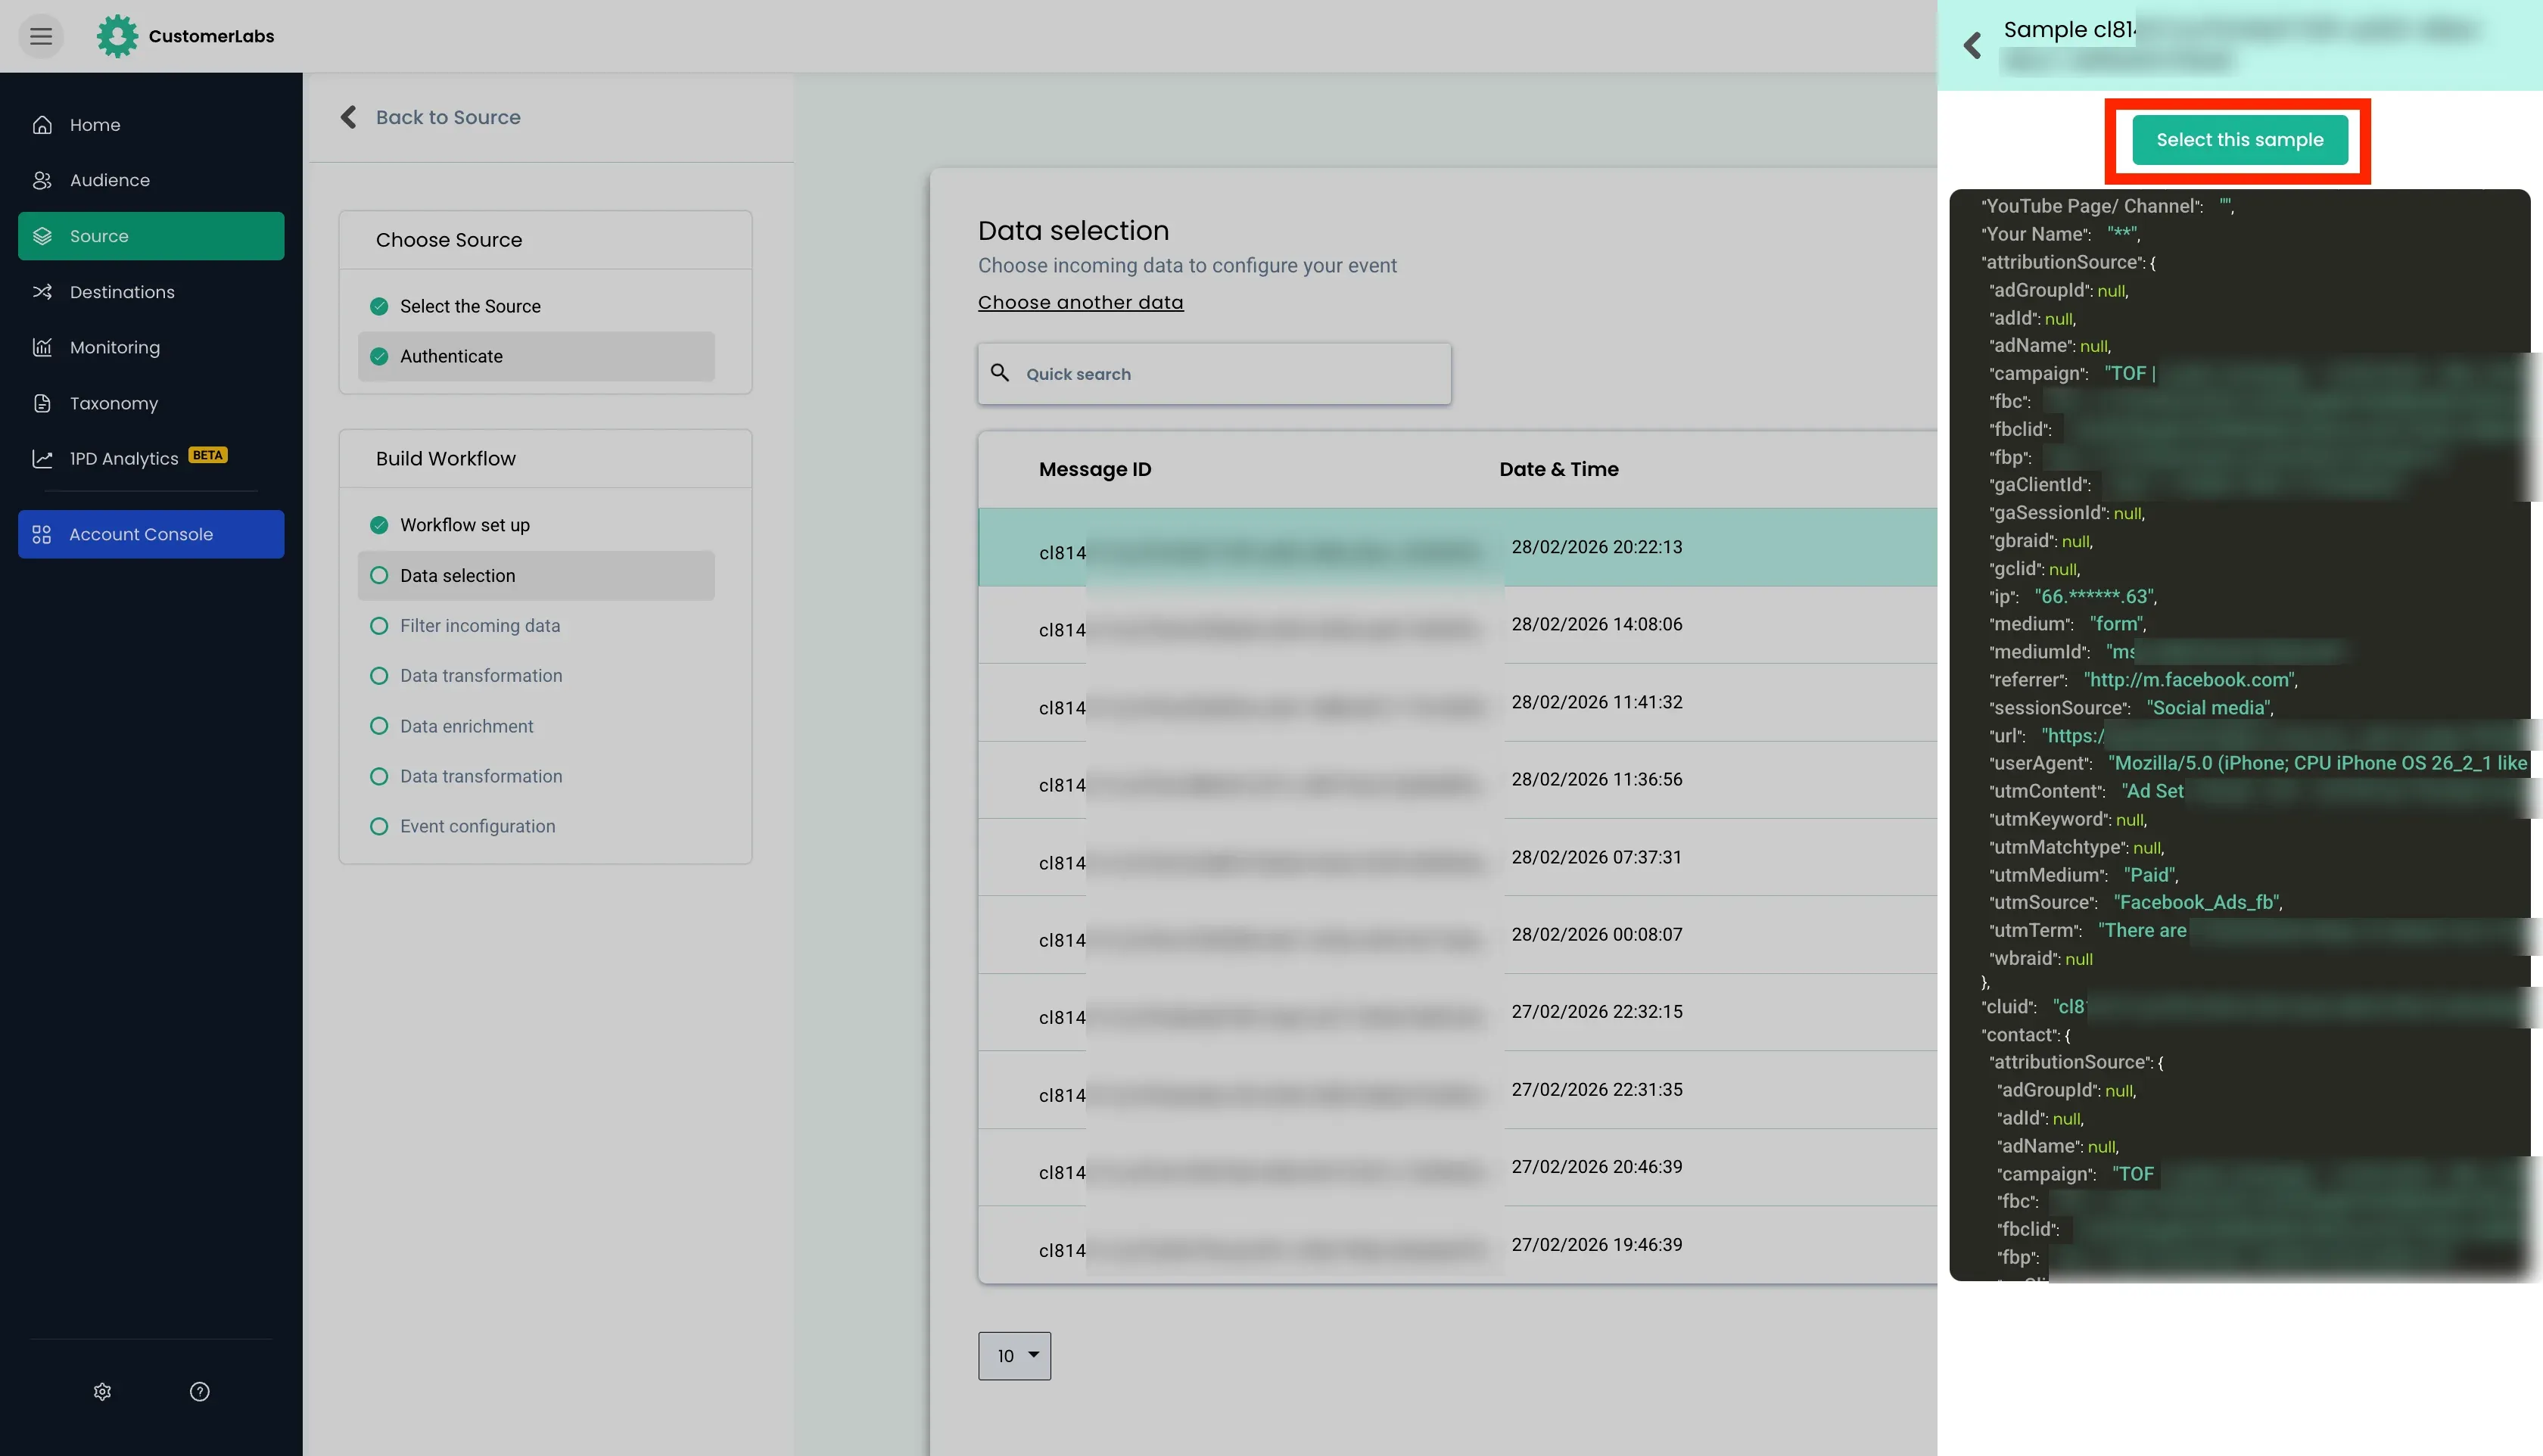
Click “View details” across the events received to view the raw payload.
-
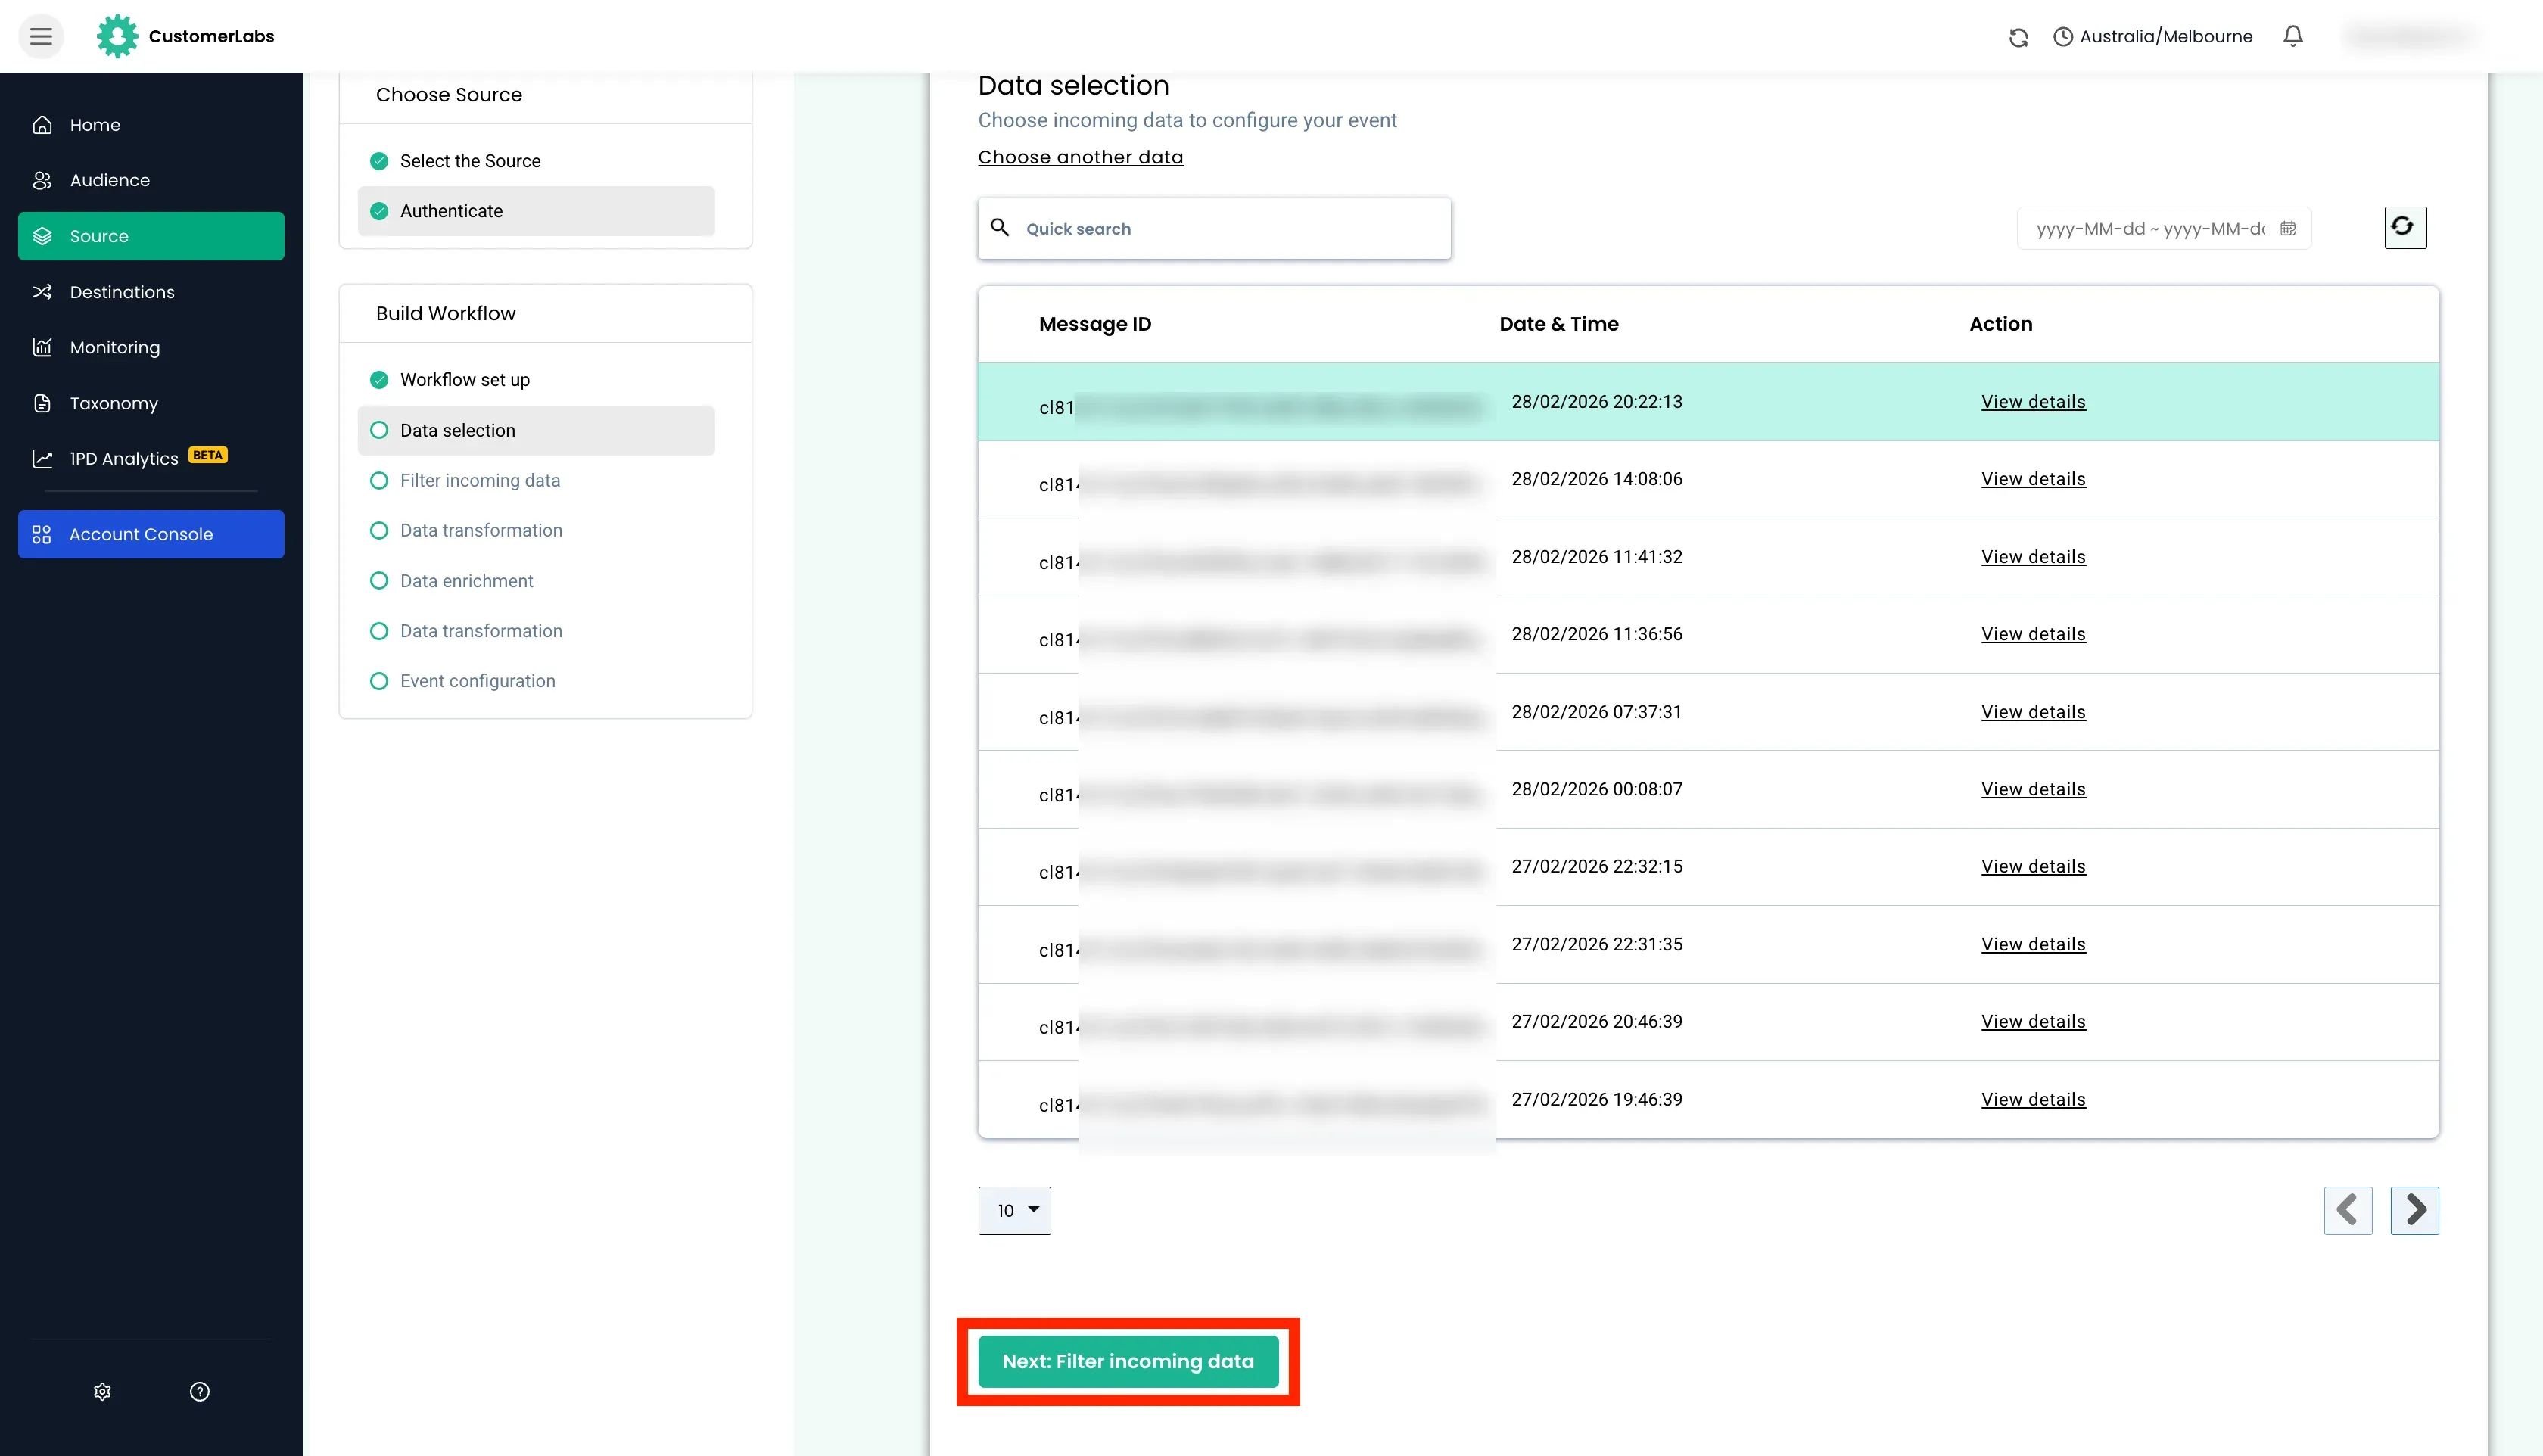
After verifying if all the details are present for configuring the workflow, click on “Select this sample” button. Click “Next: Filter incoming data”
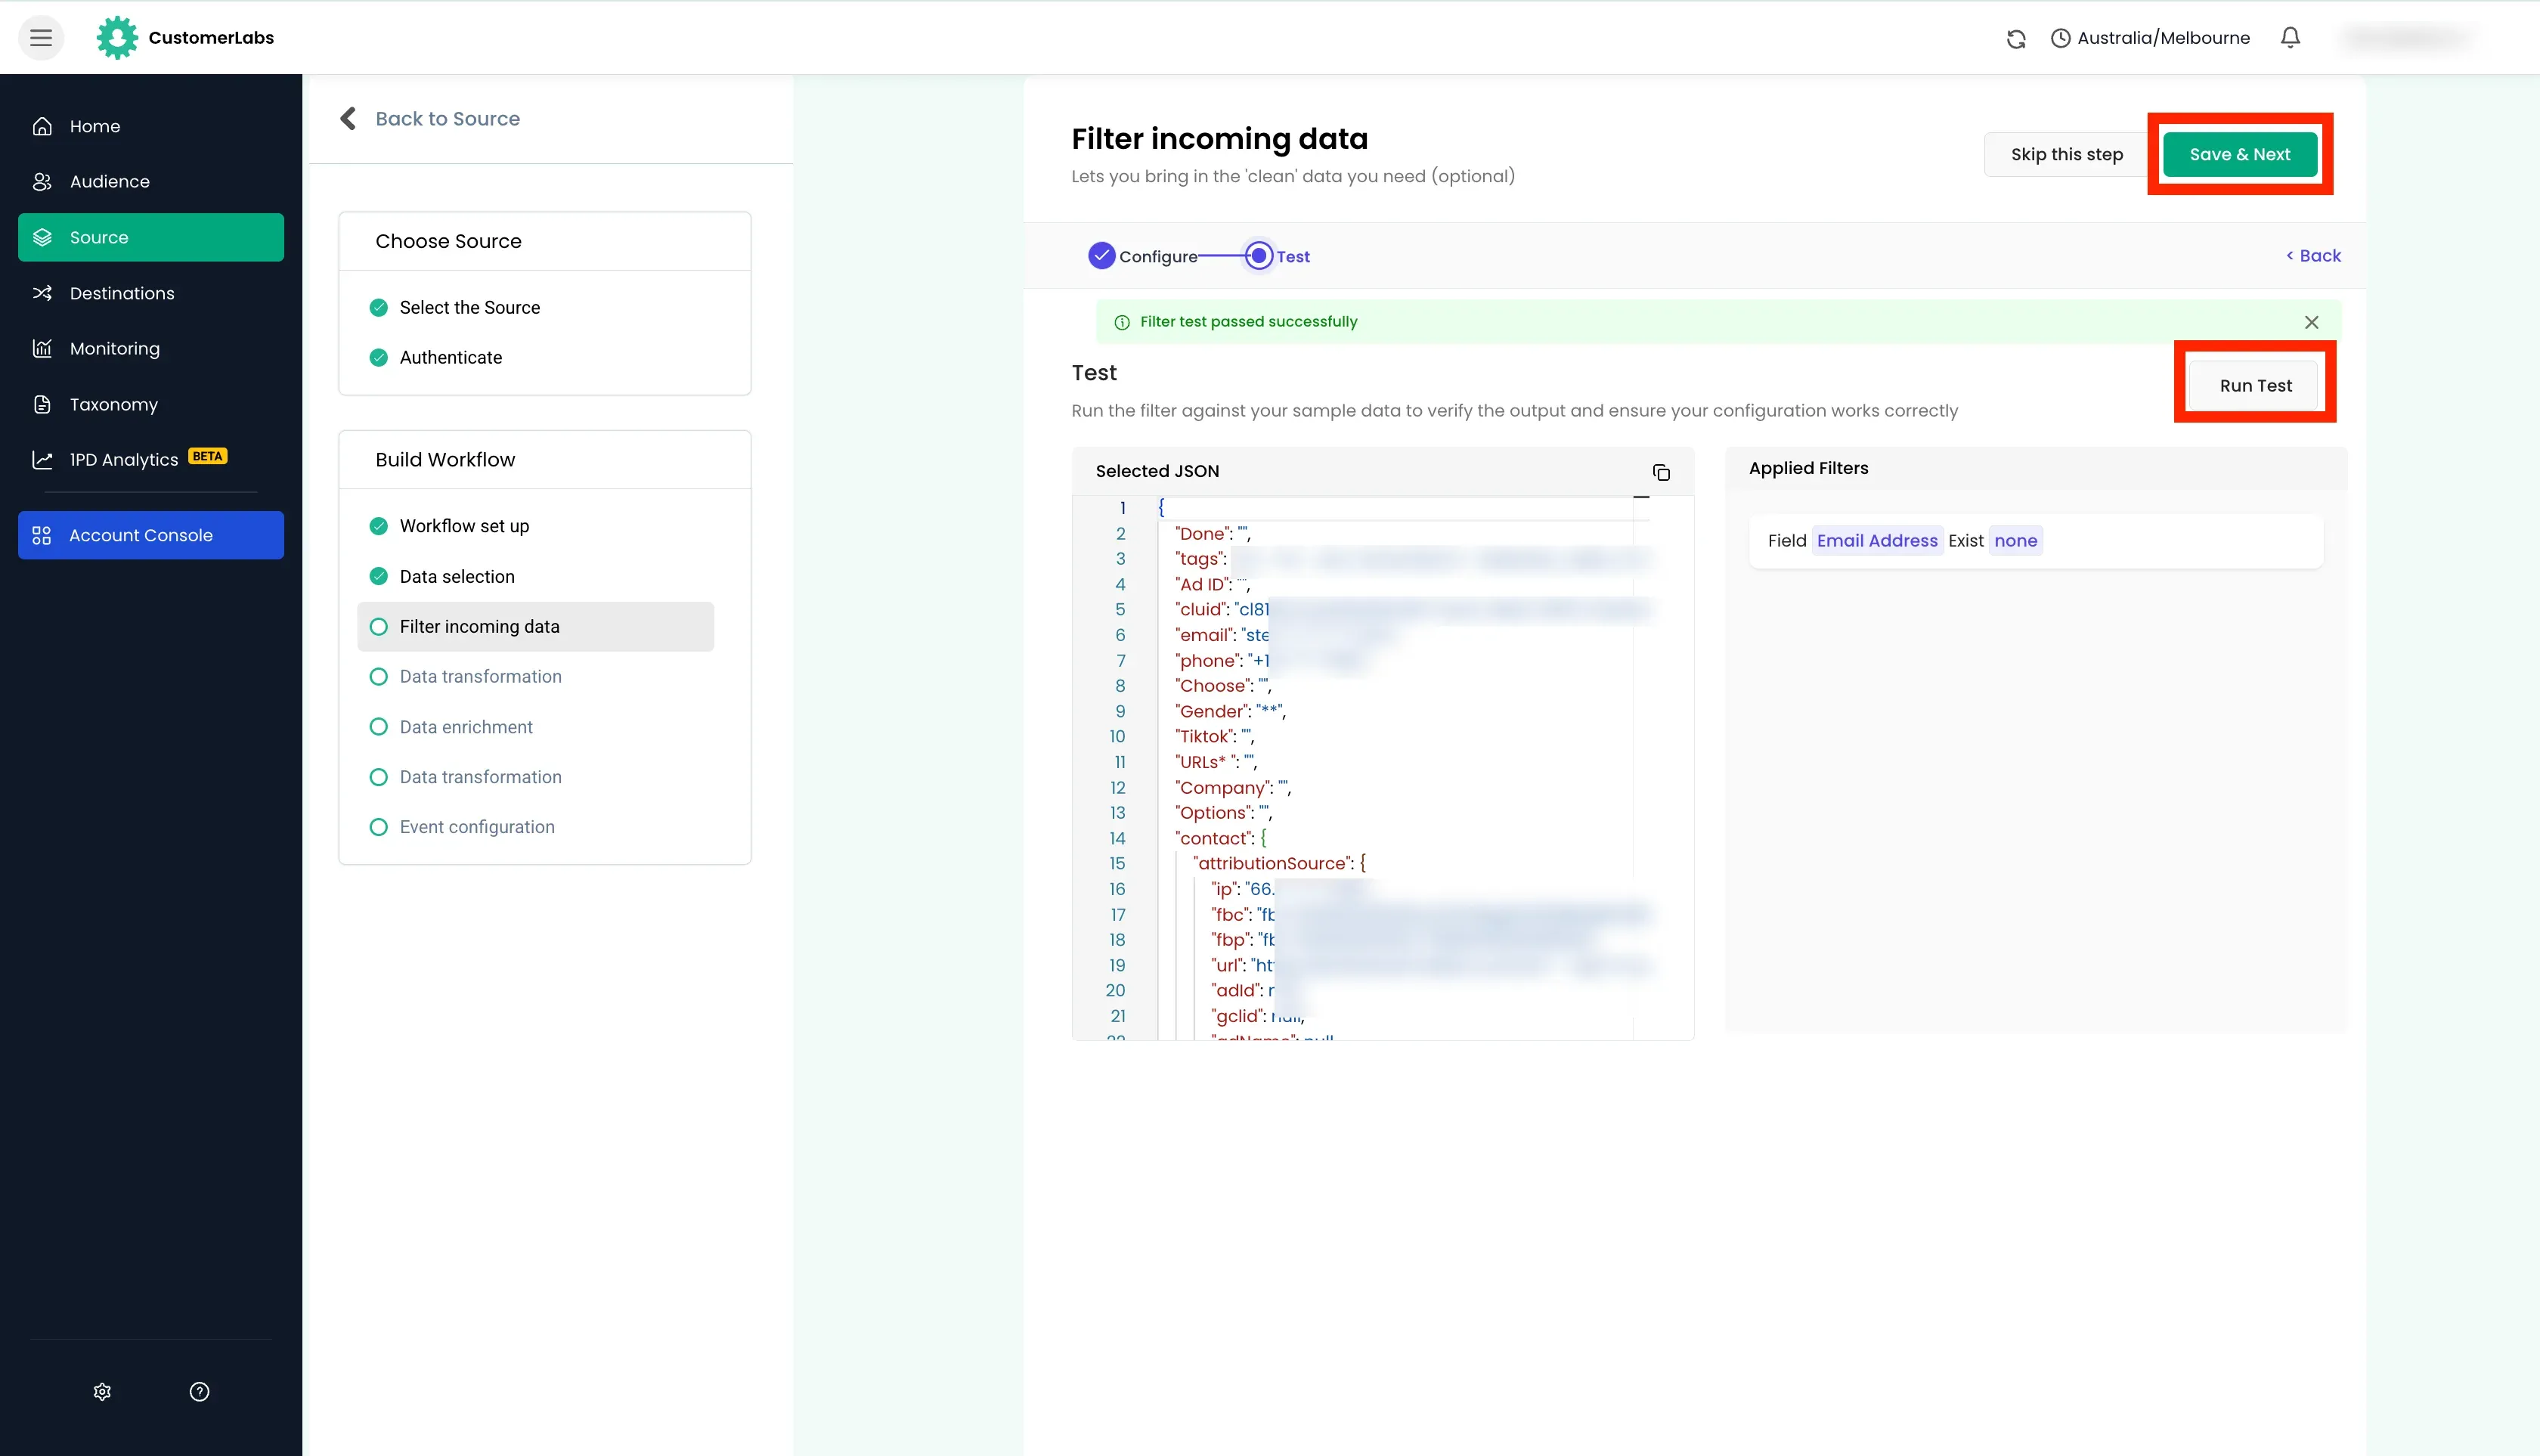
Filtering Incoming Data (Optional)
Section titled “Filtering Incoming Data (Optional)”-
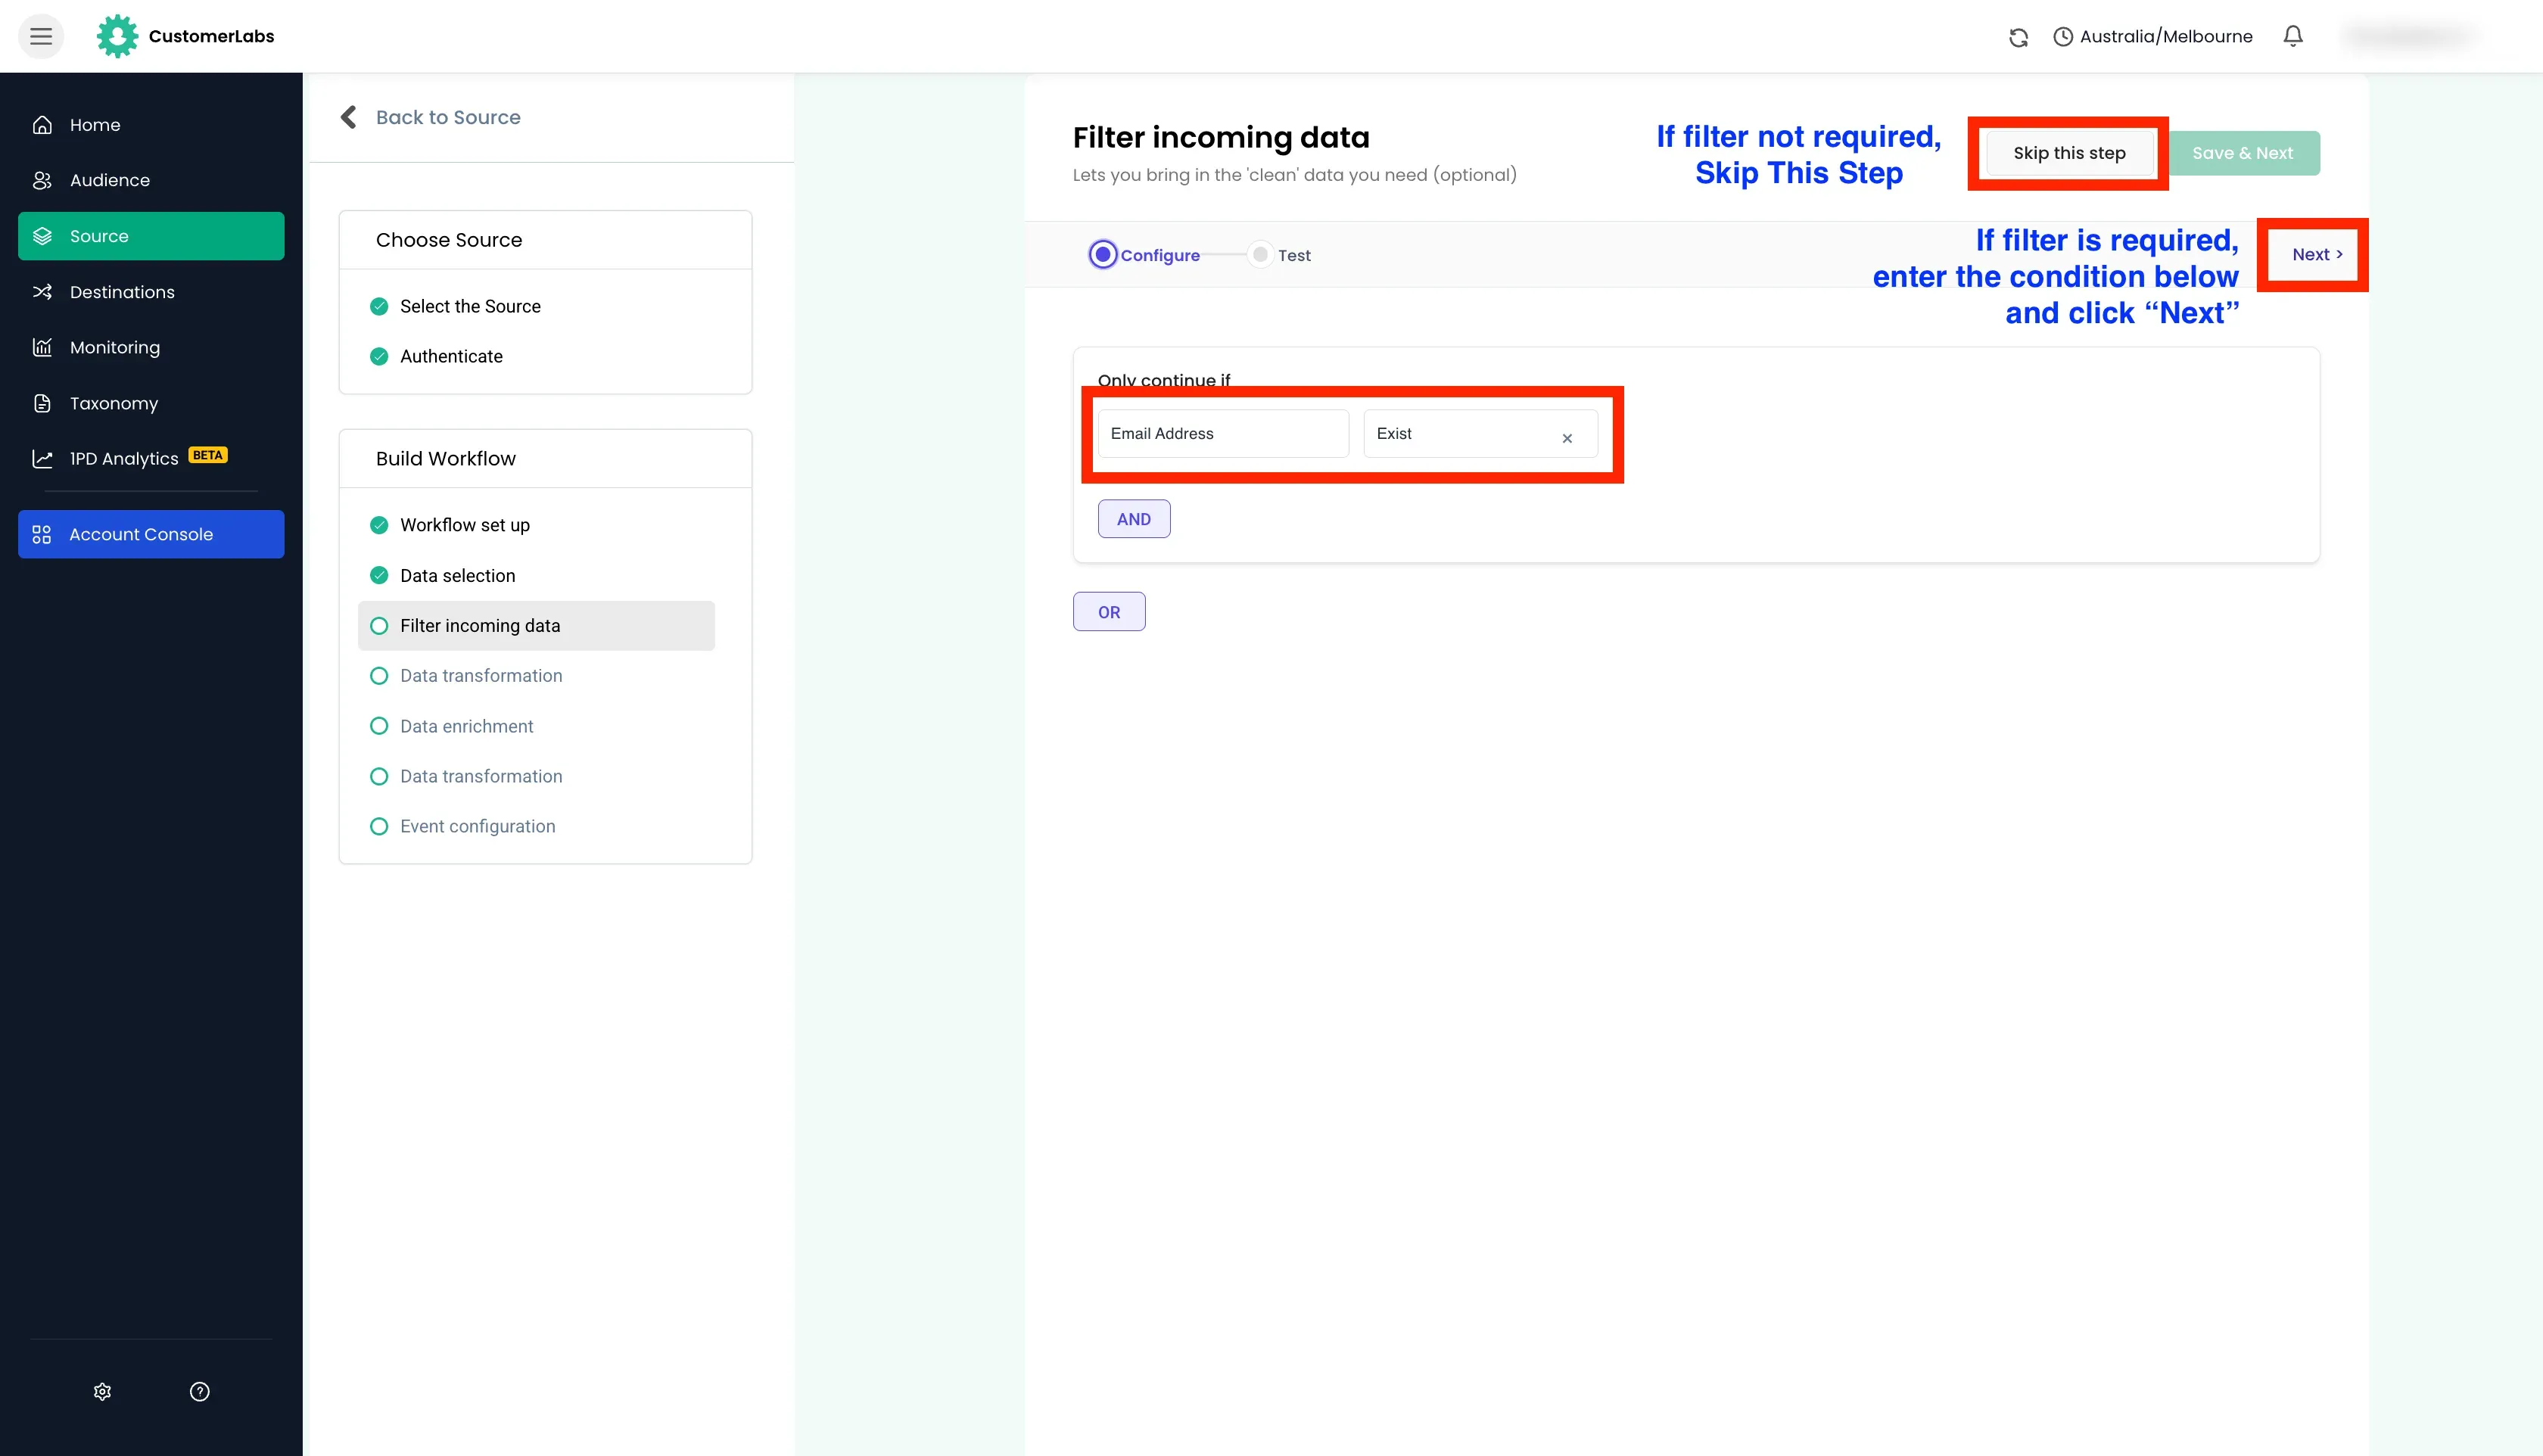
Set up the filter as per requirement. Filters will only allow the events that match the filter criteria to pass through. If filter conditions are not required, skip this step.
-
Set up the filter conditions and click “Next” to test the filter conditions.
- If the filter conditions are not met, check and modify the filter conditions.
- If the filter conditions are met, click Save & Next.
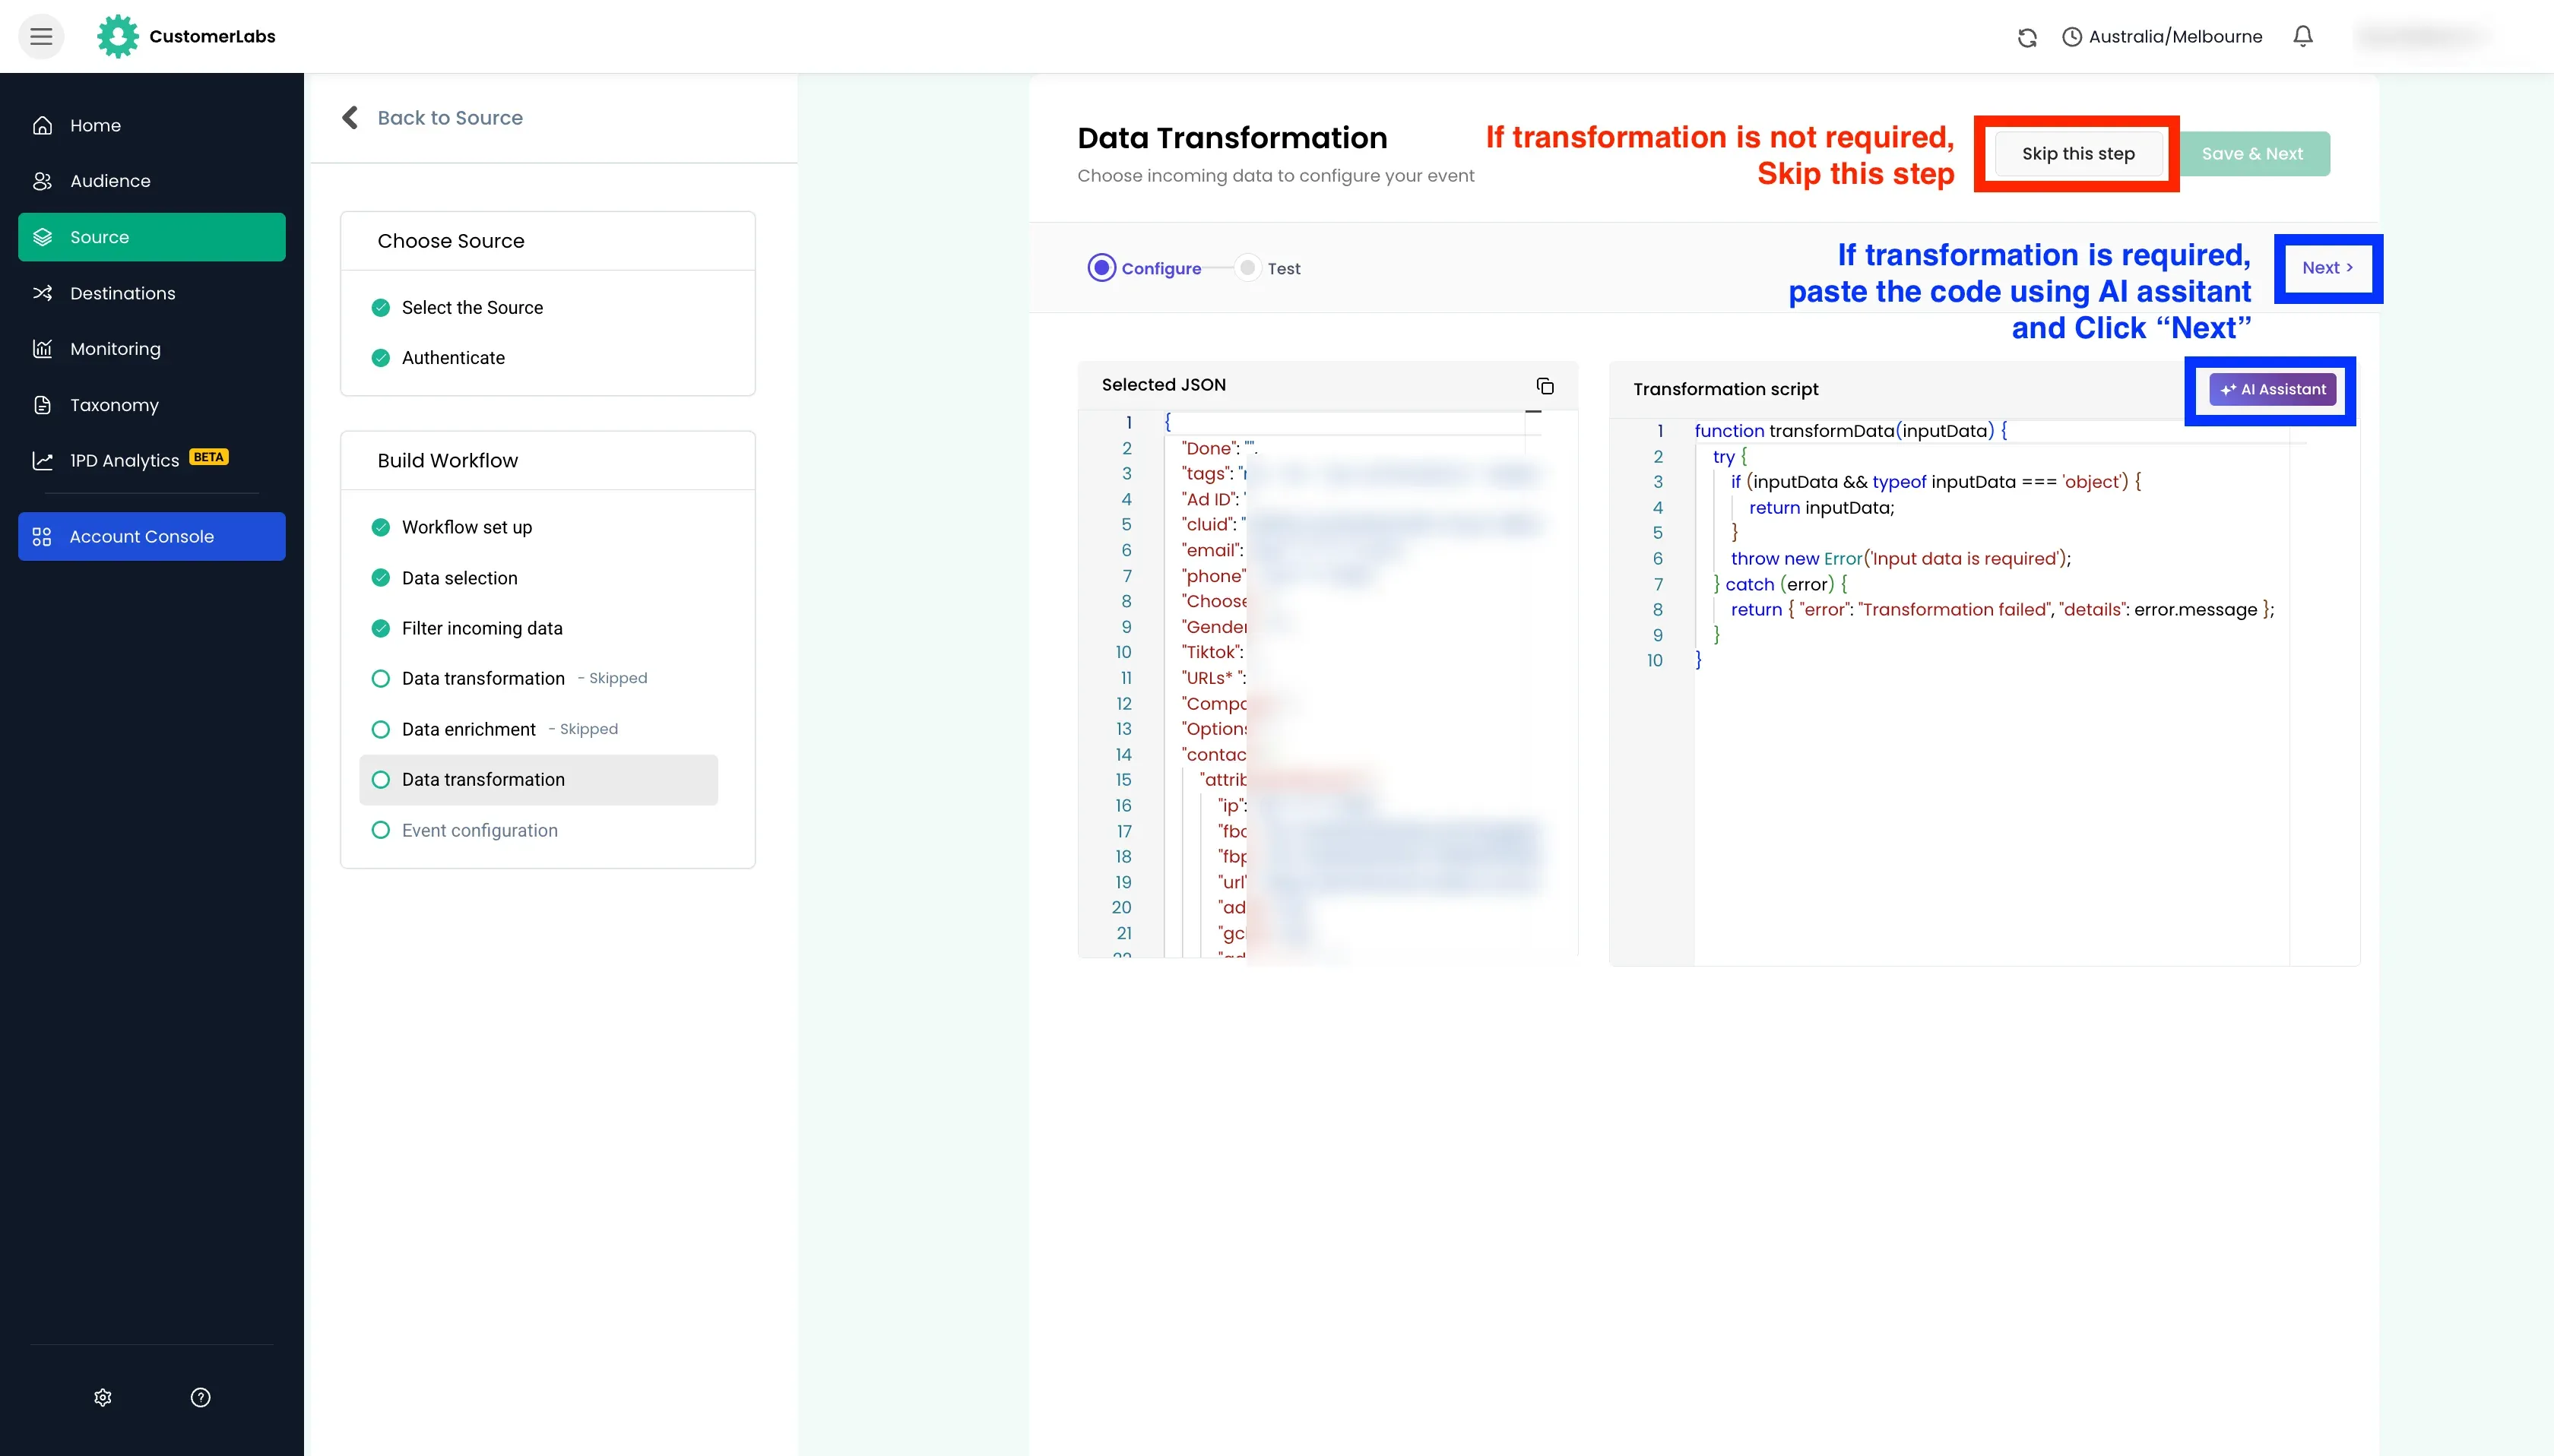
Data Transformation and Enrichment (Optional)
Section titled “Data Transformation and Enrichment (Optional)”-
Data transformation is used to modify the data received from the source platform using AI code generator. Based on the input prompt, the code is modified. If data transformation is not required, skip this step.
For example,
- If
valuefield is received as a string, it can be transformed to a number. - If product details are received as a string, it can be transformed to a array of objects.
- Sum the product prices of all the products in the payload and store it in a new variable to get the total price.
- If
-
Data enrichment is used to add additional context to the payload received from the source platform. If data enrichment is not required, skip this step.
Common Use cases and examples
- The payload received only partial data, the identifier such as
emailcan be sent to your CRM to get the complete data. - You are using any other services where additional data is stored and you want to fetch the data from that service in the payload.
- A request for credit facility was submitted by user and you want to fetch the credit score of the user before triggering the event.
The response from the external server gets appended to the original payload data and can be utilised in the work flow configuration.
- The payload received only partial data, the identifier such as
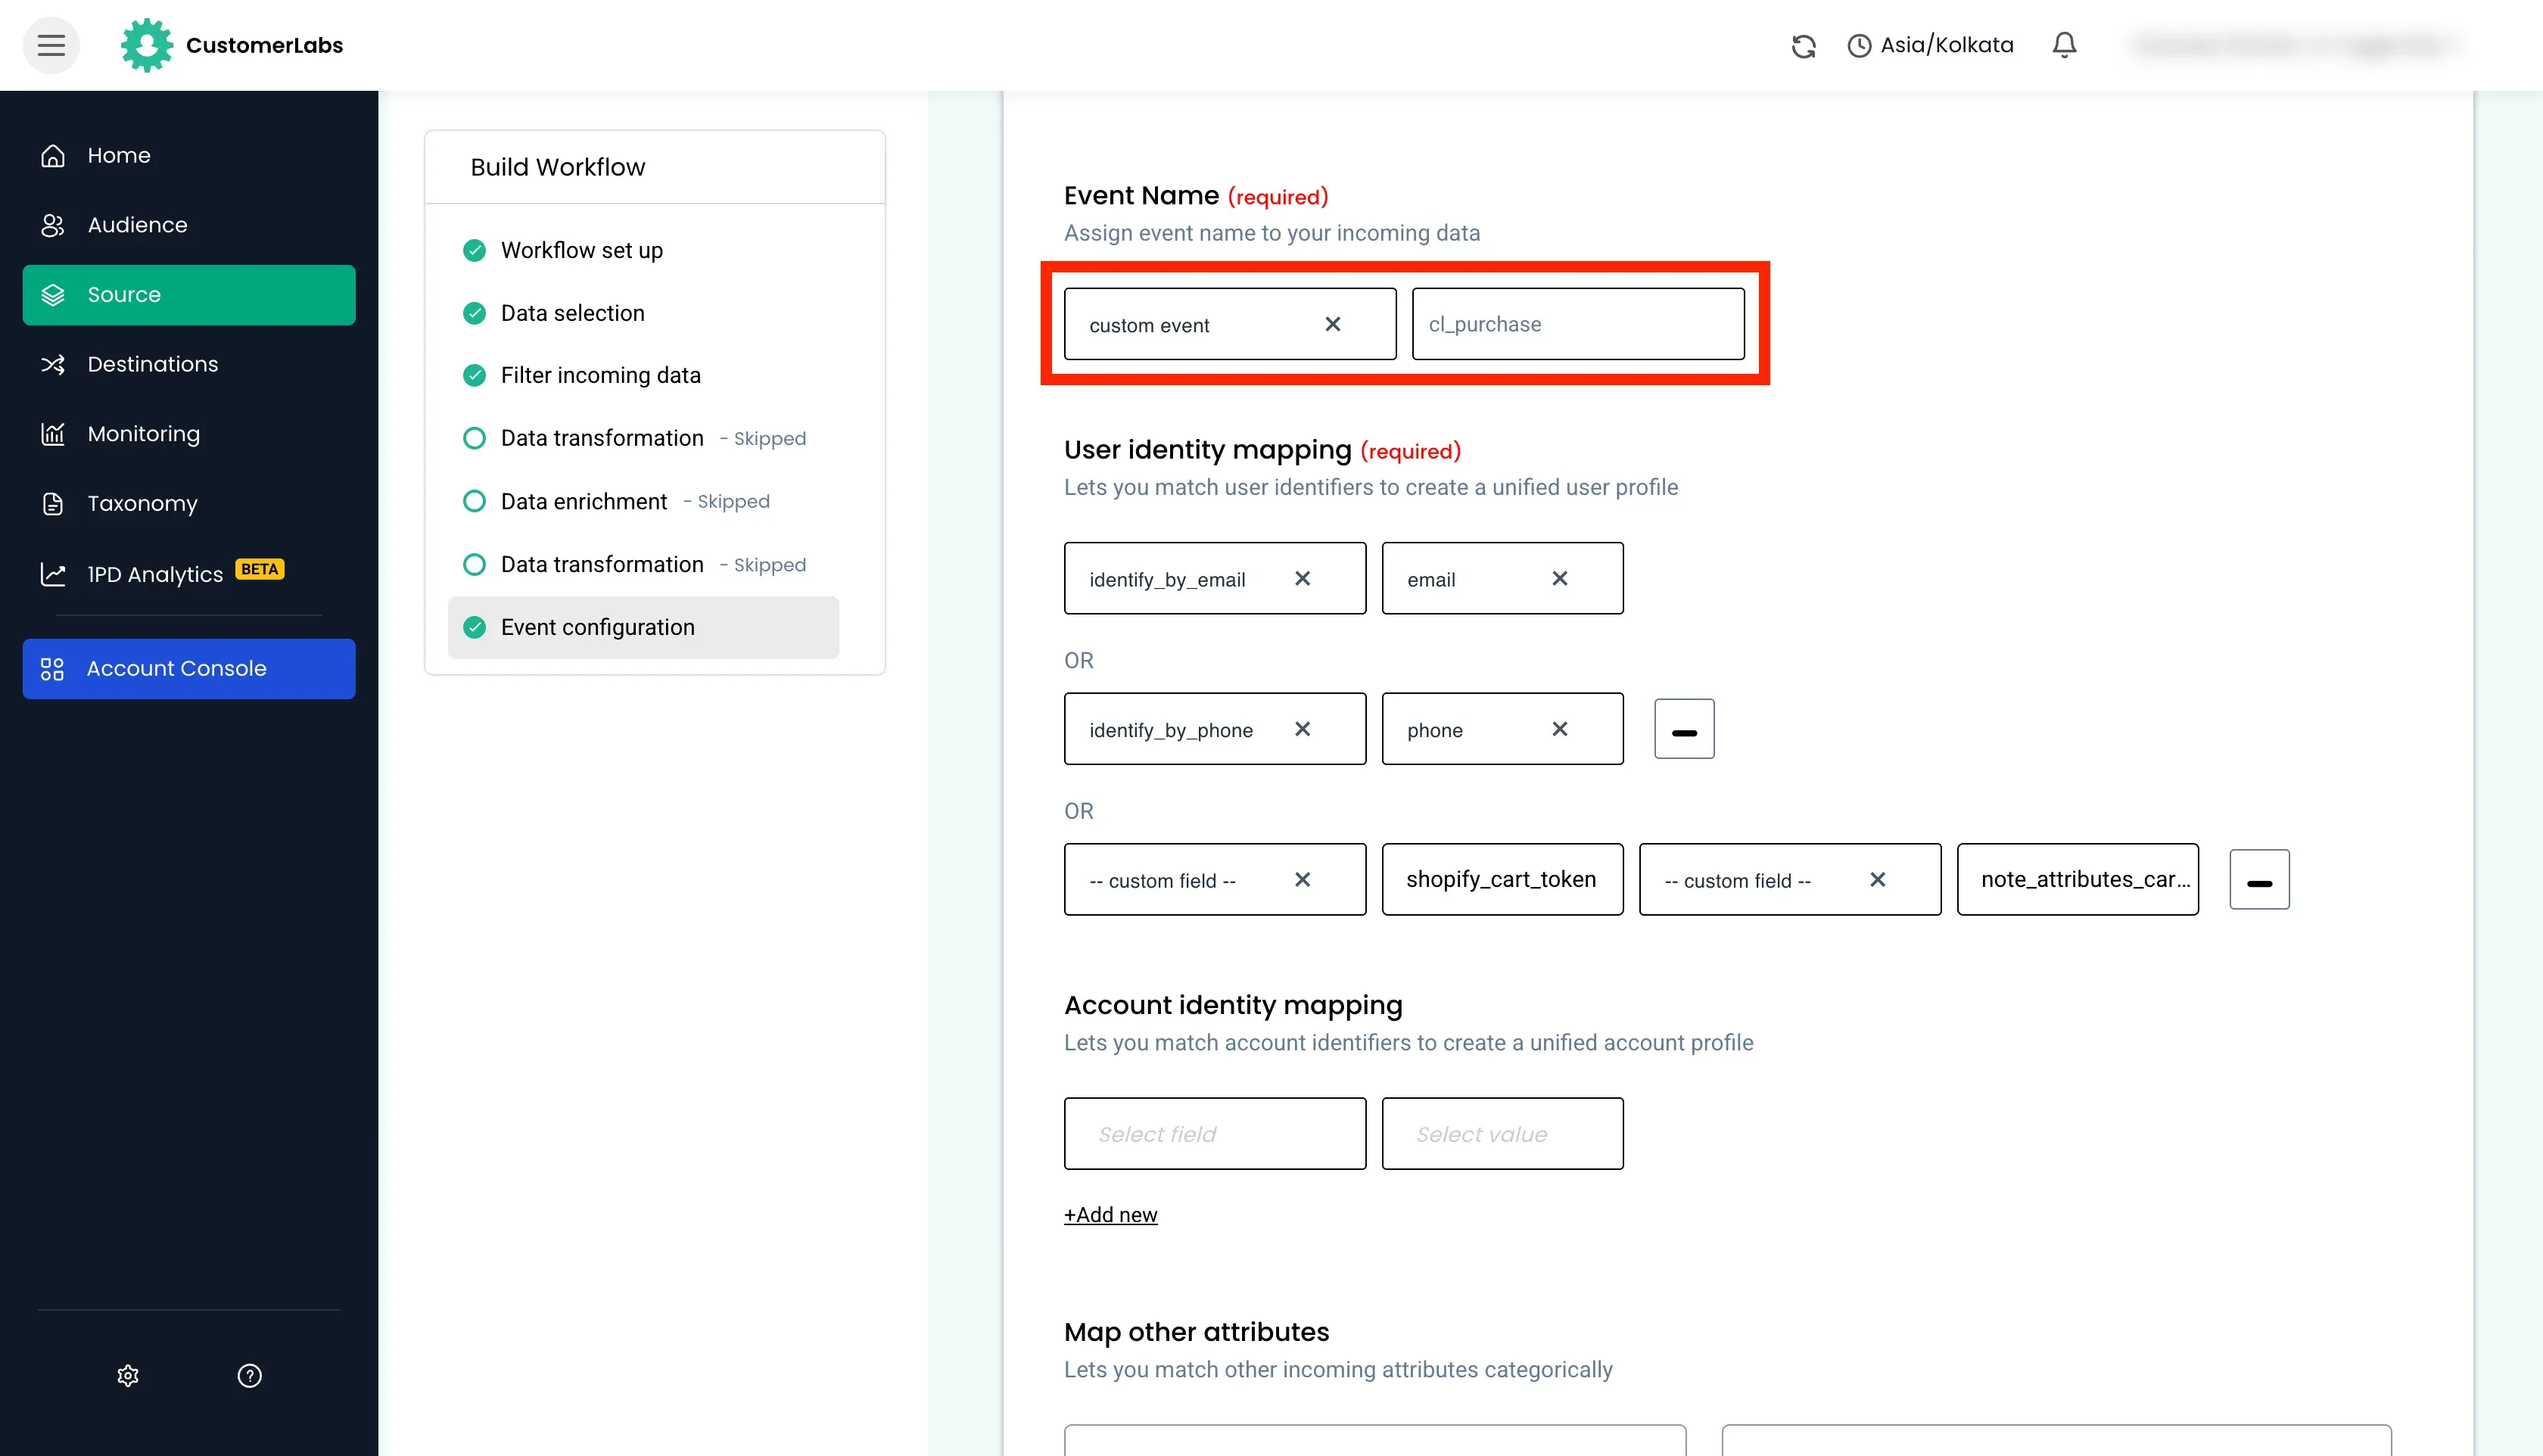
Event Configuration
Section titled “Event Configuration”-
Event Name
Section titled “Event Name”The following options are available for choosing the event name.
Events that was earlier configured
- You can choose the events that are already triggeed to CustomerLabs.
- This is highly useful when you have multiple sources sending the same event.
- Choose the existing events from the dropdown.
Custom event name
- Give a new custom event name for this workflow.
- This is useful for configuring a new event.
- Choose the option
custom eventand enter a new custom event name.
Dynamic event names
- If the payload already has a event name, and you want to use that as the event name for this workflow.
- This is useful for capturing multiple lead stages from the CRM.
- Choose the option
dynamic eventand choose the field from the payload.
Create or Update User / Group
- If you want to create or update a user or group in CustomerLabs with the data from payload without triggering any event.
- Choose
create or update userorcreate or update groupdepending on the requirement.
Assign Group to a User
- If you want to assign a account trait to a user in CustomerLabs with the data from payload without triggering any event.
- Choose
assign group to user.
-
Identity Mapping
Section titled “Identity Mapping”User Identity Mapping (Mandatory)
Section titled “User Identity Mapping (Mandatory)”This field and value is used to identify the user in CustomerLabs.
For every data received in this workflow, these value will be searched in the CustomerLabs database for this account and,
- If the user is already present in the system, the event properties and all other traits are updated to that user.
- If the user is not present, a new user profile is created and the event properties and all other traits are added to the new profile.
The primary identity mapping are
identify_by_email,identify_by_phone,customerlabs_user_id.Third party identifiers can be used in identity mapping such as
shopify_cart_token,hubspot_user_id, etc. can be used if it was used earlier and mapped to external ids.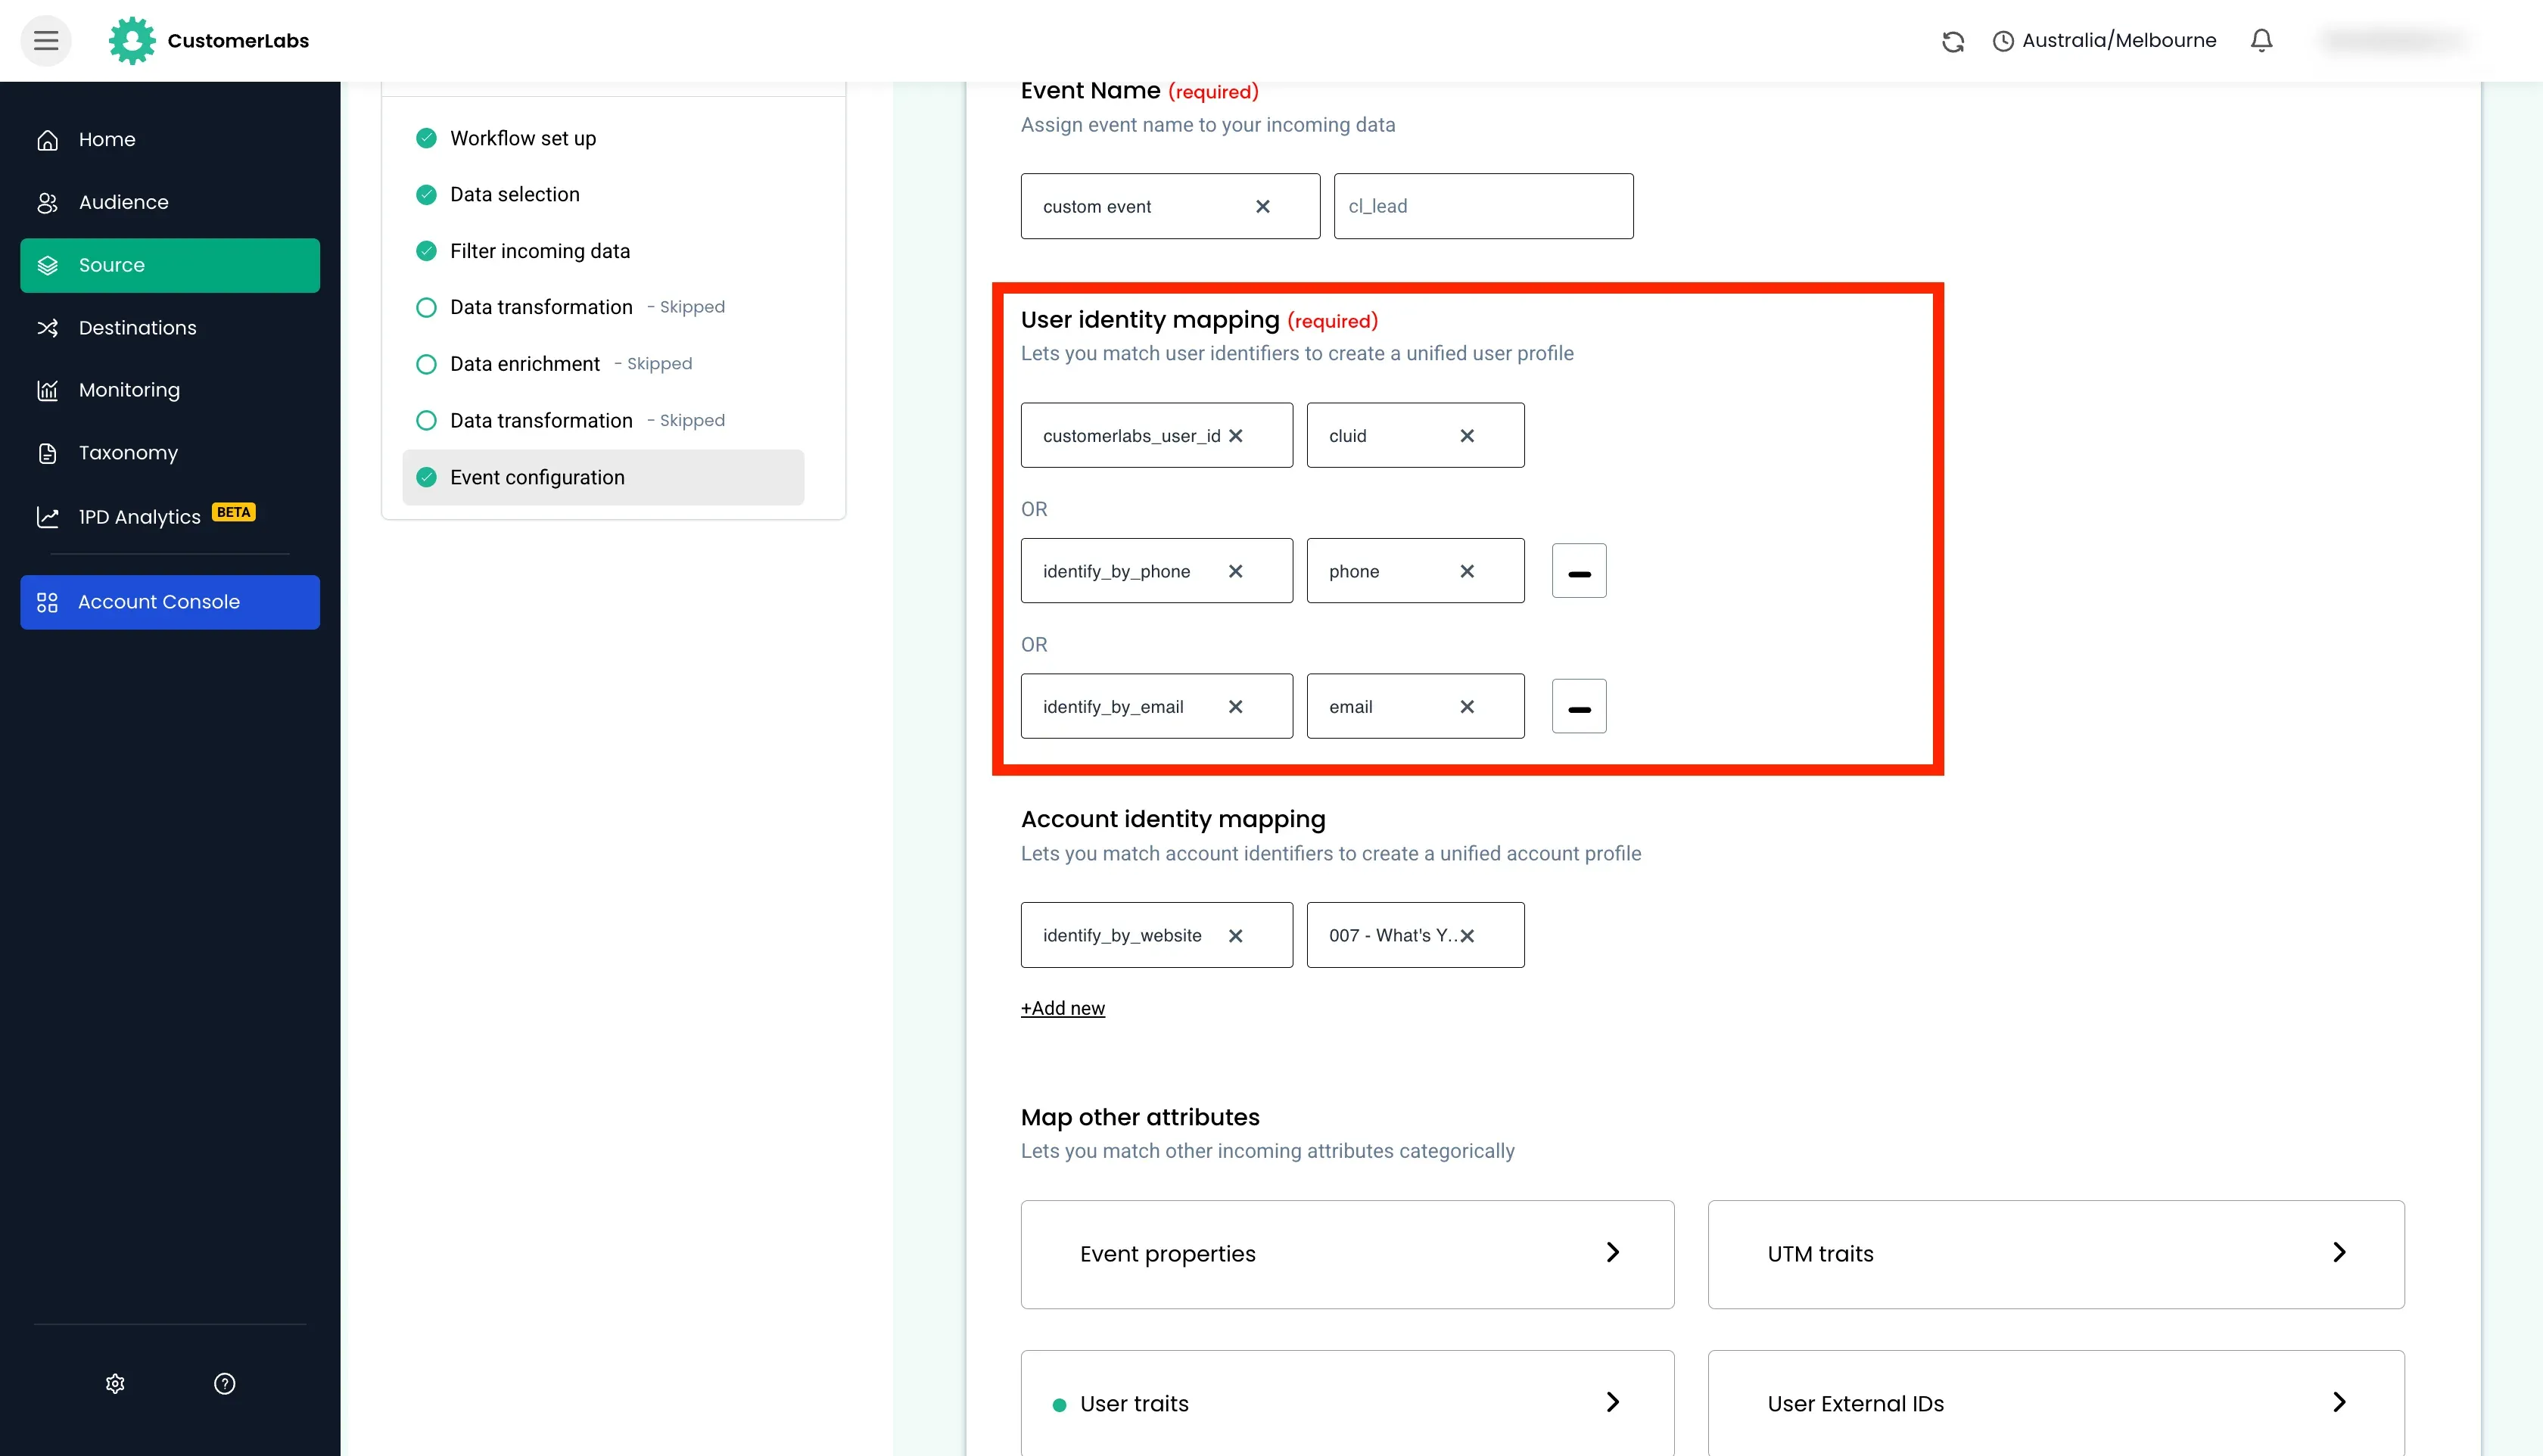
Account Identity Mapping (Non mandatory)
Section titled “Account Identity Mapping (Non mandatory)”This is used to identify the group account in CustomerLabs.
- If the account is already present, the event properties and traits are updated.
- If the account is not present, a new account profile is created and the event properties and other traits are added to the new profile.
The primary identity mapping are
identify_by_websiteandidentify_by_company.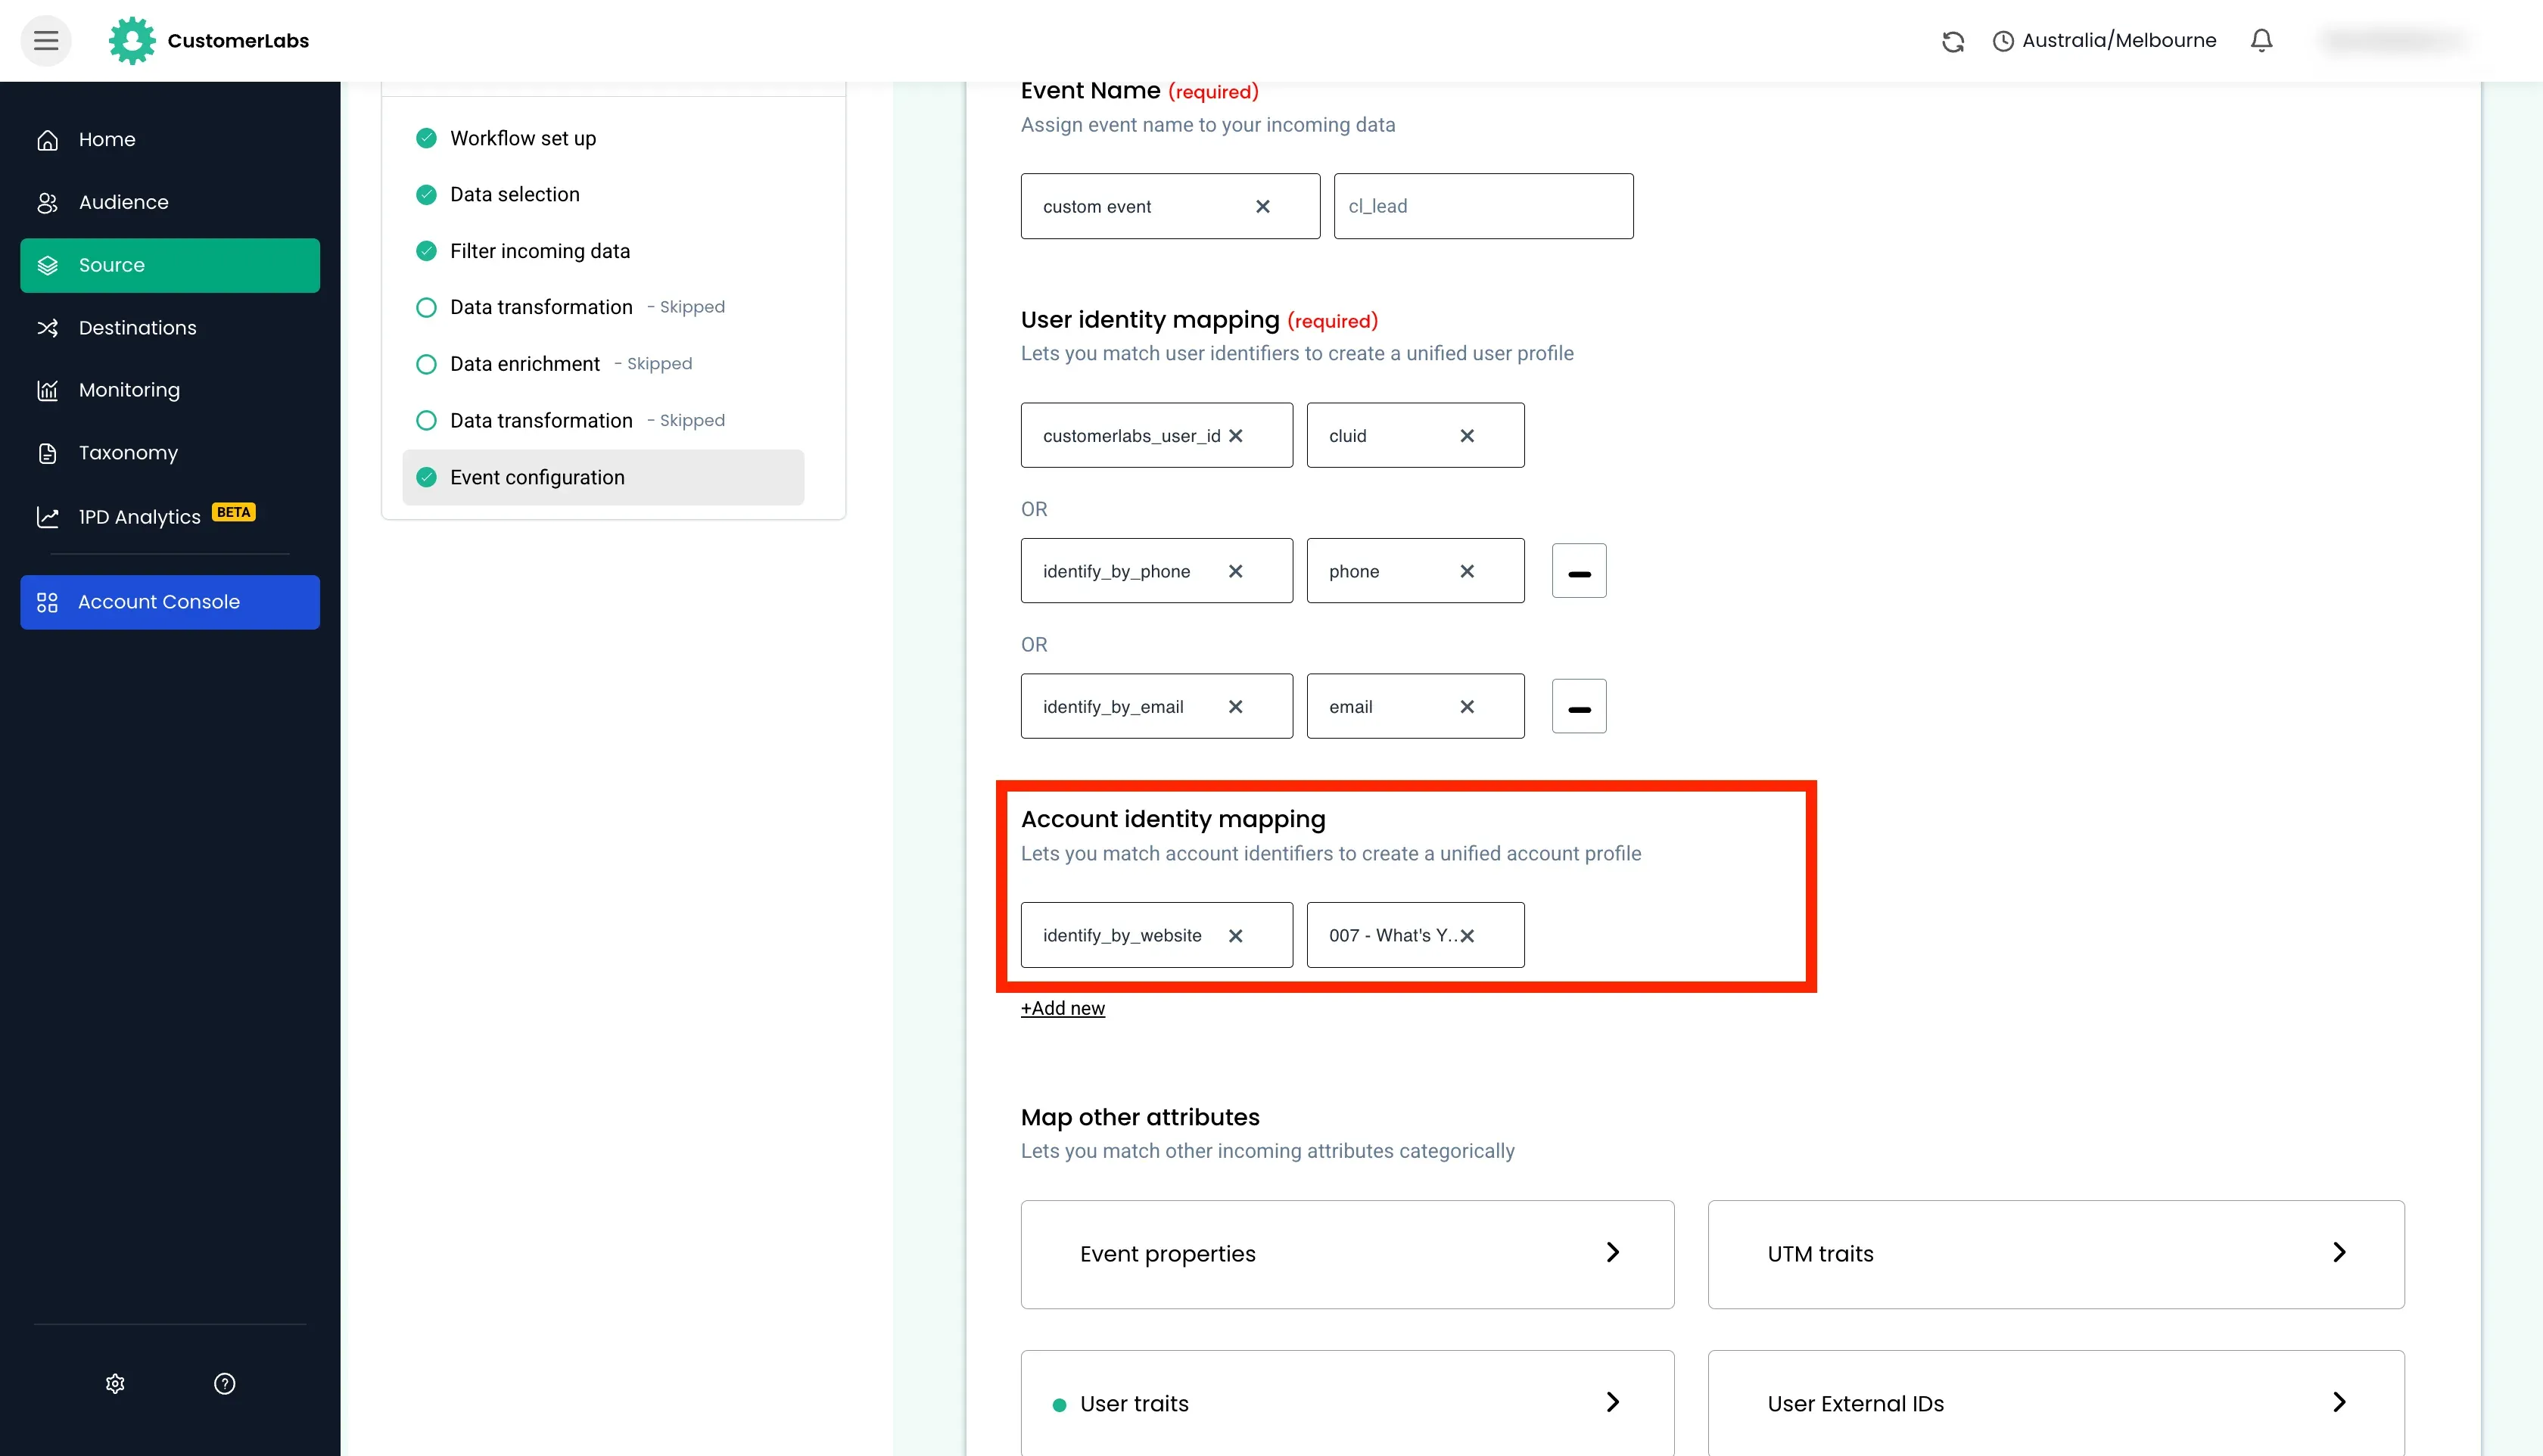
-
Map Other Attributes
Section titled “Map Other Attributes”Here, we will be mapping the data from the payload to the properties and traits fields in CustomerLabs.
Event Properties
Section titled “Event Properties”Event data from the payload will be mapped here such as
value,currency,transaction_id,form_id,form_name,lifecyclestage, etc.
User Traits
Section titled “User Traits”User data from the payload will be mapped here such as
email,phone,first_name,last_name,city,state,country,zip,user_id,user_type, etc.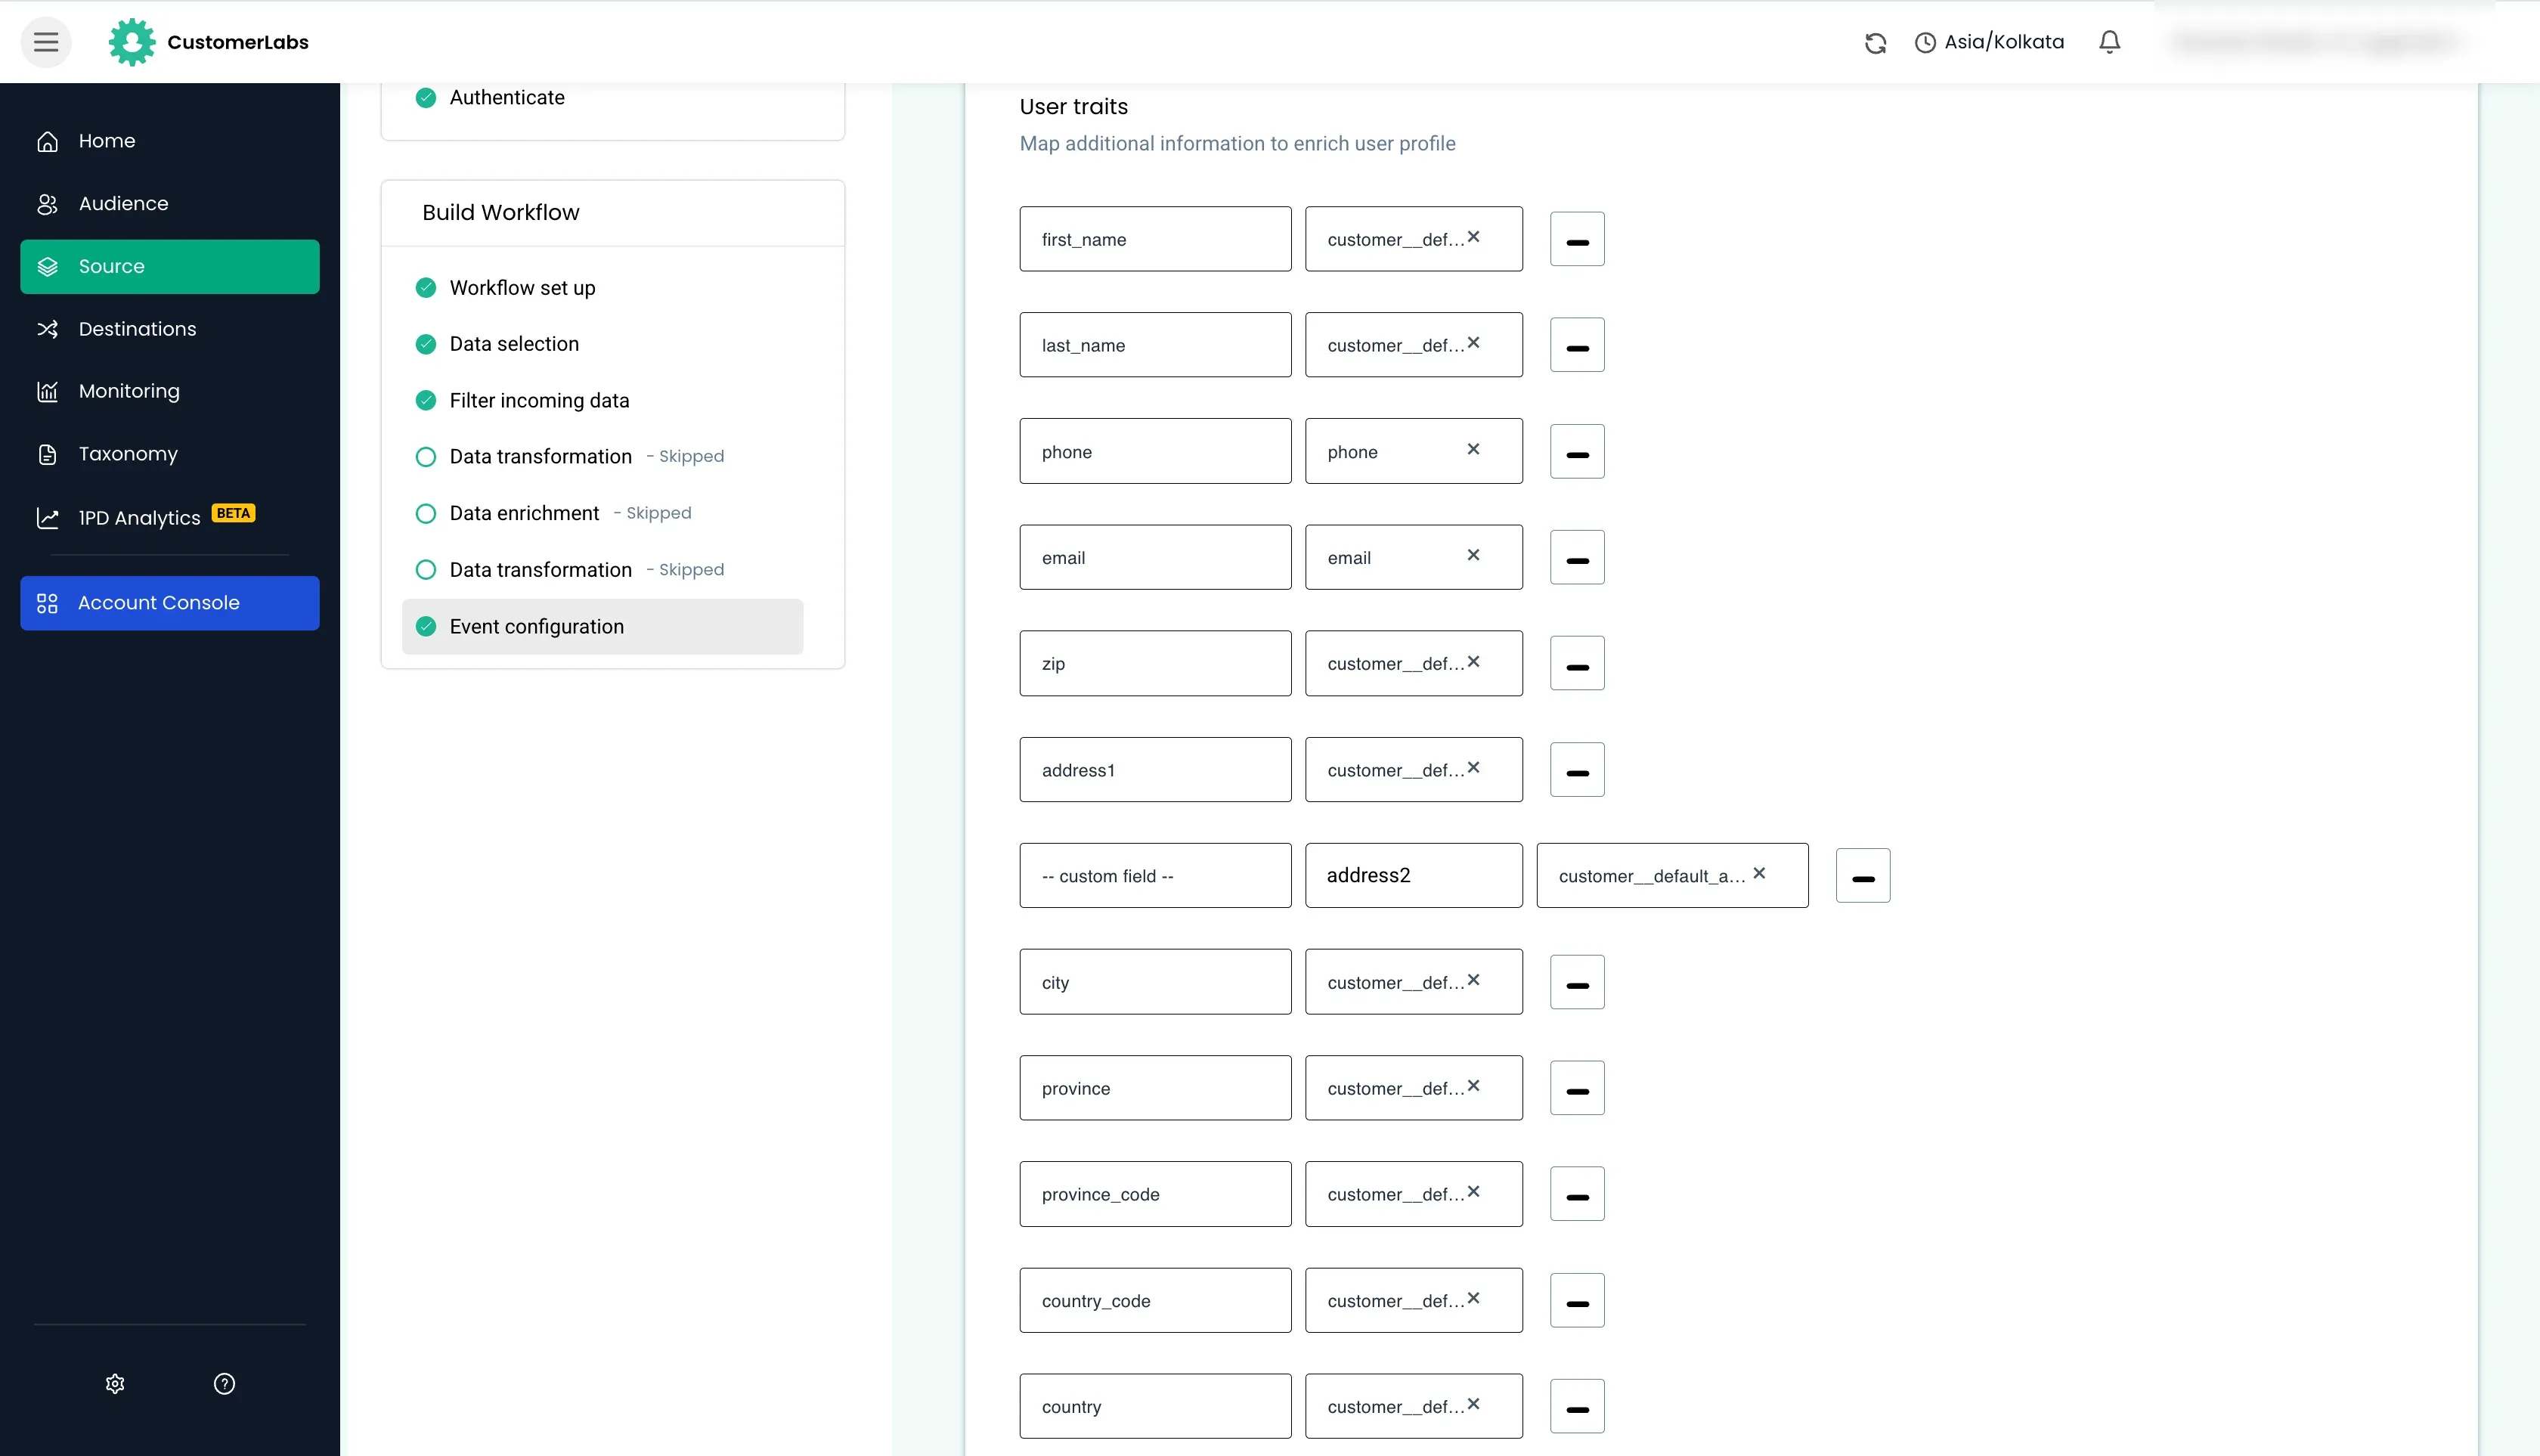
Account Traits
Section titled “Account Traits”Account data from the payload will be mapped here such as
company_website,company_name, etc.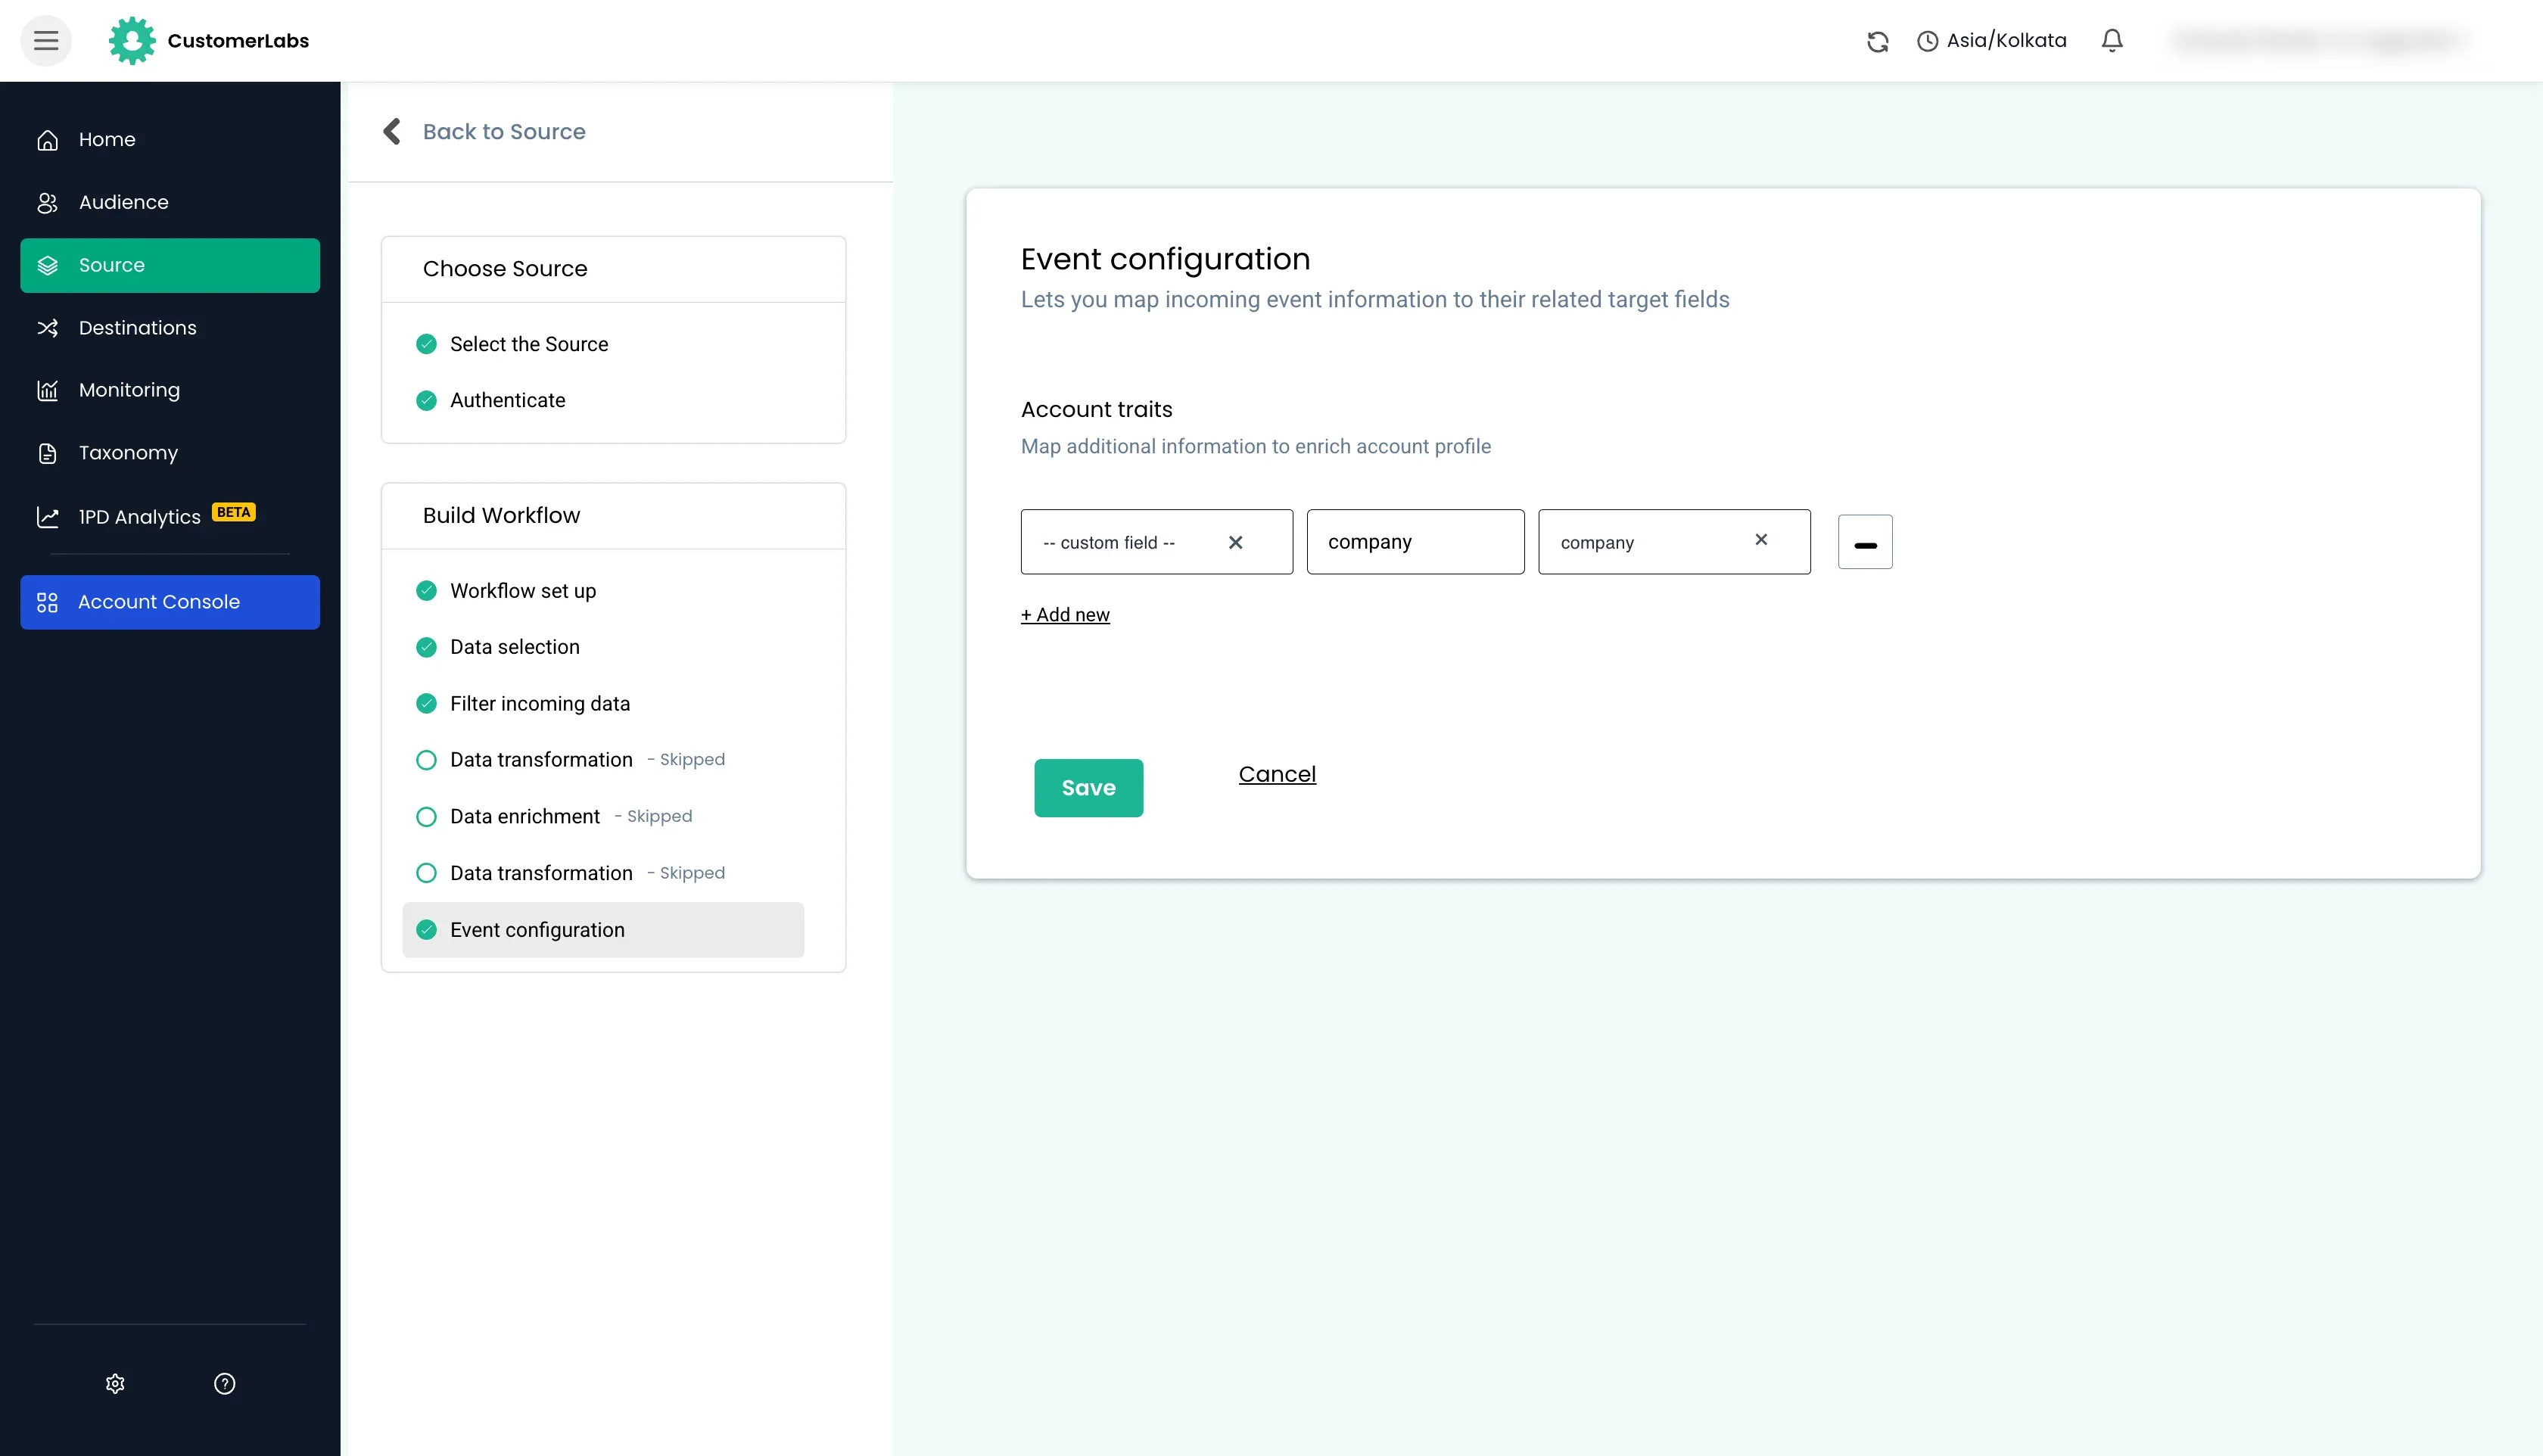
Product details
Section titled “Product details”Product details are usually received as an array of objects in the payload. Therefore, it cannot be directly mapped.
To map it successfully,
- We will have to first choose the array field on top (in this case,
line_itemscontained the array of objects). - Now that array field is chosen, each object field will now be visible to map it with respective fields in CustomerLabs.
Product data from the payload will be mapped here such as
product_id,product_name,product_price,product_quantity, etc.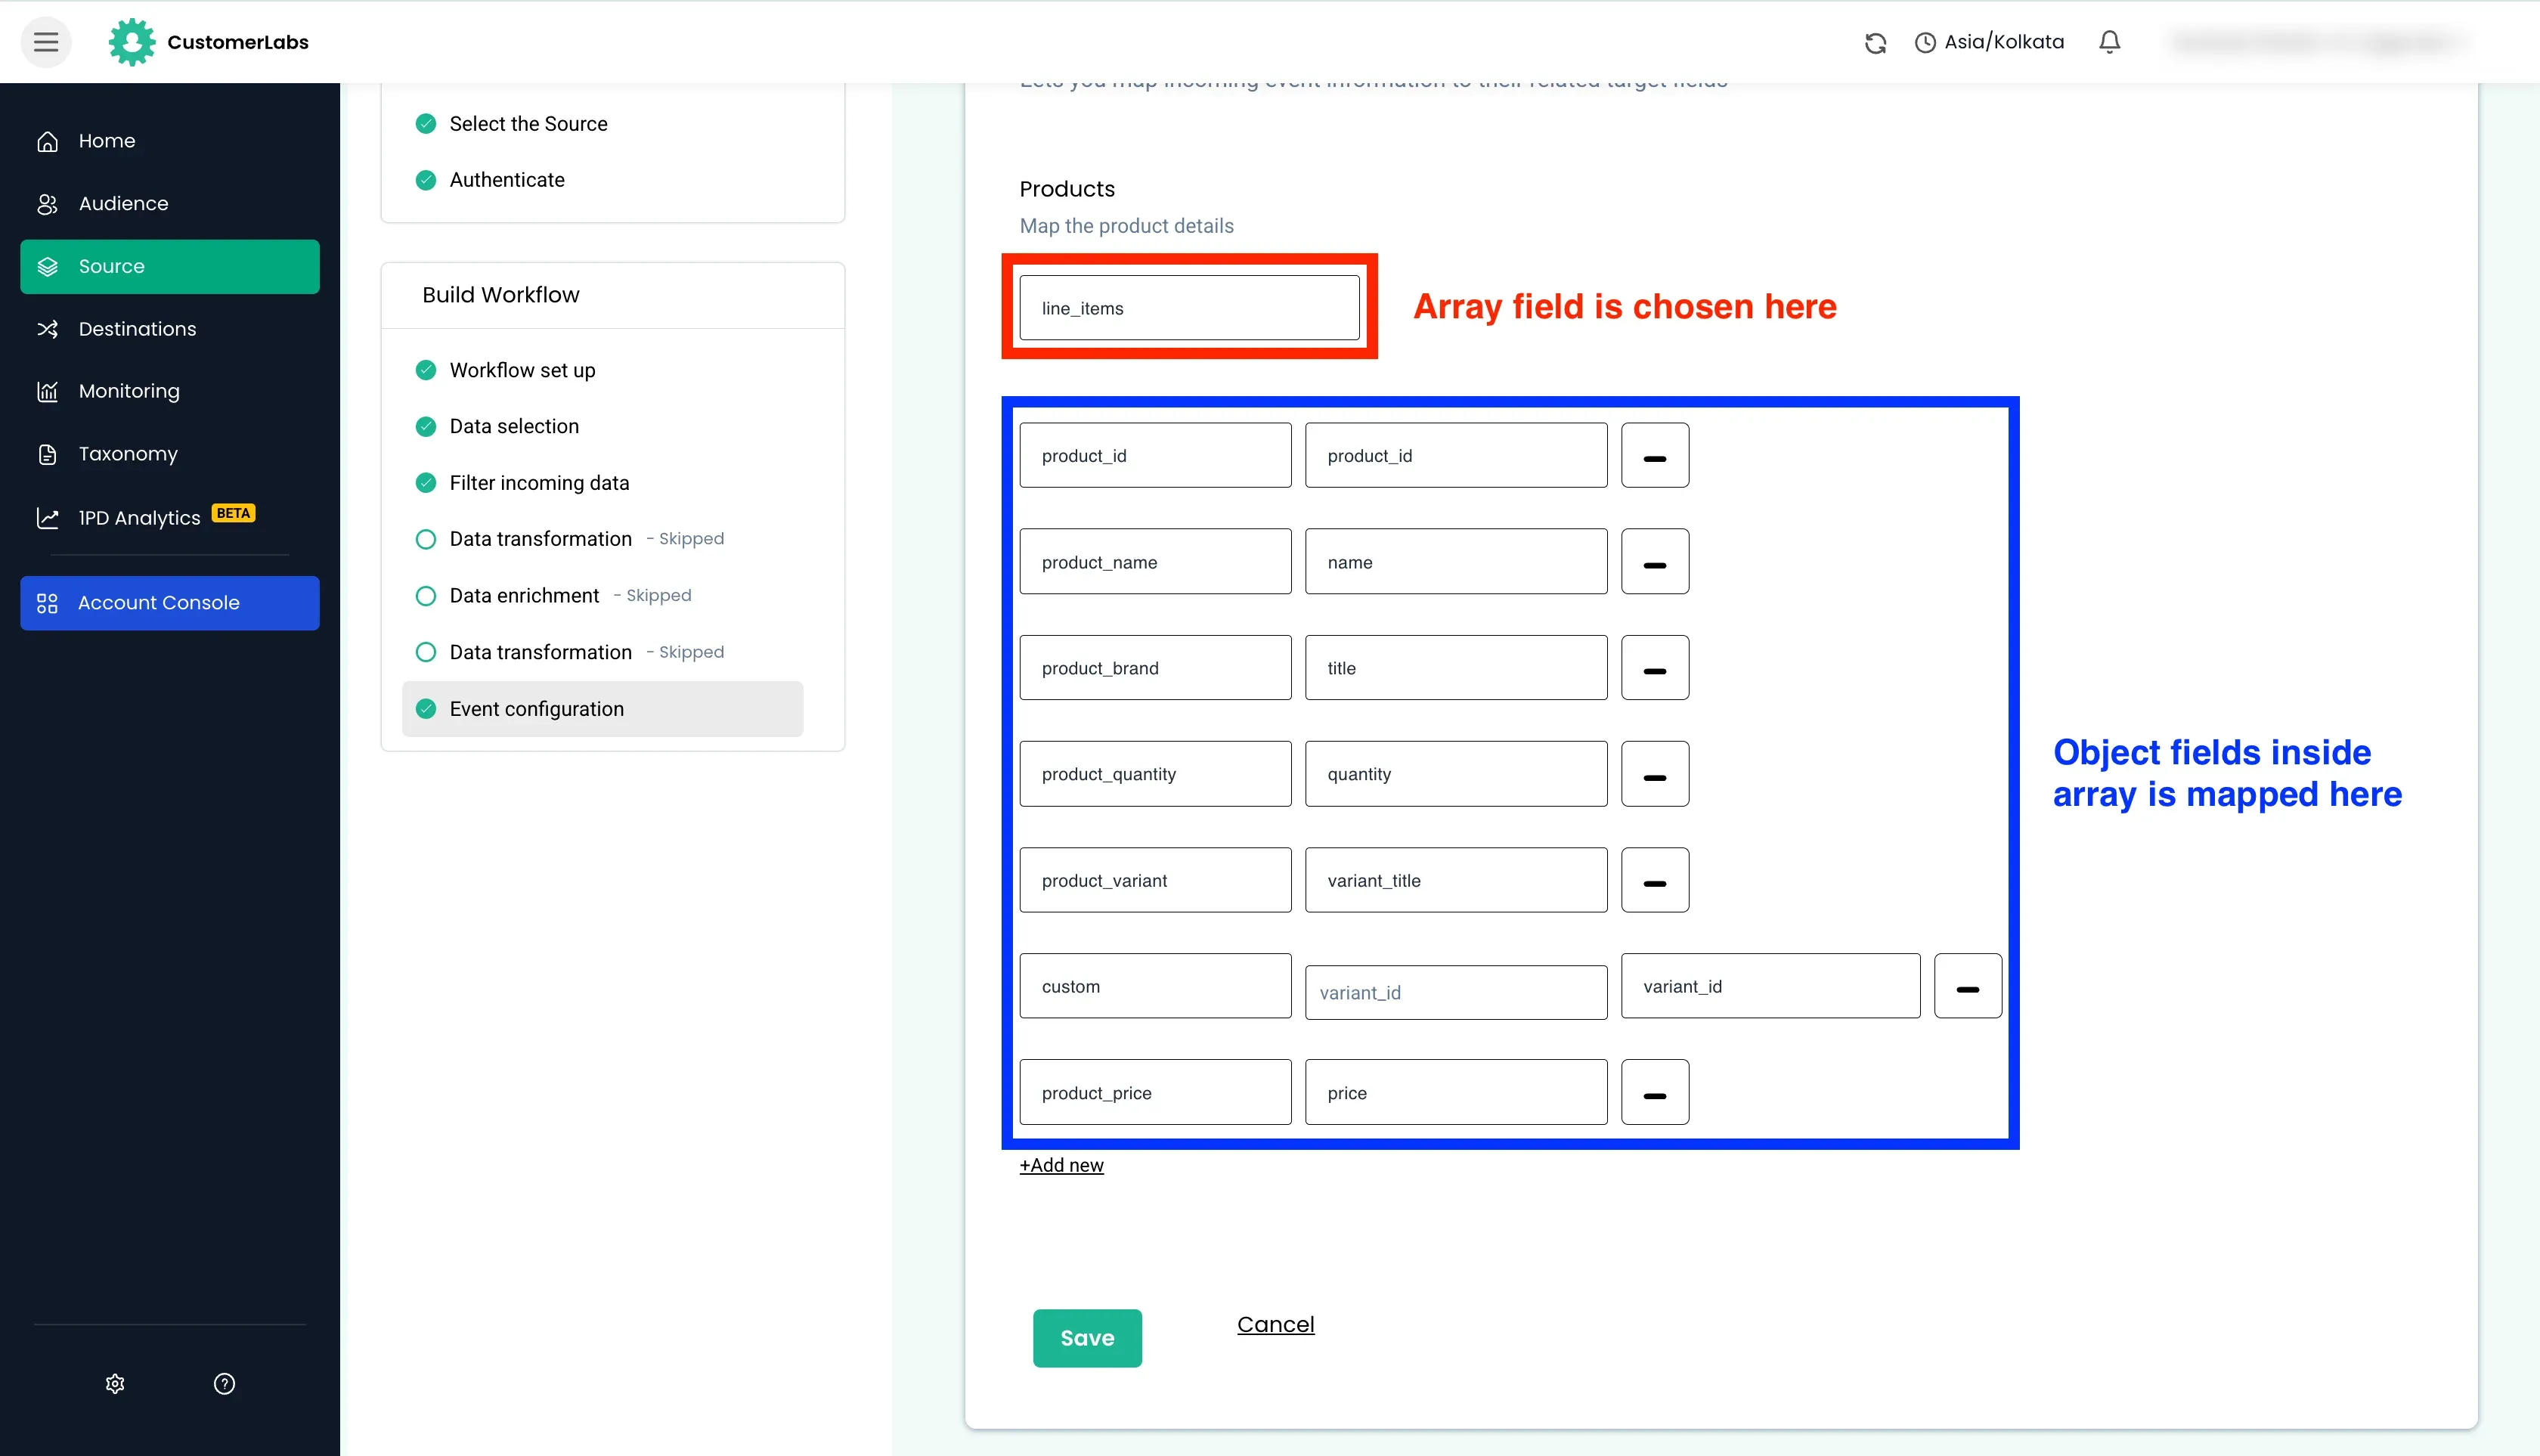
UTM traits
Section titled “UTM traits”UTM data from the payload will be mapped here such as
utm_source,utm_medium,utm_campaign,utm_term,utm_content, etc.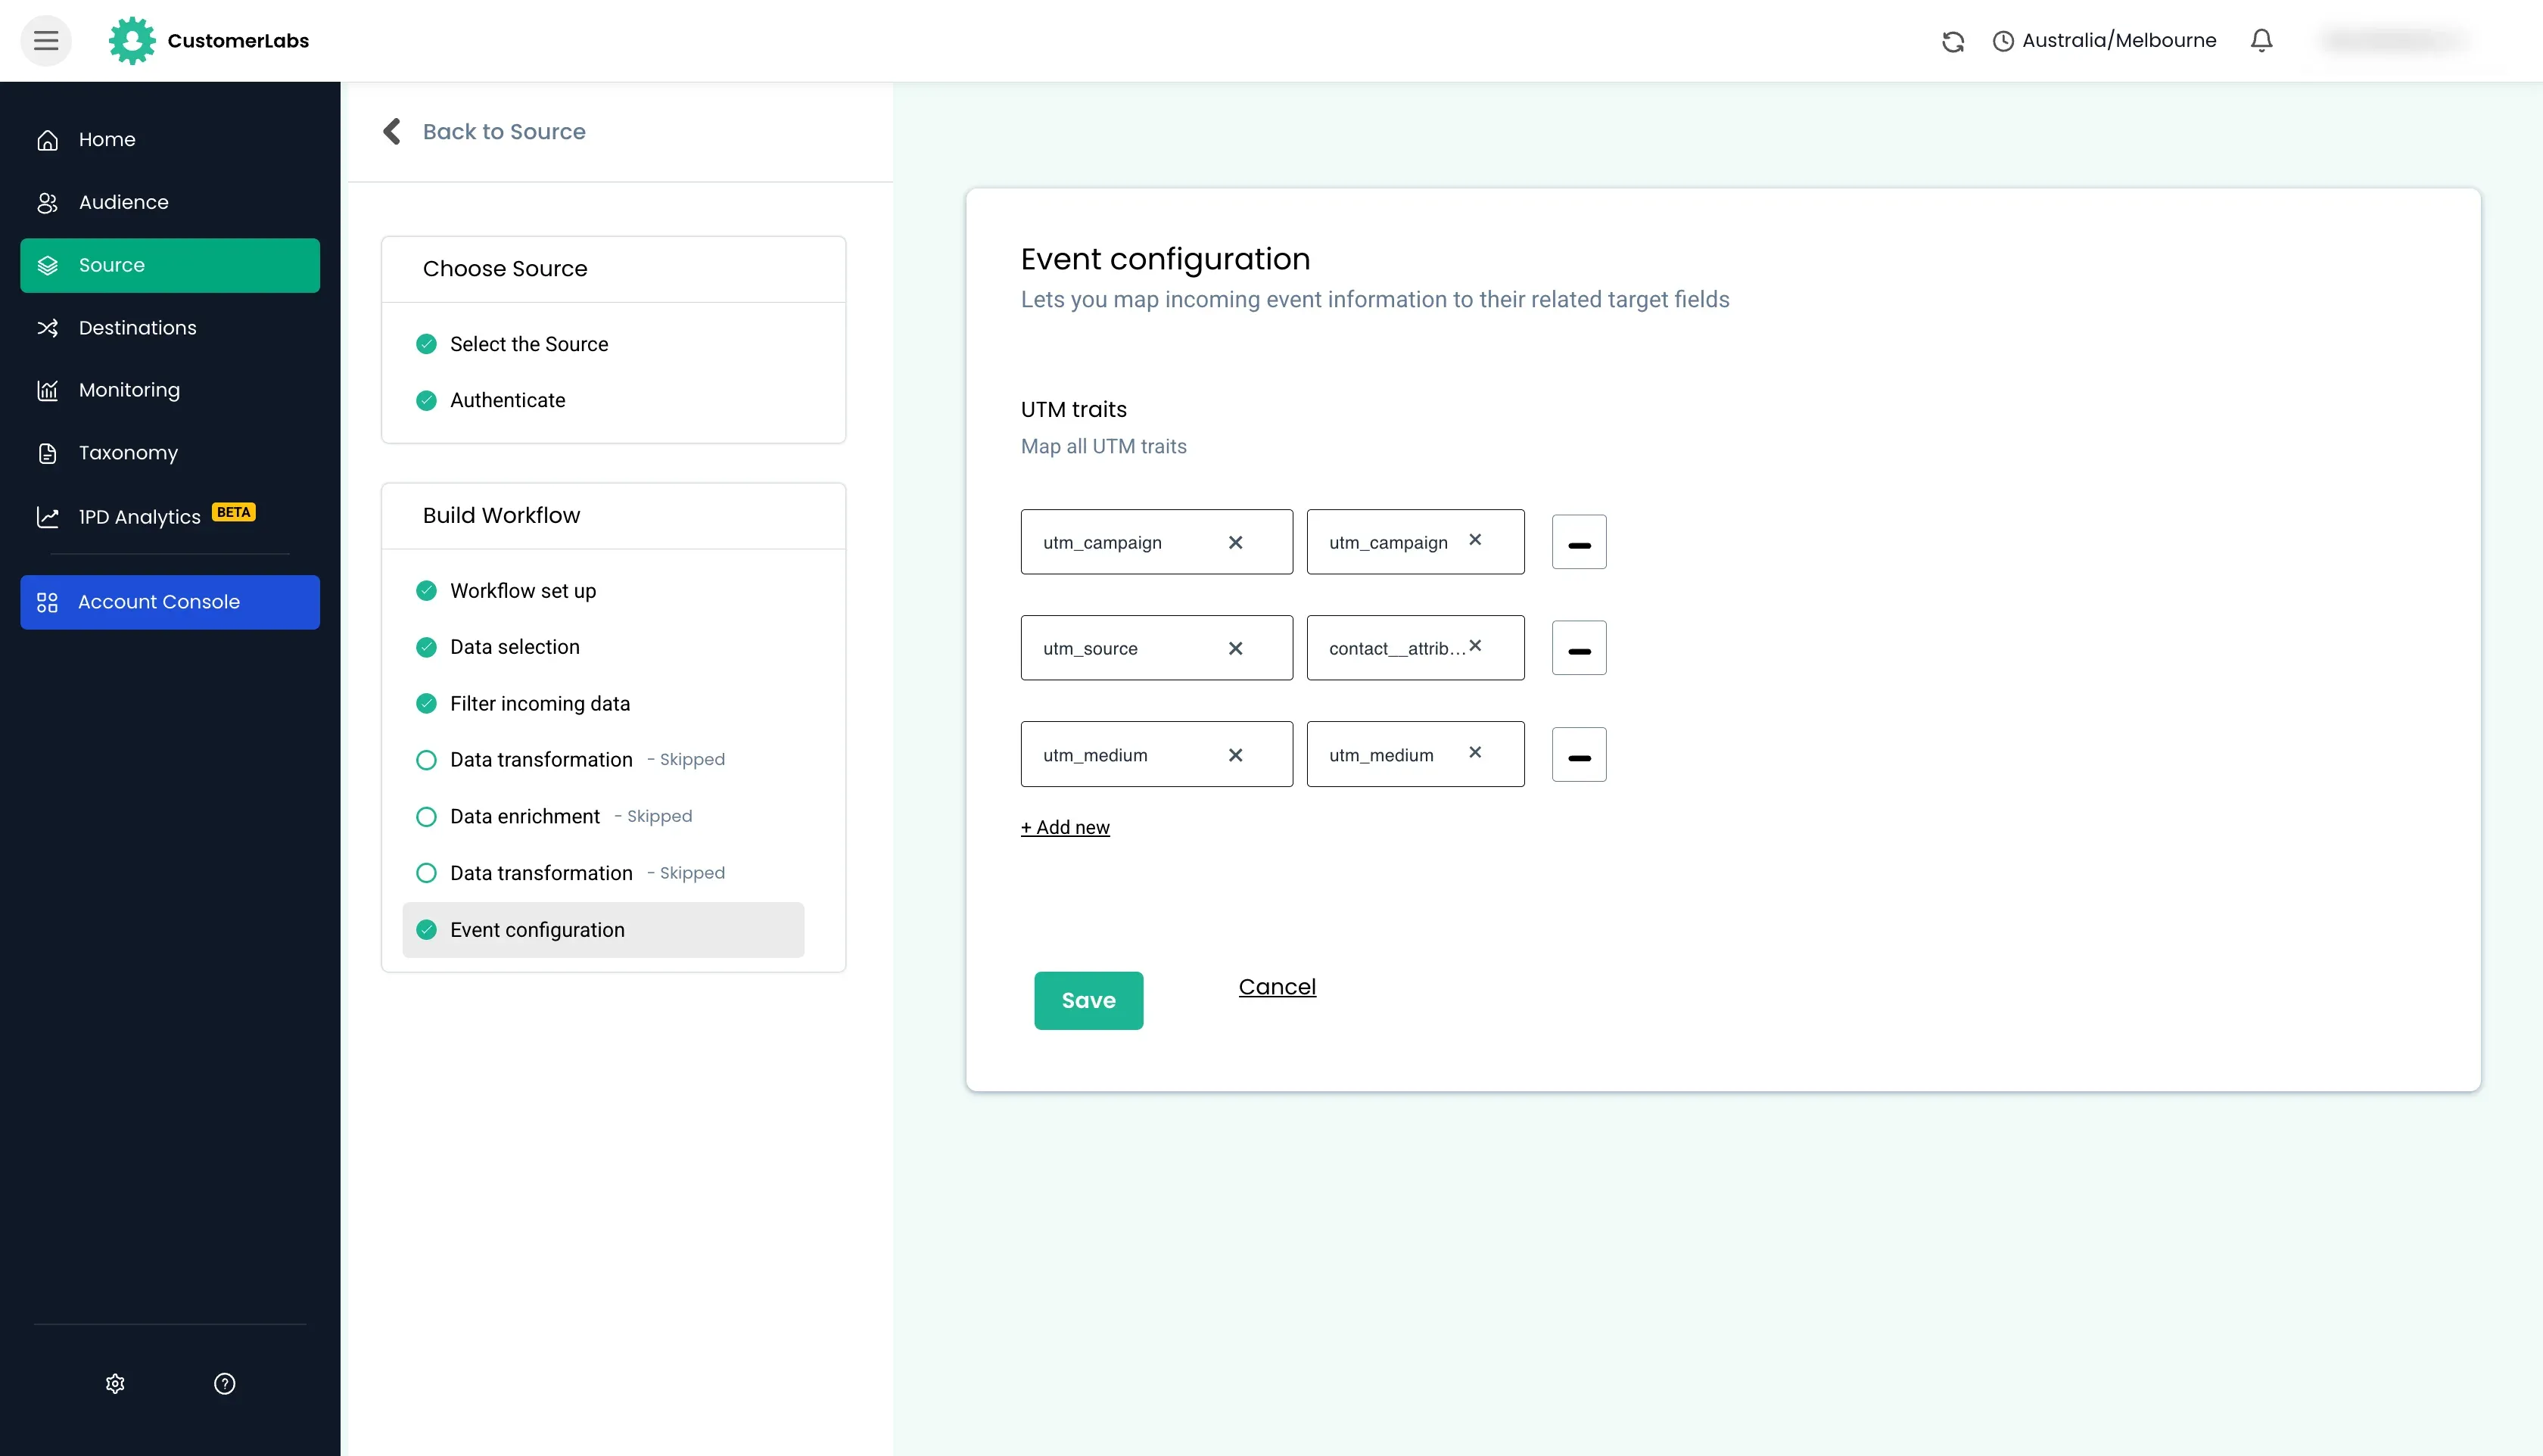
User External IDs
Section titled “User External IDs”User traits that wanted to be used as external IDs from the payload will be mapped here such as
user_id,customerlabs_user_id, etc.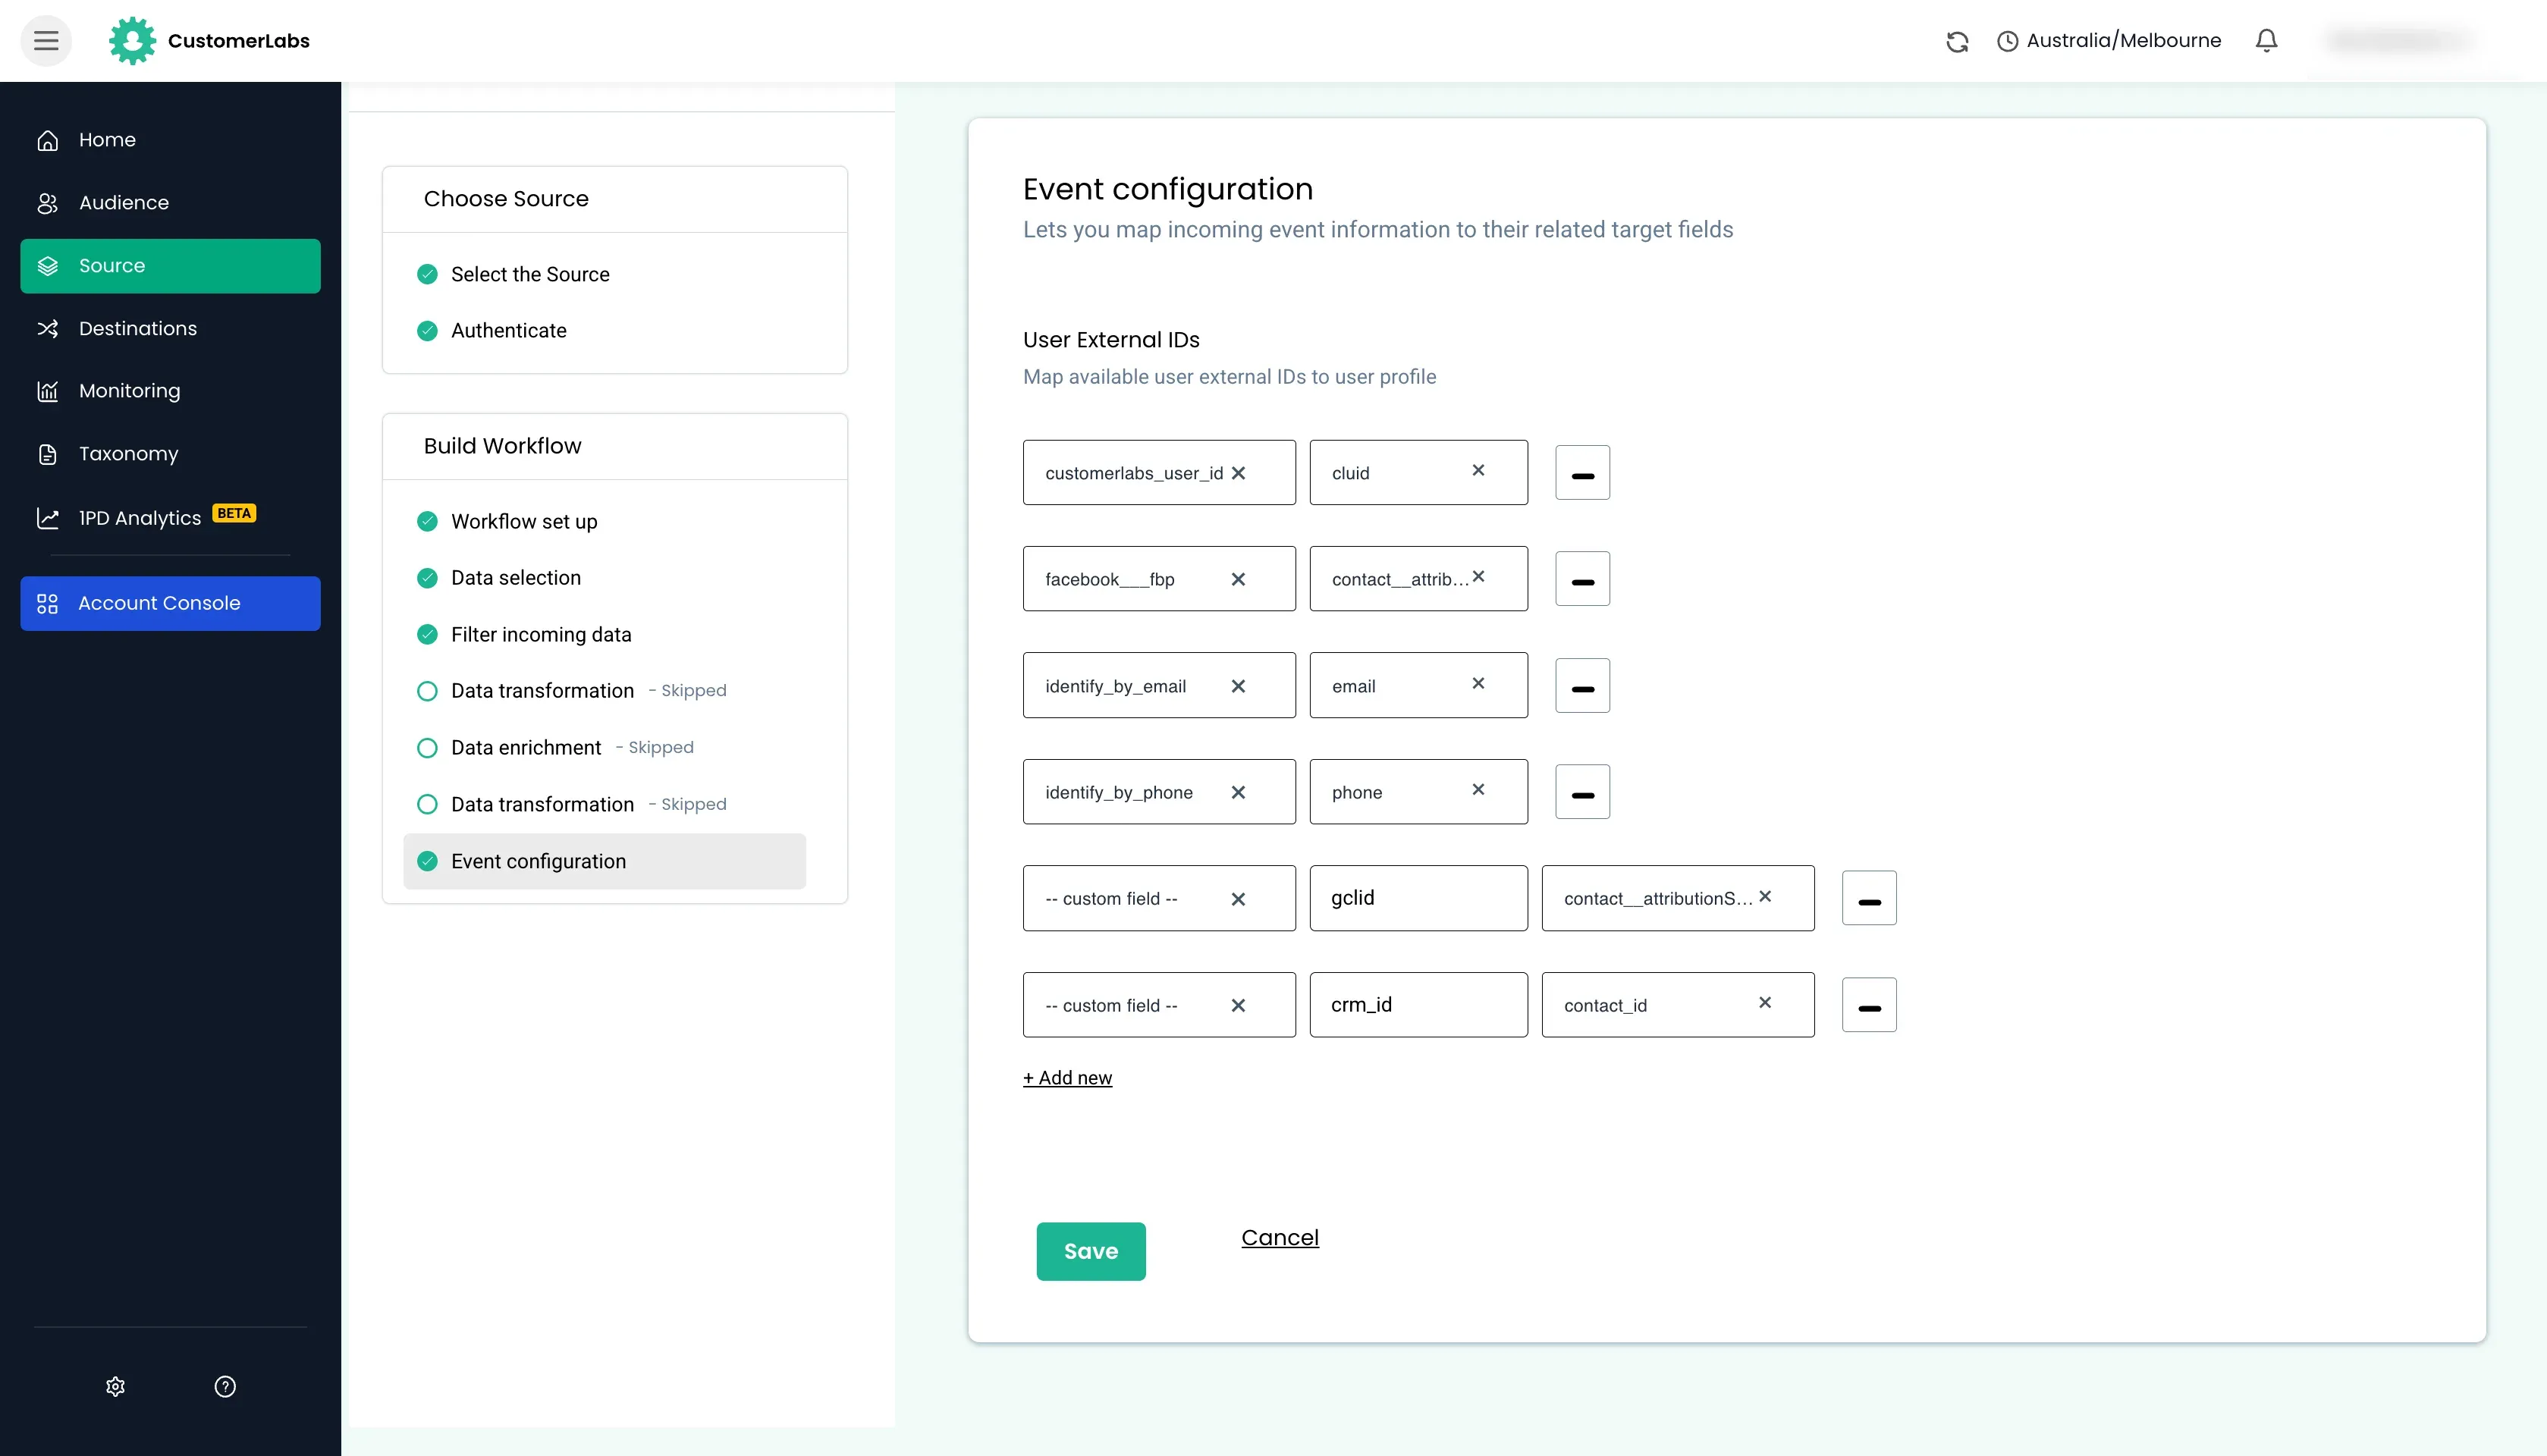
Account External IDs
Section titled “Account External IDs”Account traits that wanted to be used as external IDs from the payload will be mapped here such as
identity_by_website,identity_by_company, etc.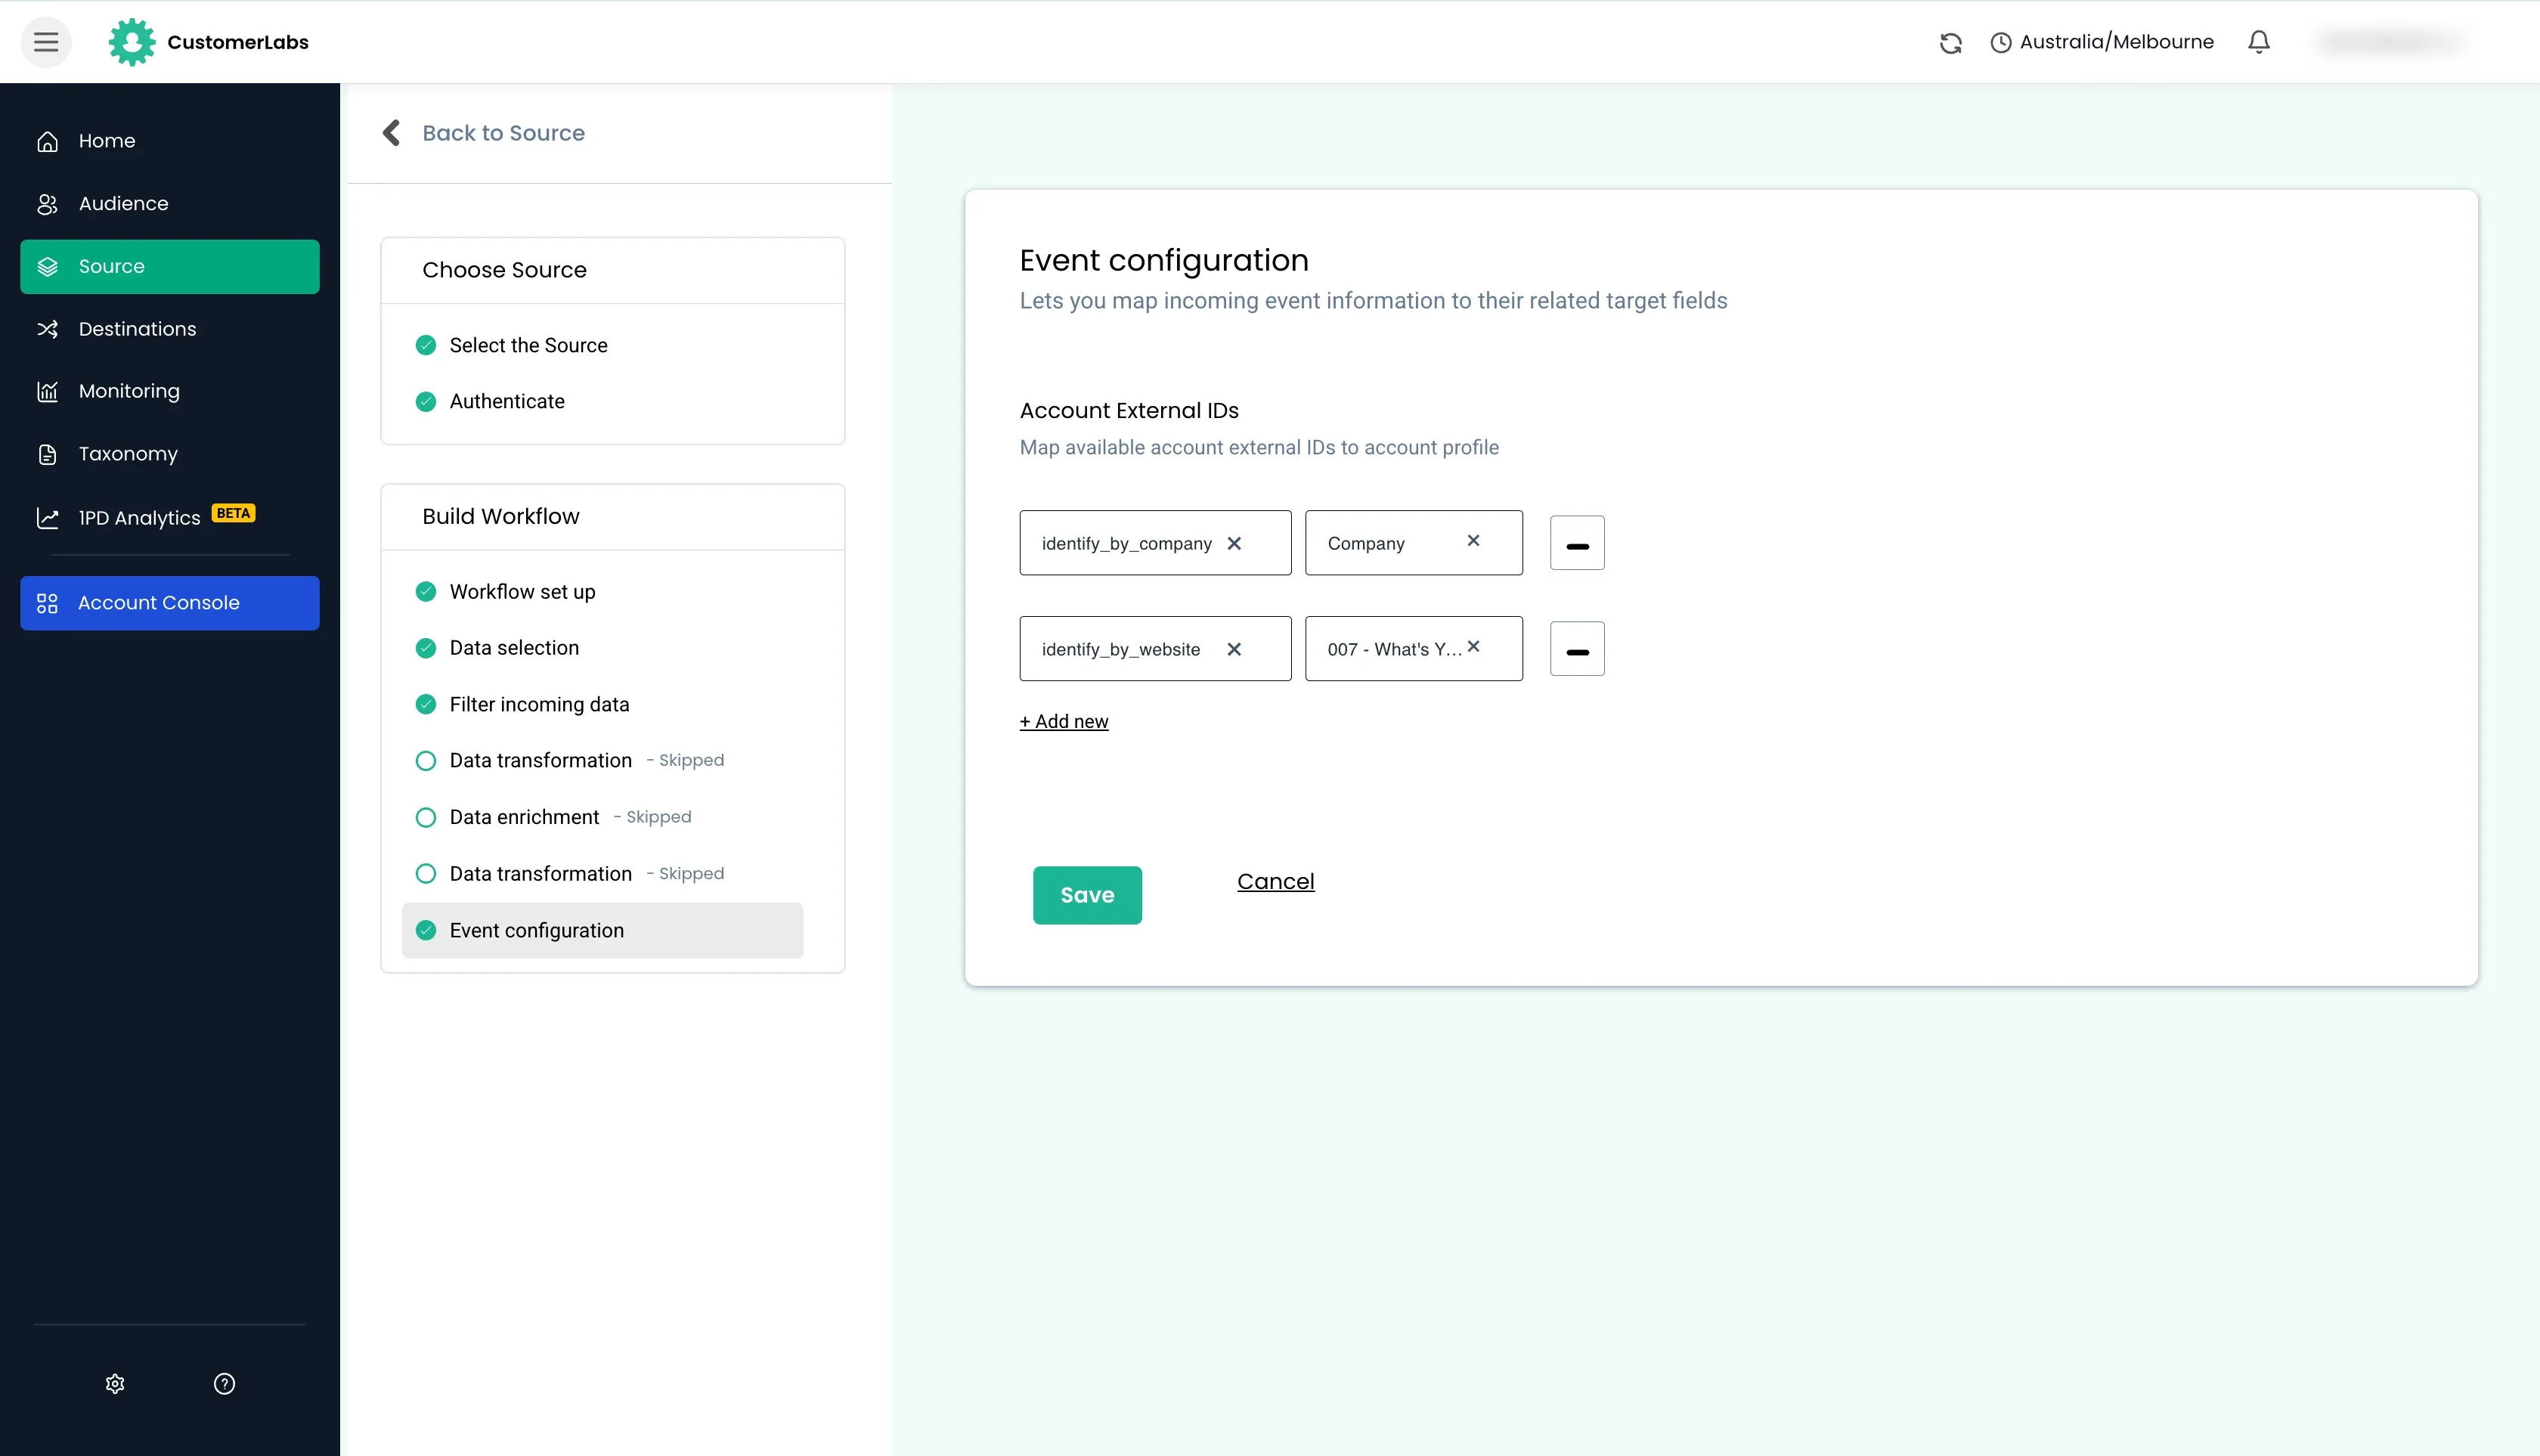
Consent mode
Section titled “Consent mode”Consent mode will be mapped here such as consent to
email_marketing,sms_marketing,whatsapp_marketing,ad personalization, etc.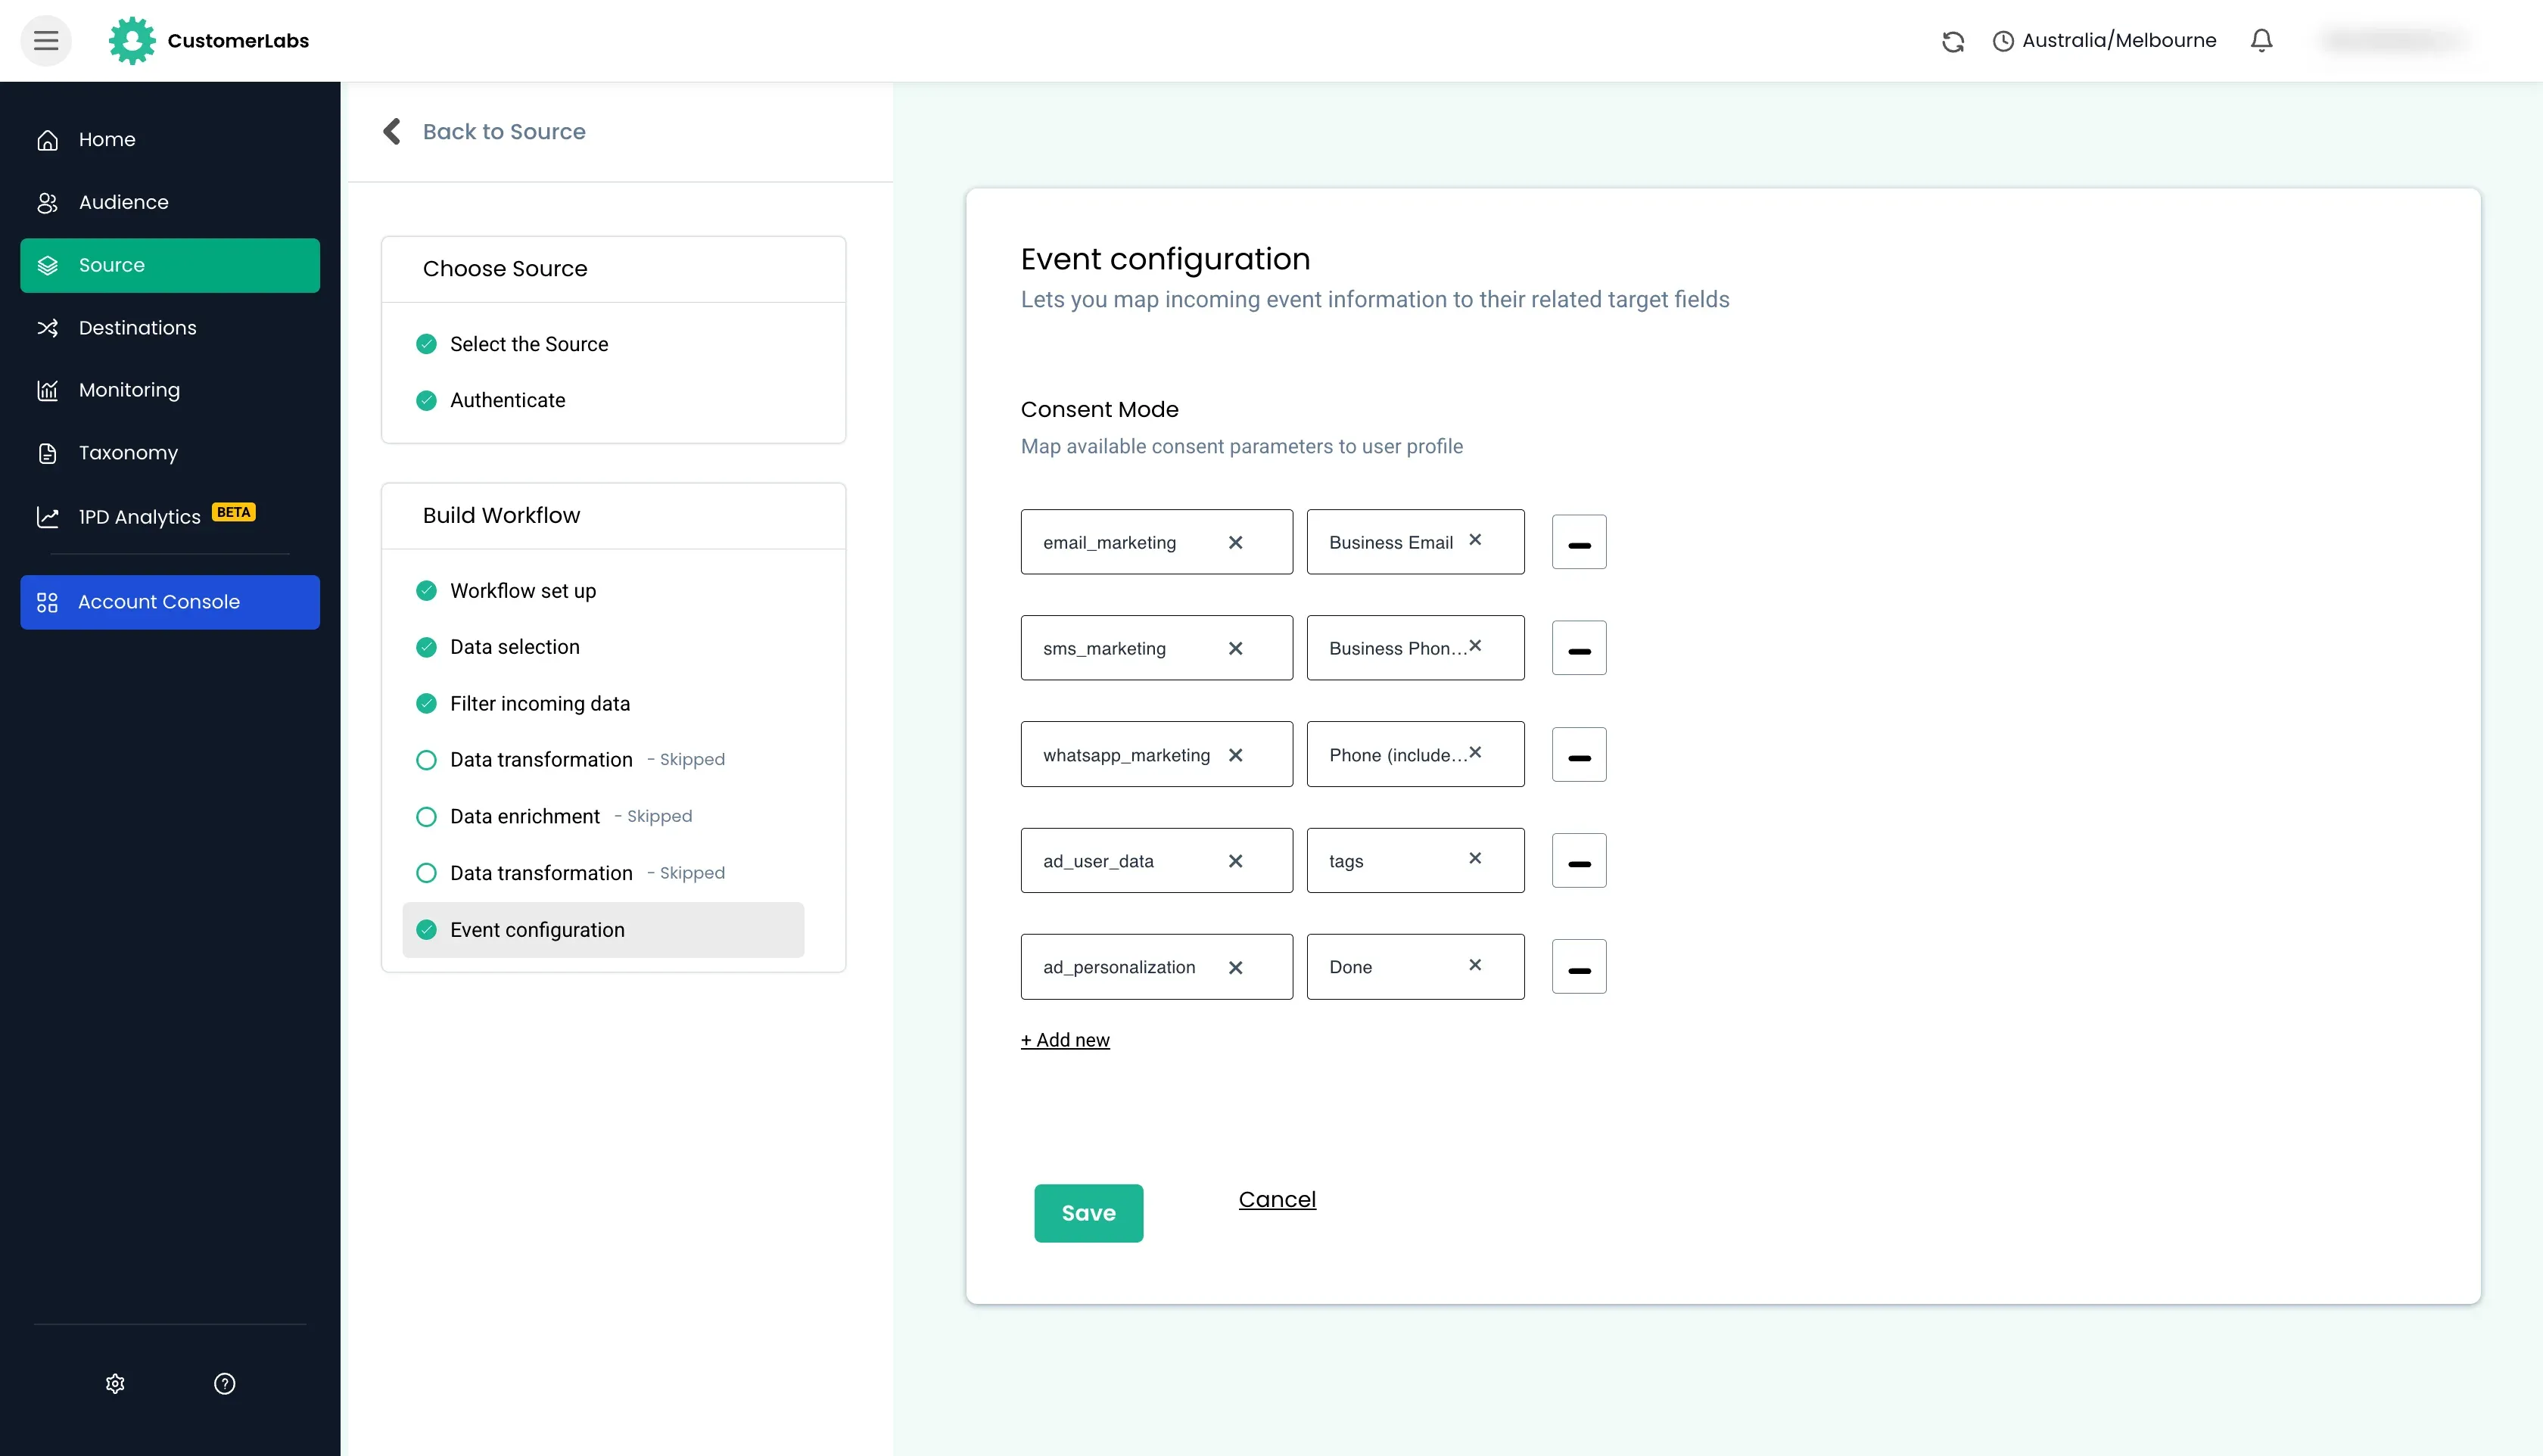
- We will have to first choose the array field on top (in this case,
Filter Conditions
Section titled “Filter Conditions”Filter conditions allow you to filter the incoming data based on the conditions specified. The data will pass through the filter only if the conditions are met.
Filter criteria available
Section titled “Filter criteria available”The filter conditions available in CustomerLabs are:
| Filter Condition | Description |
|---|---|
Text contains | the field contains the specified value (partial matching is allowed) |
Text does not contain | the field does not contain the specified value (partial matching is allowed) |
Text exactly matches | the field exactly matches the specified value |
Text does not exactly match | the field does not exactly match the specified value (partial match is allowed) |
Text starts with | the field starts with the specified value |
Text does not starts with | the field does not start with the specified value |
Text ends with | the field ends with the specified value |
Text does not end with | the field does not end with the specified value |
Text is in | the field is in the specified value |
Text is not in | the field is not in the specified value |
Number greater than | the field is greater than the specified value (equal is not considered) |
Number less than | the field is less than the specified value (equal is not considered) |
Number greater than or equal to | the field is greater than or equal to the specified value |
Number less than or equal to | the field is less than or equal to the specified value |
Number equals | the field equals the specified value |
Number not equal | the field does not equal the specified value |
Date after | the field is after the specified date |
Date before | the field is before the specified date |
Date equal | the field is after or equal to the specified date |
Boolean is true | the field is true |
Boolean is false | the field is false |
Array contains | the field is an array and contains the specified value |
Array does not contain | the field is an array and does not contain the specified value |
Exists | the field exists (field with empty or null values are considered as existing) |
Does not exist | the field does not exist |
Should empty | the field is empty (null is not considered as empty) |
Should not empty | the field is not empty (null is not considered as empty) |
Is null | the value is null |
Is not null | the value is not null |
Examples
Section titled “Examples”Example 1:
“source_name” : “shopify_draft_order”
Filter Scenarios:
- “source_name”
Text contains“draft” → will allow the event to pass through the filter. - “source_name”
Text does not contain“draft” → will not allow the event to pass through the filter. - “source_name”
Text exactly matches“draft” → will not allow the event to pass through the filter. - “source_name”
Text does not exactly matches“draft” → will allow the event to pass through the filter.
Example 2:
“order_value”: 2499
Filter Scenarios:
- “order_value”
Number greater than2000 → will allow the event to pass through the filter. - “order_value”
Number less than2000 → will not allow the event to pass through the filter. - “order_value”
Number greater than or equal to2499 → will allow the event to pass through the filter. - “order_value”
Number less than or equal to2499 → will allow the event to pass through the filter. - “order_value”
Number equals2499 → will allow the event to pass through the filter. - “order_value”
Number not equals2499 → will not allow the event to pass through the filter.
Data Transformation
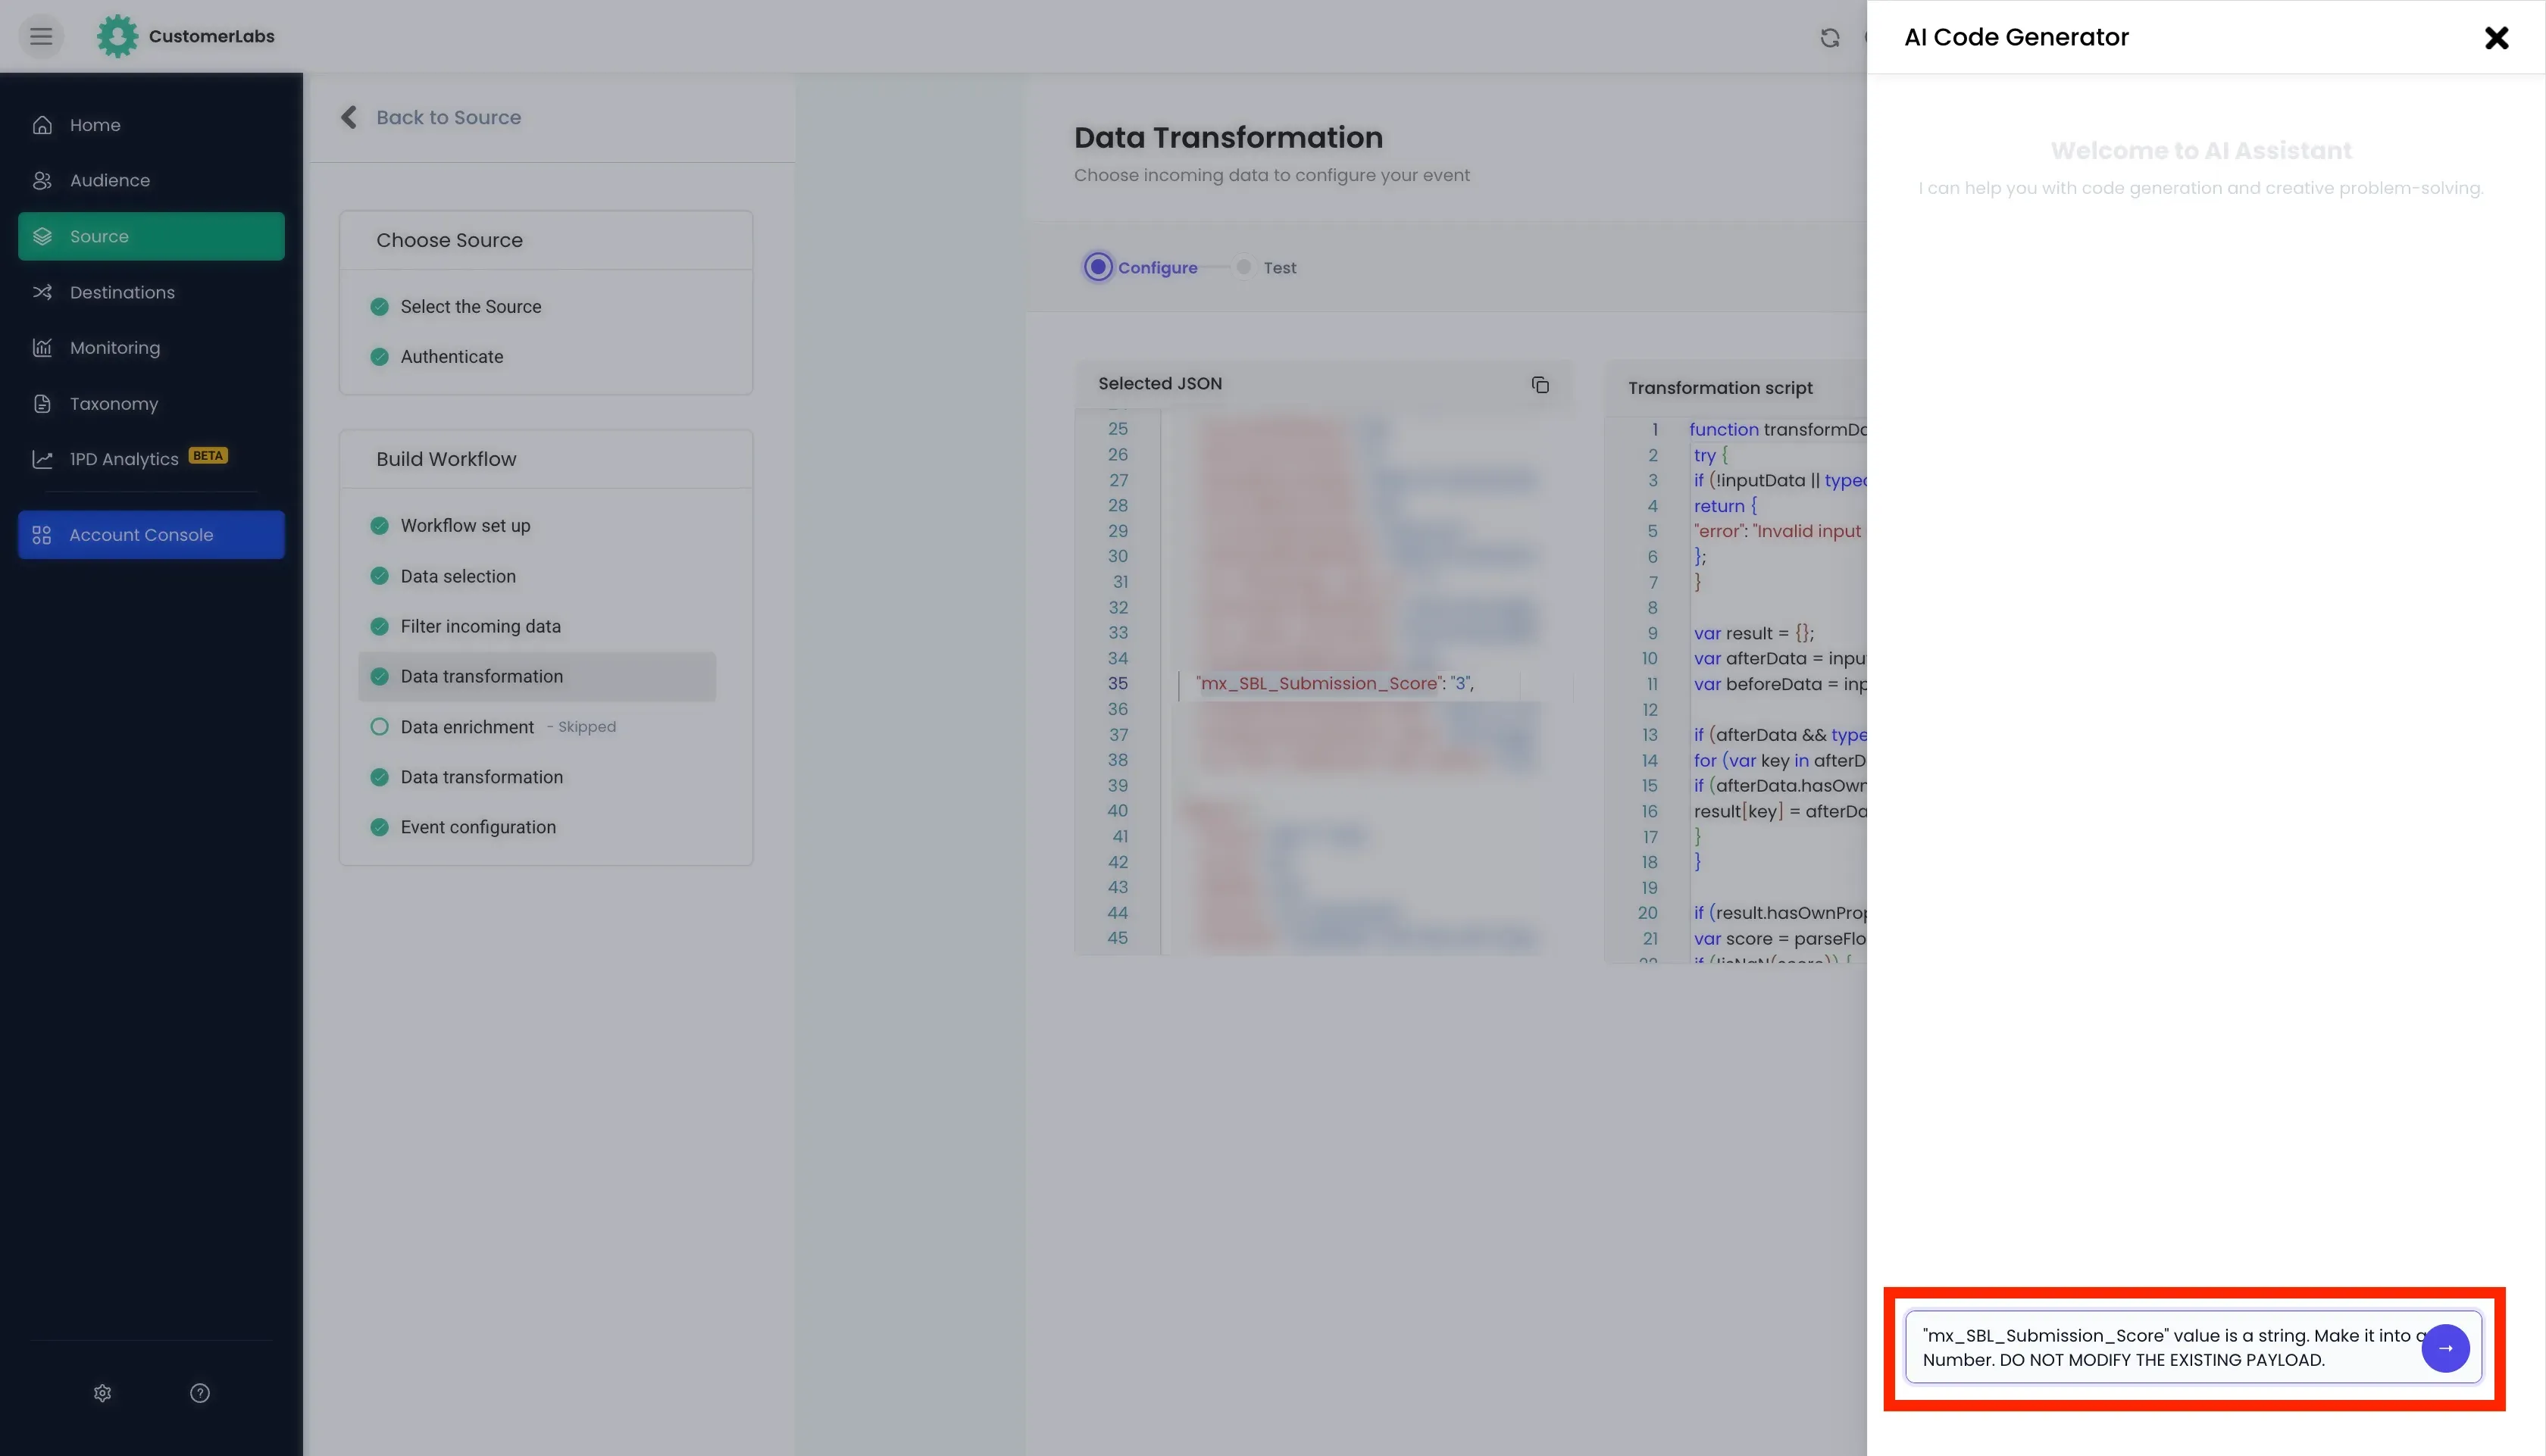
Section titled “Data Transformation”Data transformation allows you to modify the incoming data using JavaScript functions. You can generate the JavaScript function using the the AI assistant with few prompts.
Data Transformation prompt to AI Assistant
Section titled “Data Transformation prompt to AI Assistant”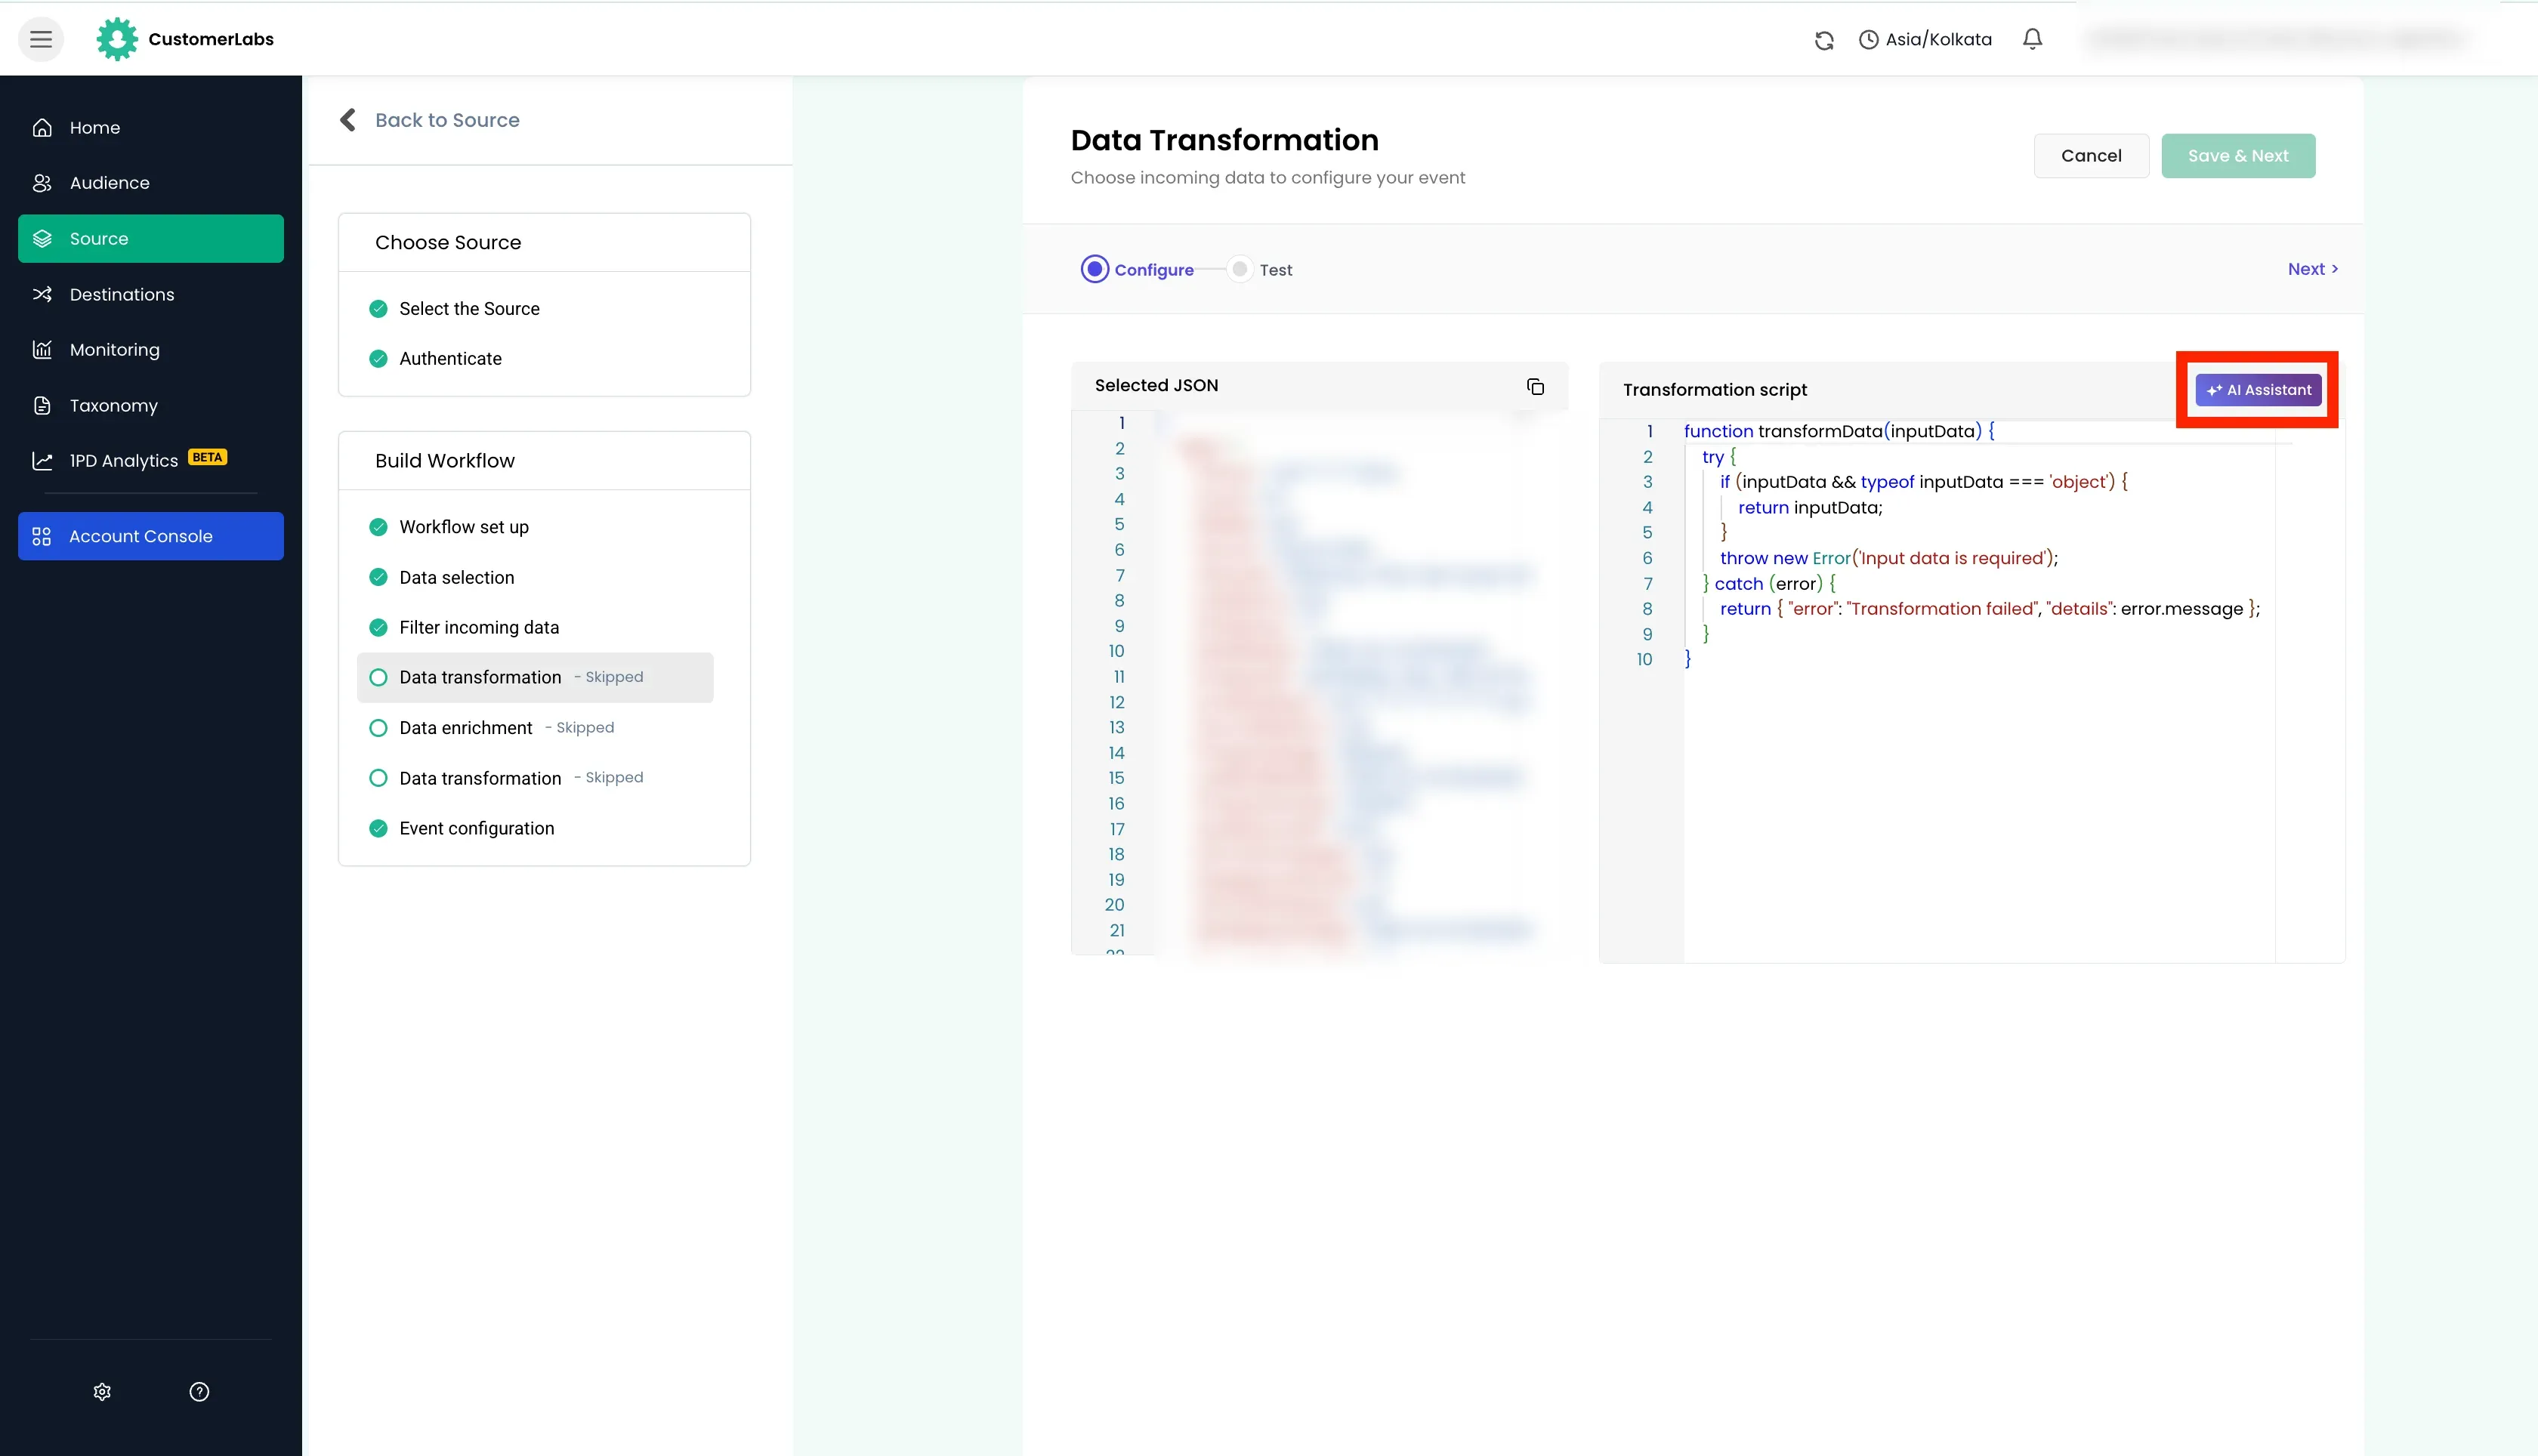
Basic Use cases:
- If
valuefield is received as a string, it can be transformed to a number. - Sum the product prices of all the products in the payload and store it in a new variable to get the total price.
Advanced Use cases:
- If product details are received as a string in individual keys, it can be grouped and transformed to a array of objects.
- If basic filter conditions in “Filter incoming data” section are not enough, you can use data transformation to set up advanced filters using code and if they do not pass the conditions, make the payload empty which will stop the event from triggering.
Testing the data transformation:
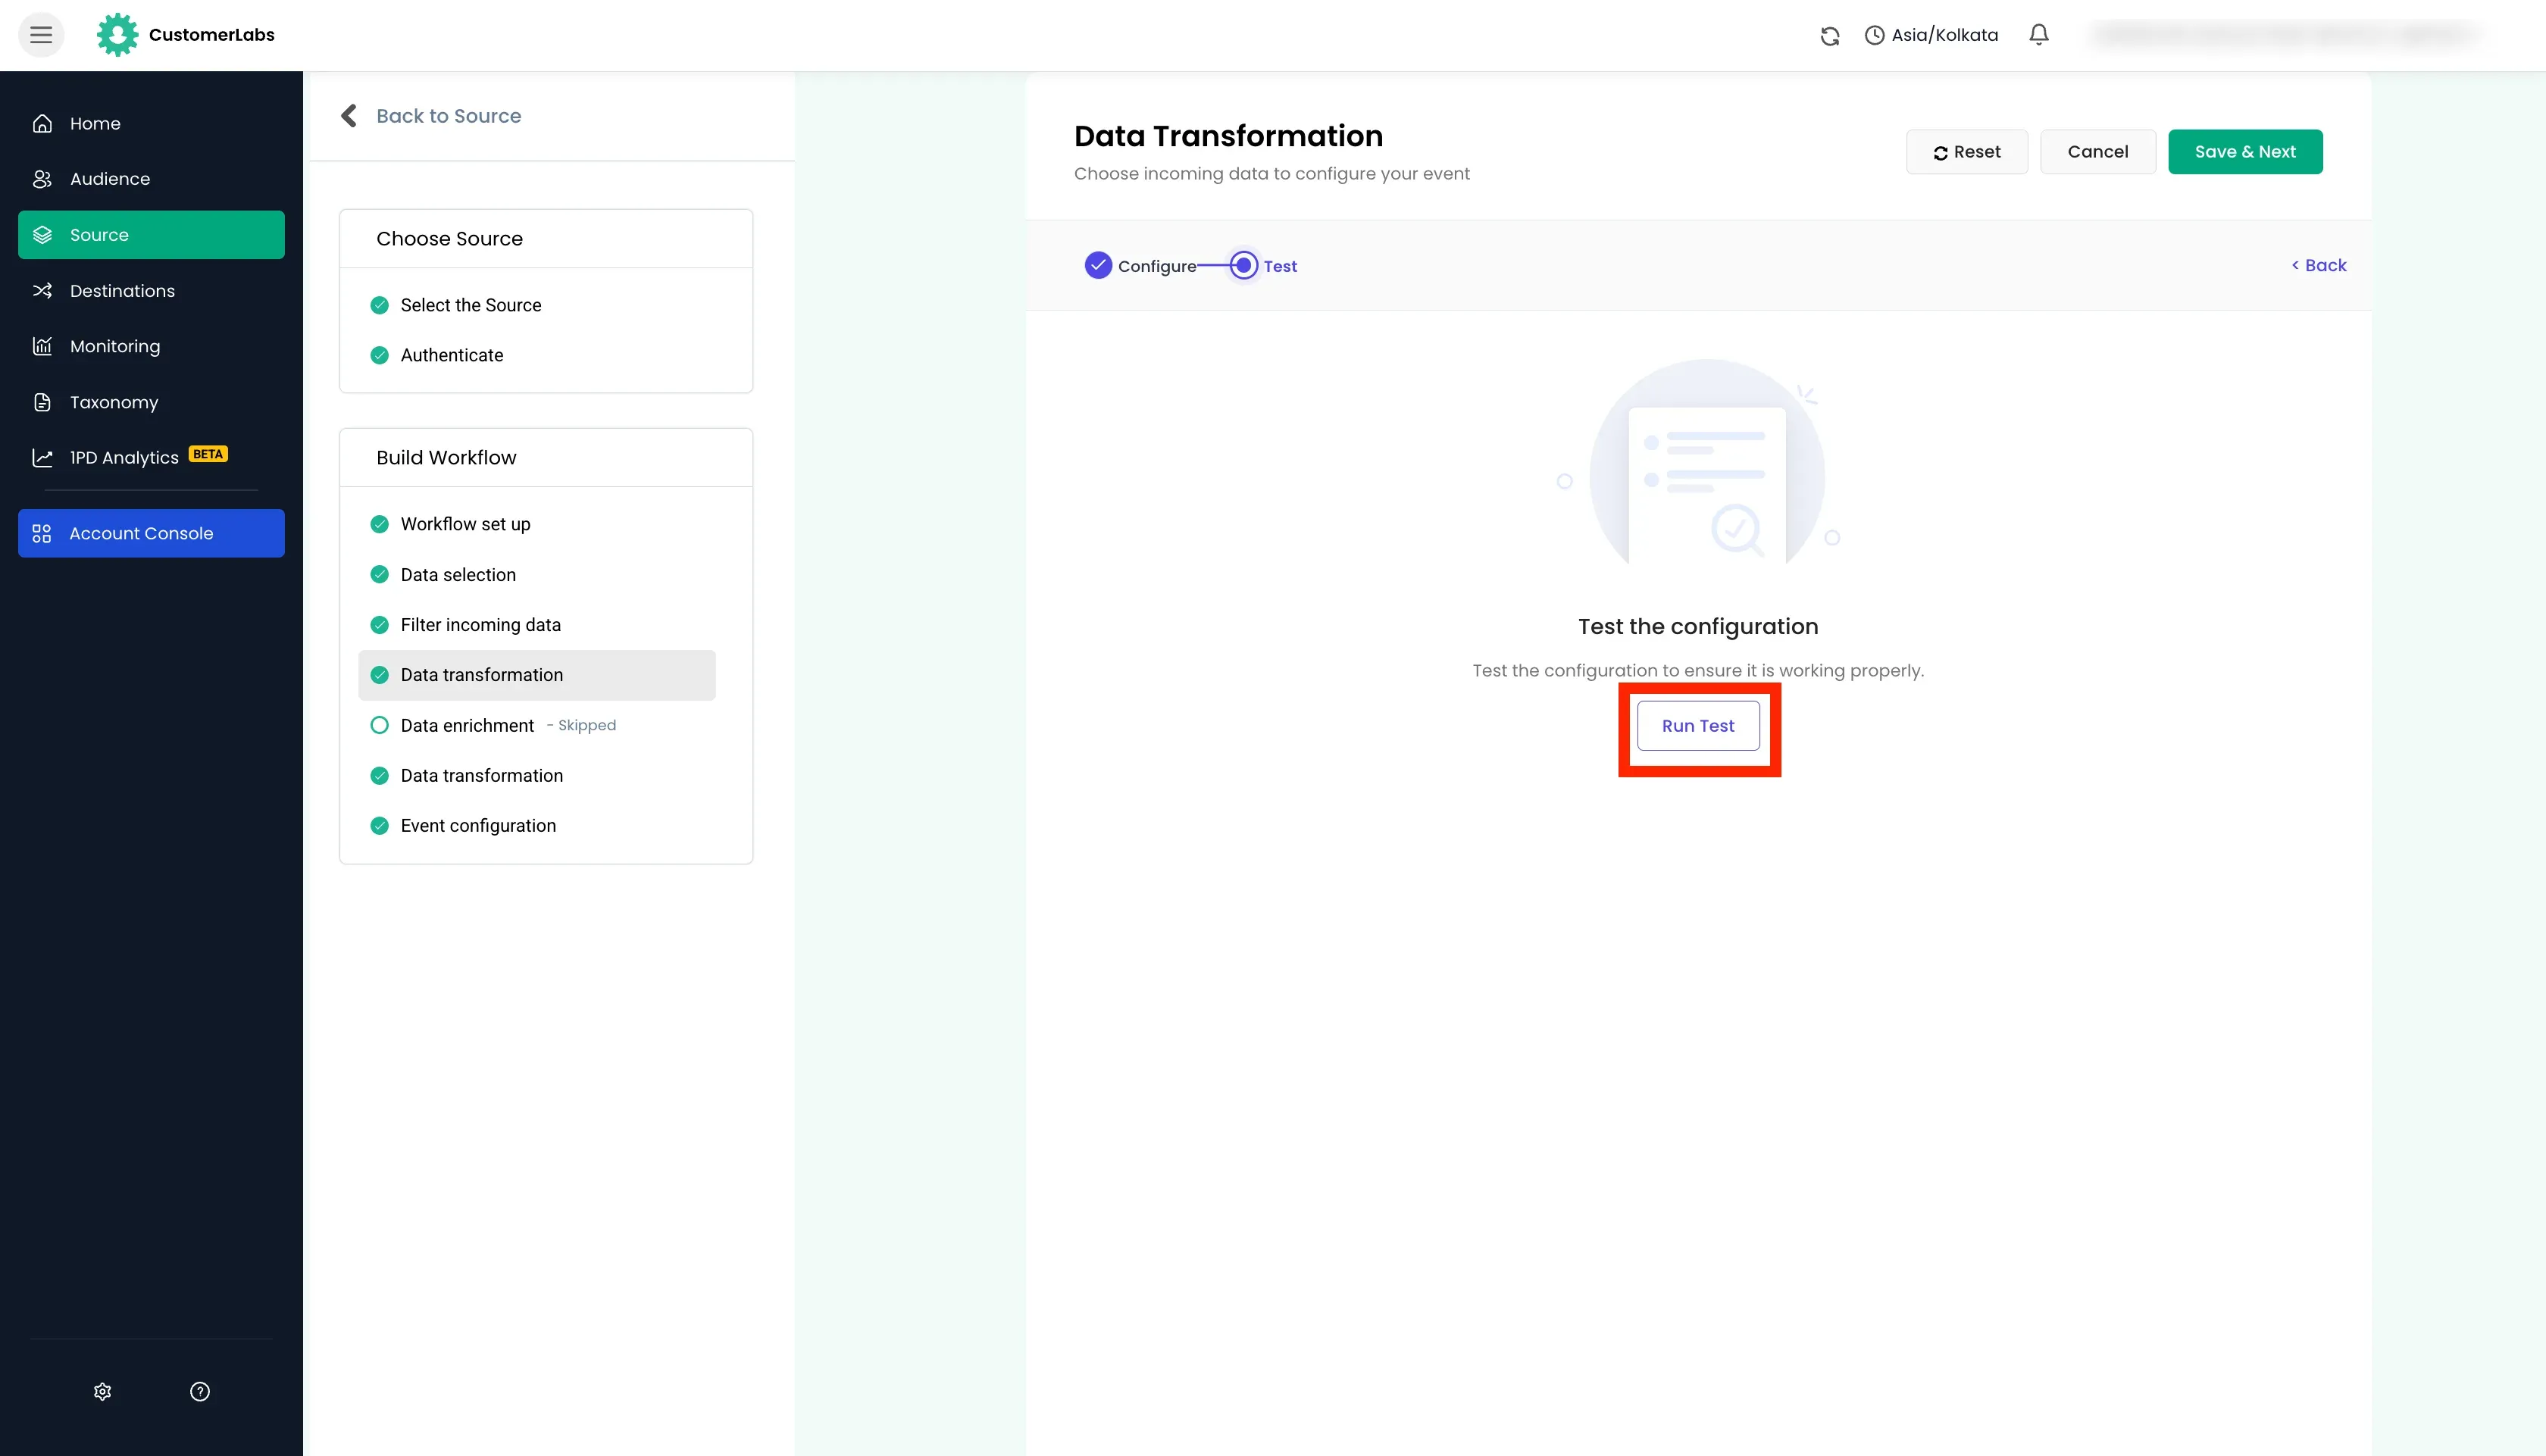
Section titled “Testing the data transformation:”After the AI assistant generates the JavaScript function, you can test it using the testing section. Click “Next” and click on “Run Test” section.
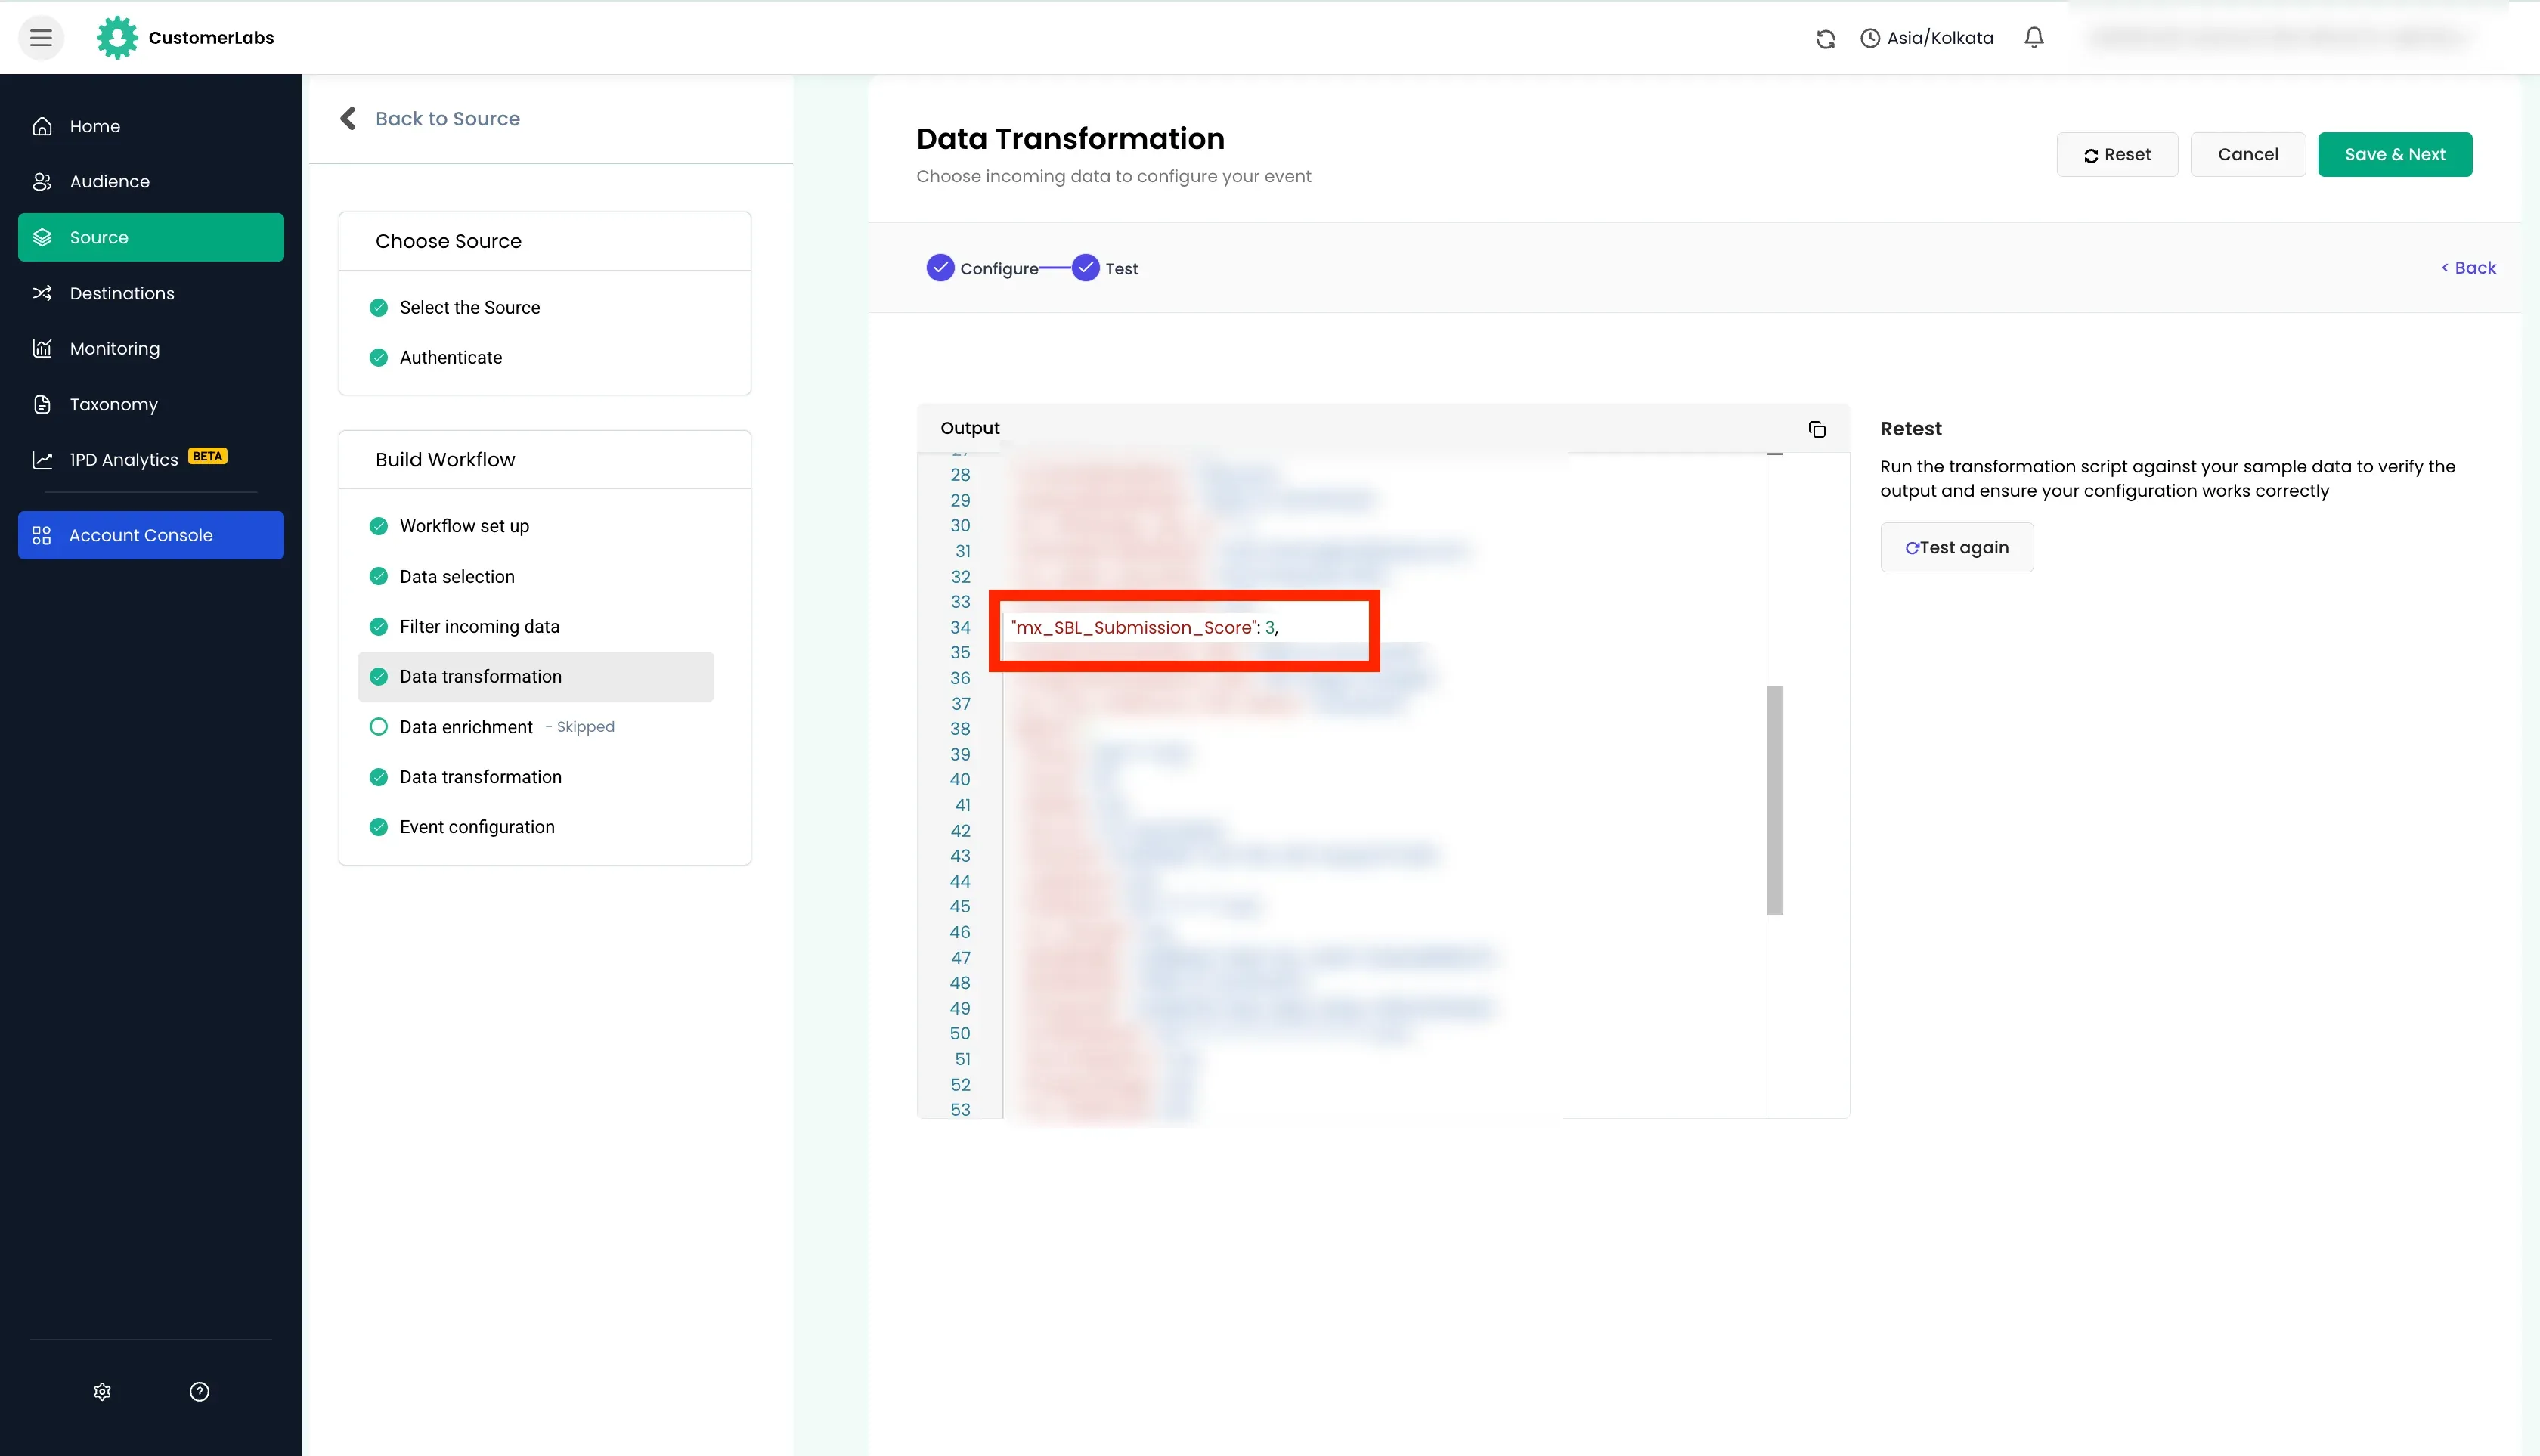
After testing, the transformed data will be displayed. Check the payload if the transformation is as expected.
There are 2 data transformation sections in the workflow builder:
- Before the
Data Enrichmentsection - After the
Data Enrichmentsection
This was intentionally given to modify the raw payload and enriched payload allowing maximum flexibility.
Example
Section titled “Example”Example 1: Basic Use Case
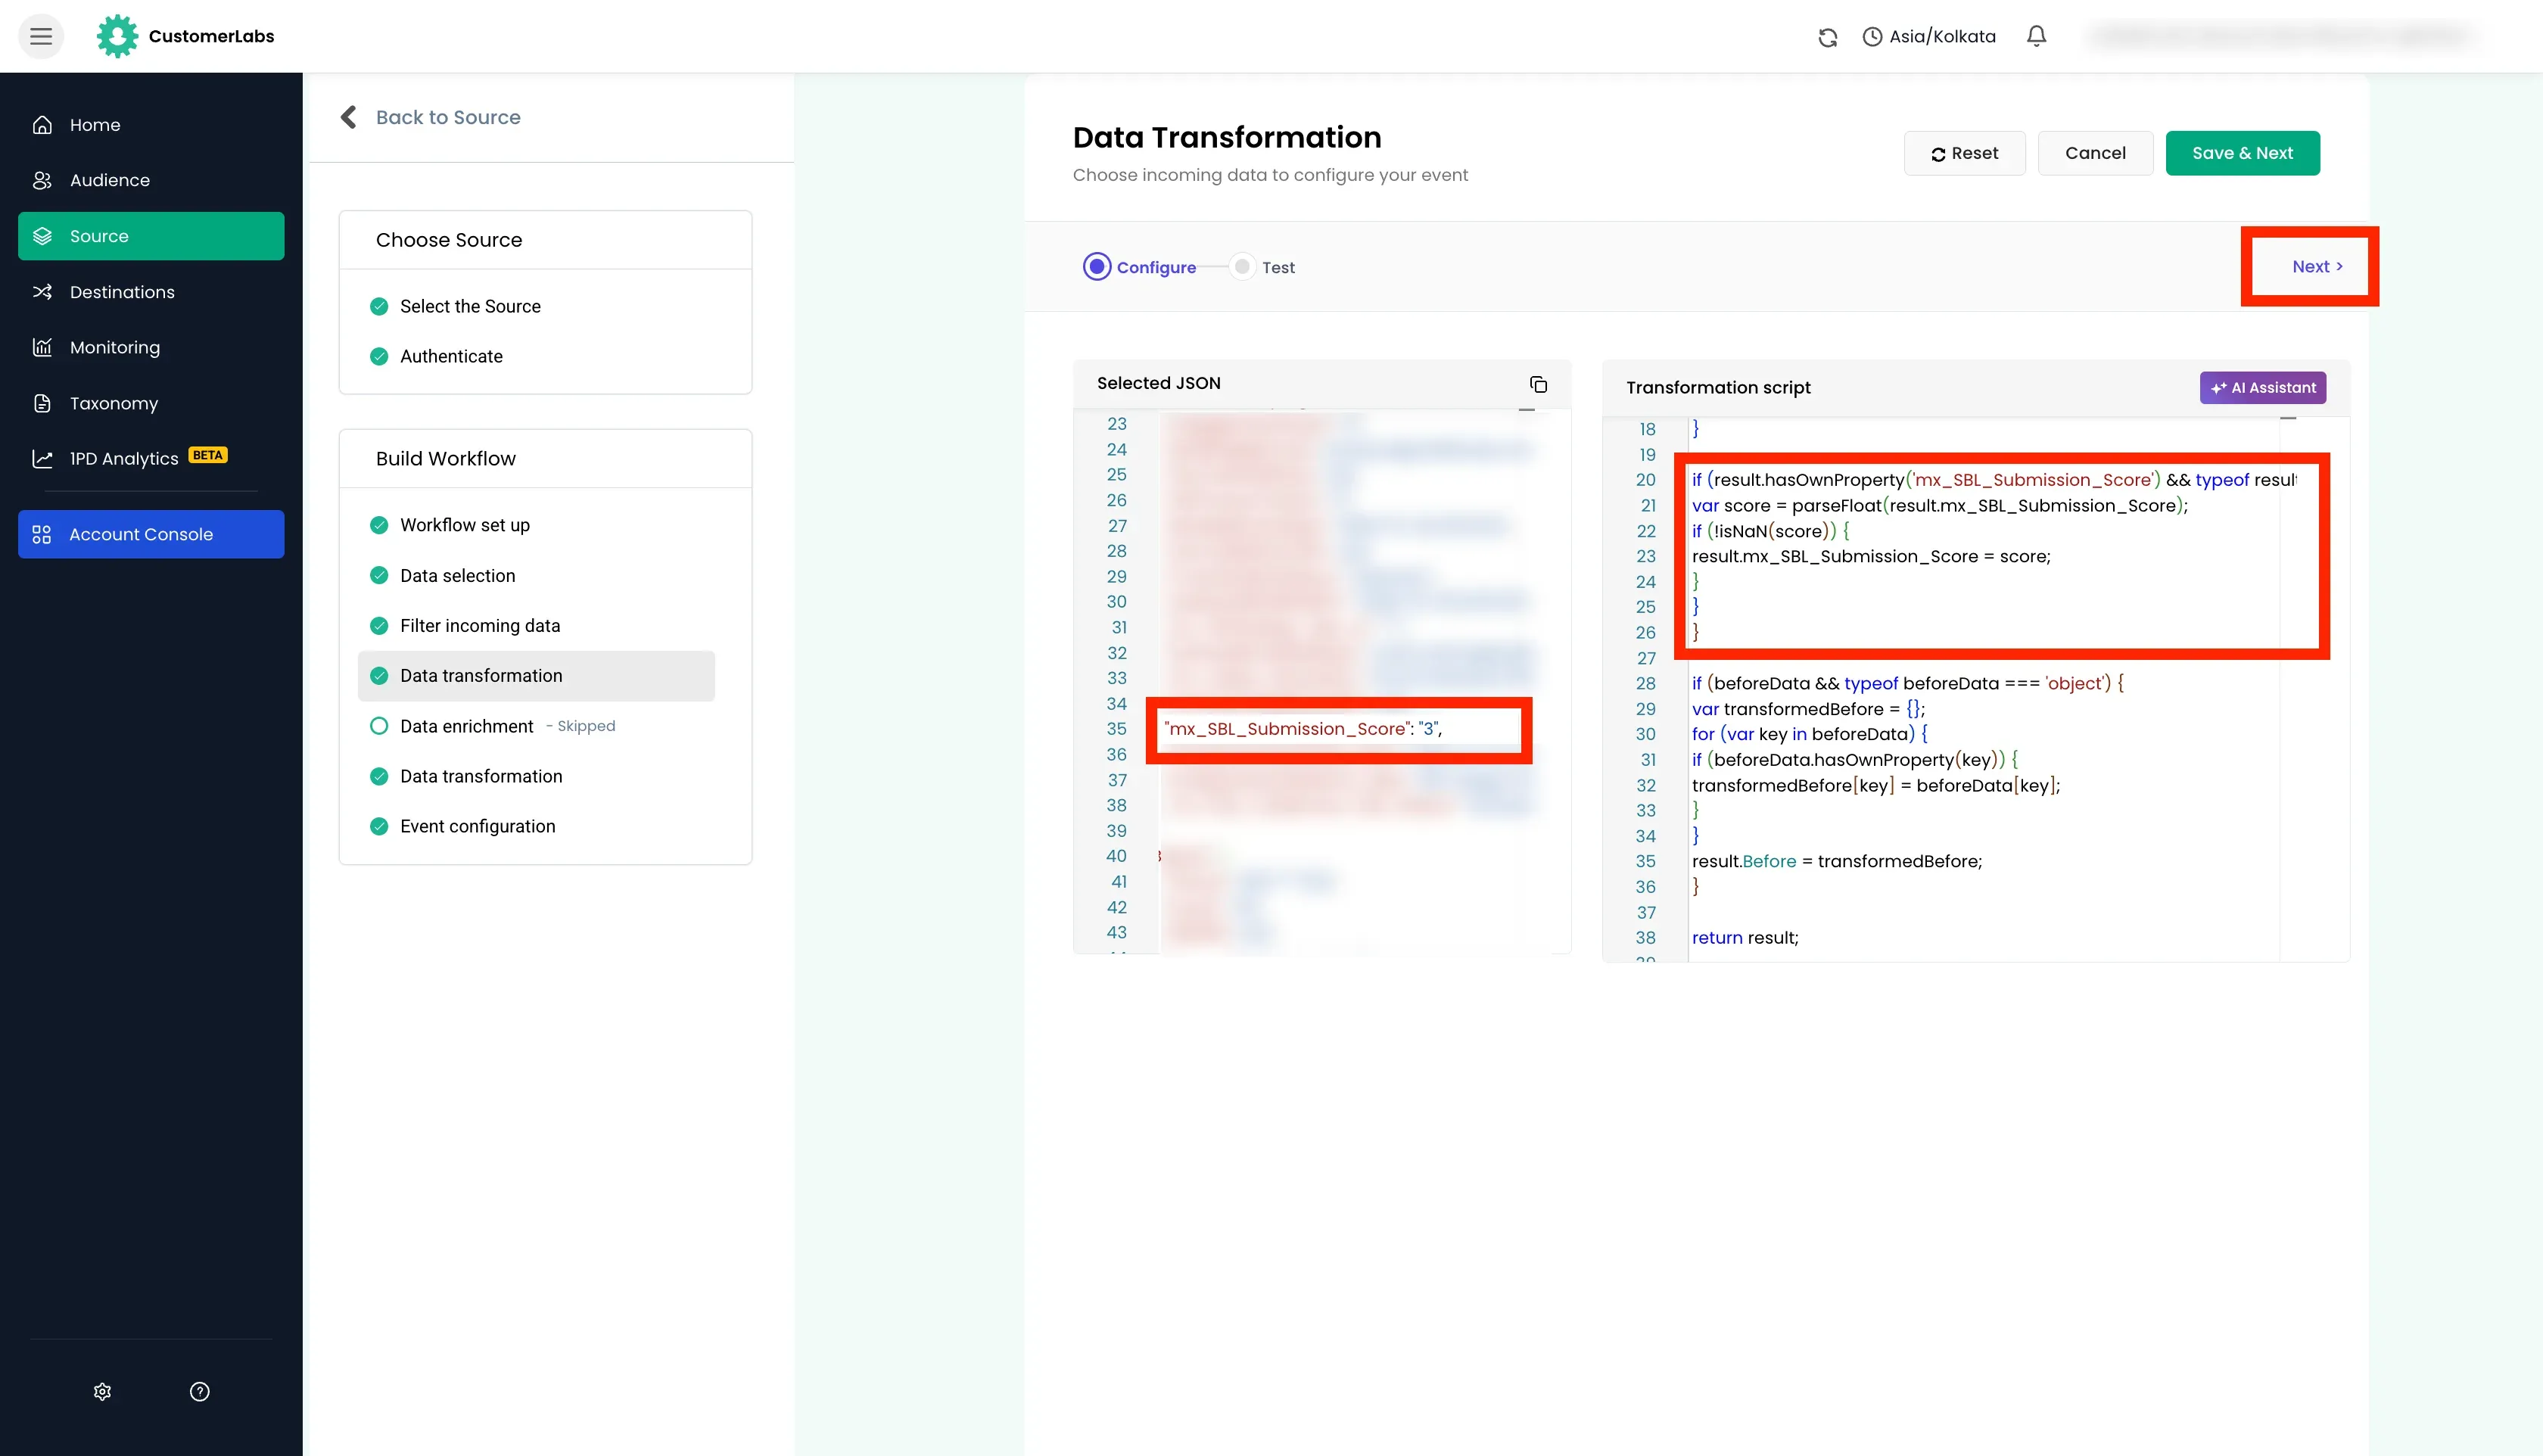
Section titled “Example 1: Basic Use Case”Here we will use the data transformation section to modify the data type from string to number.
The prompt was given to the AI assistant to modify the data type of the field from string to number.
Click on the “tick” icon to paste the code in the data transformation section. Click “Next” to test the code.
Here we can see the data type is now a Number. Earlier, it was score was wrapped in quotes making it a string. Now its without quotes making it a number.
Example 2: Advanced Use Case
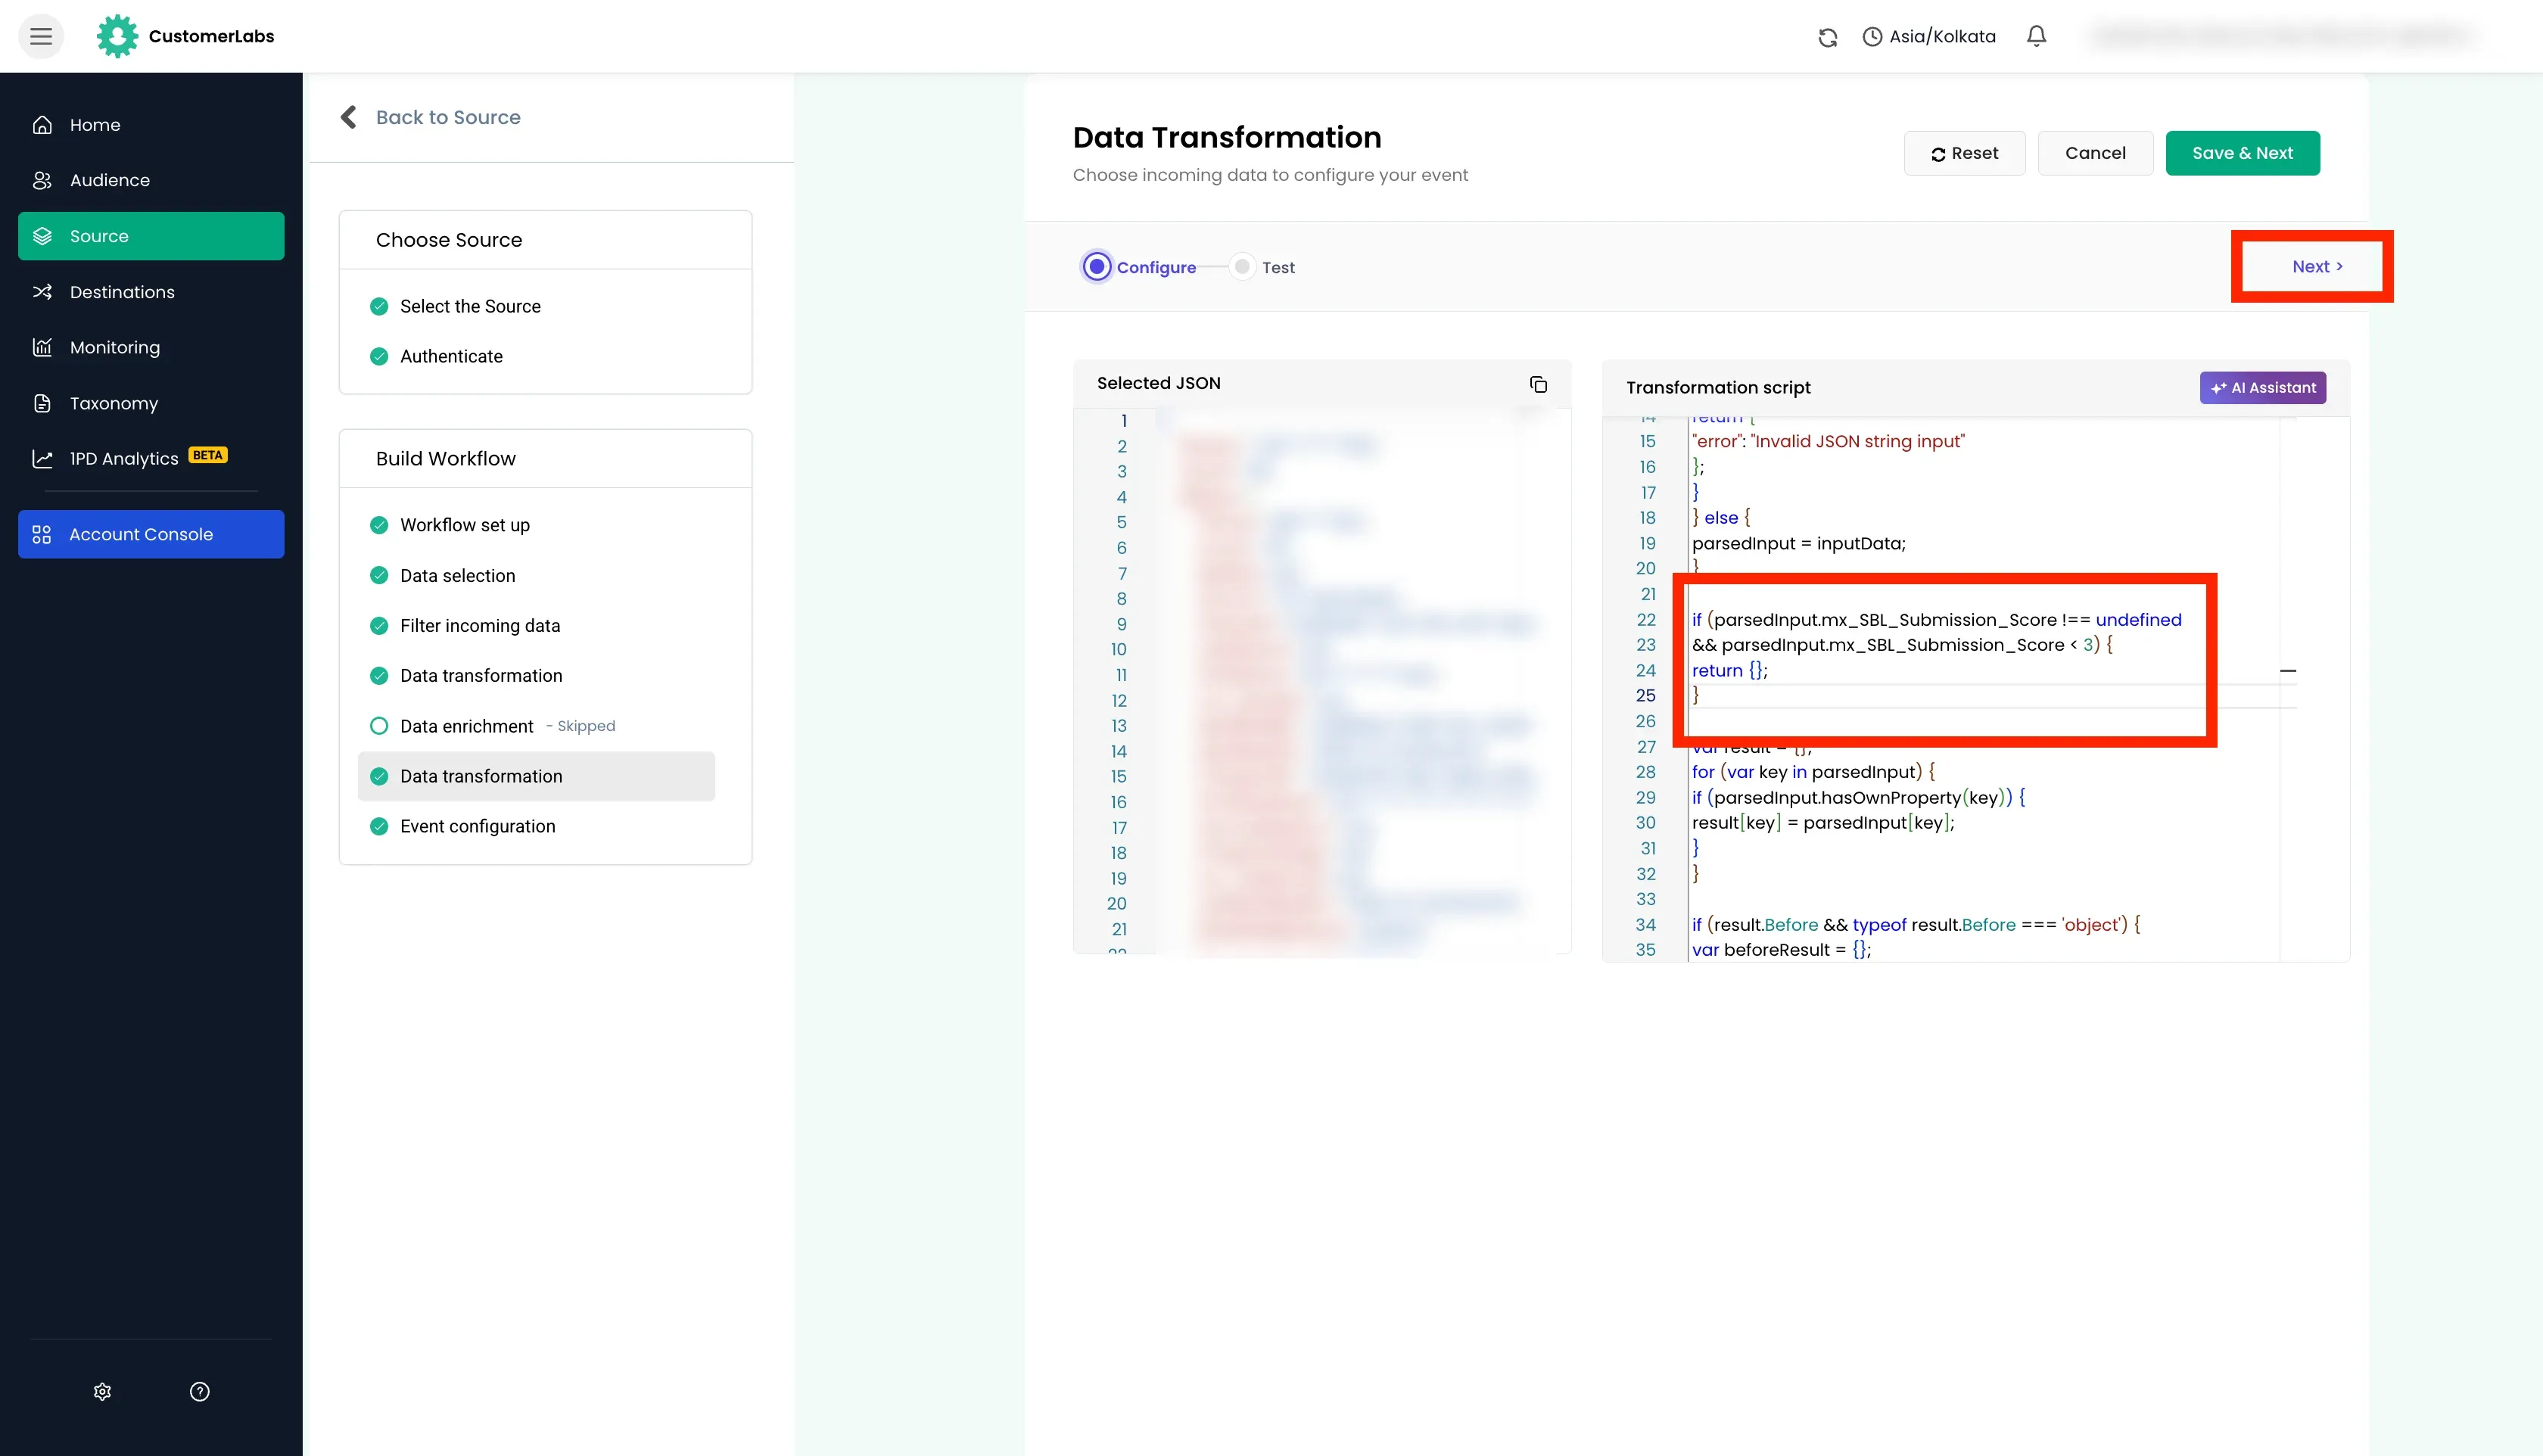
Section titled “Example 2: Advanced Use Case”Here we will use the data transformation section to make the payload empty if the the value is less than 3.
The prompt was given to AI assistant to return a empty payload if the value is less than 3.
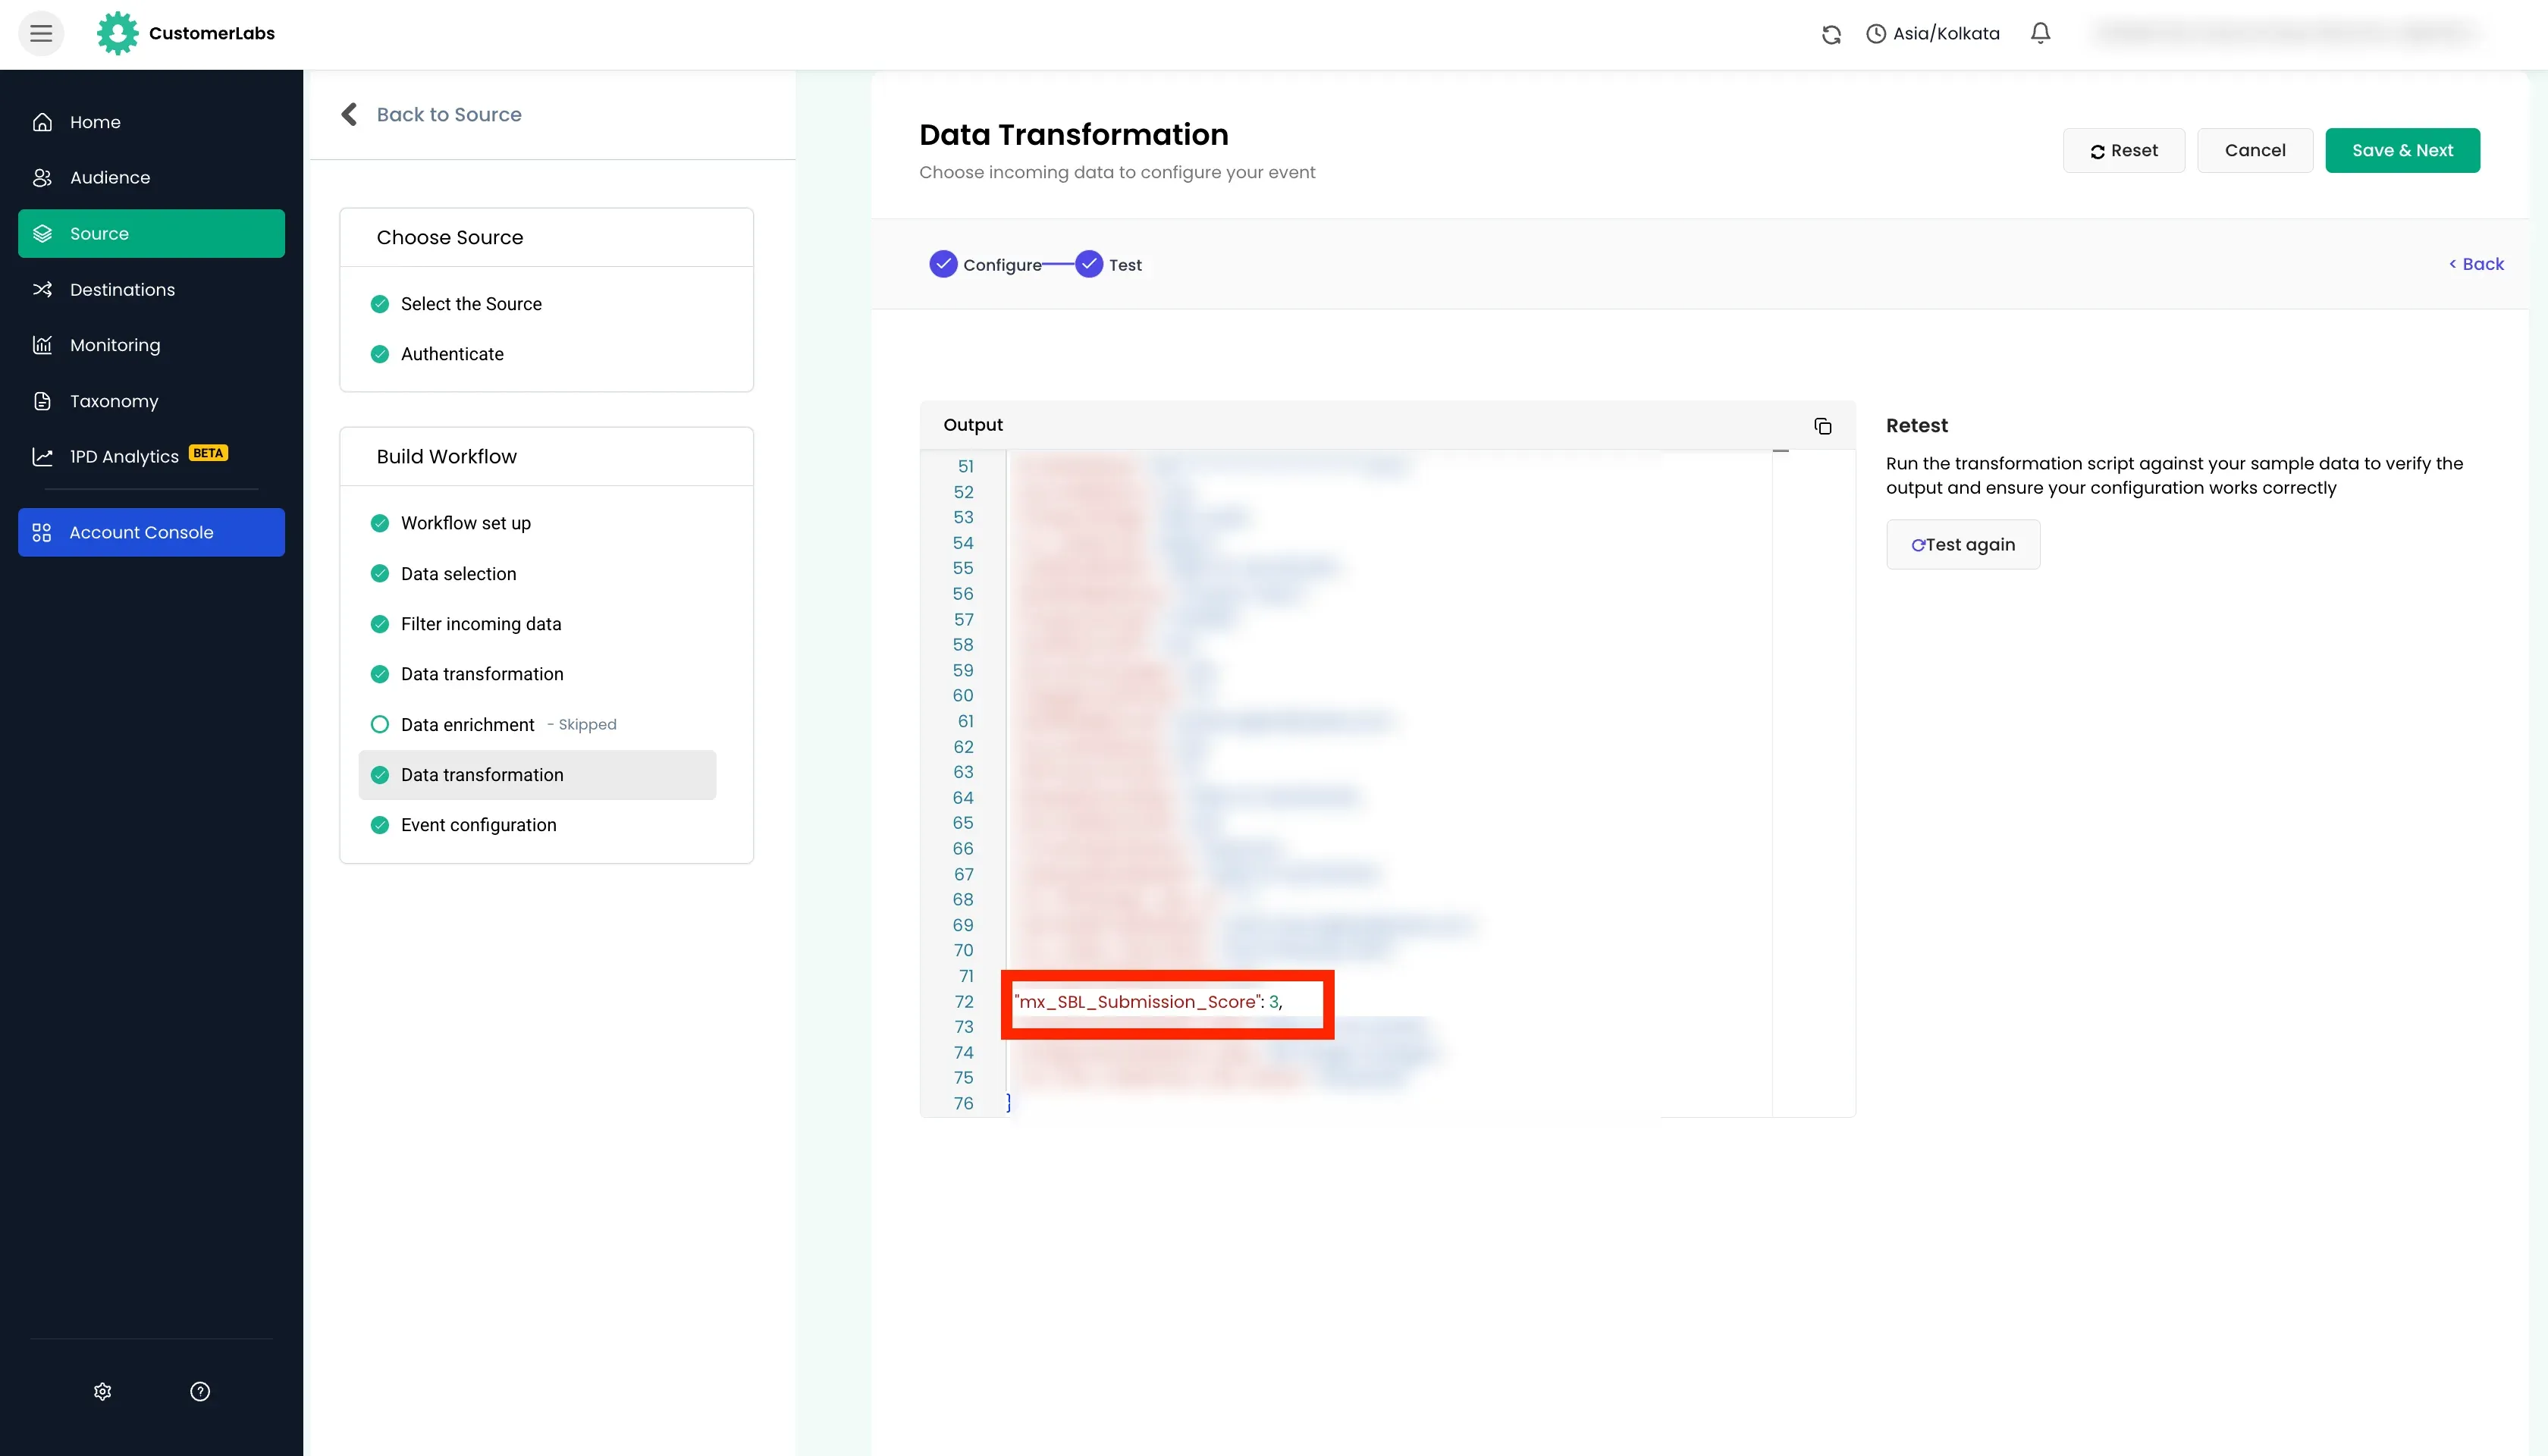
Since the value is equal to 3, the original payload was returned.
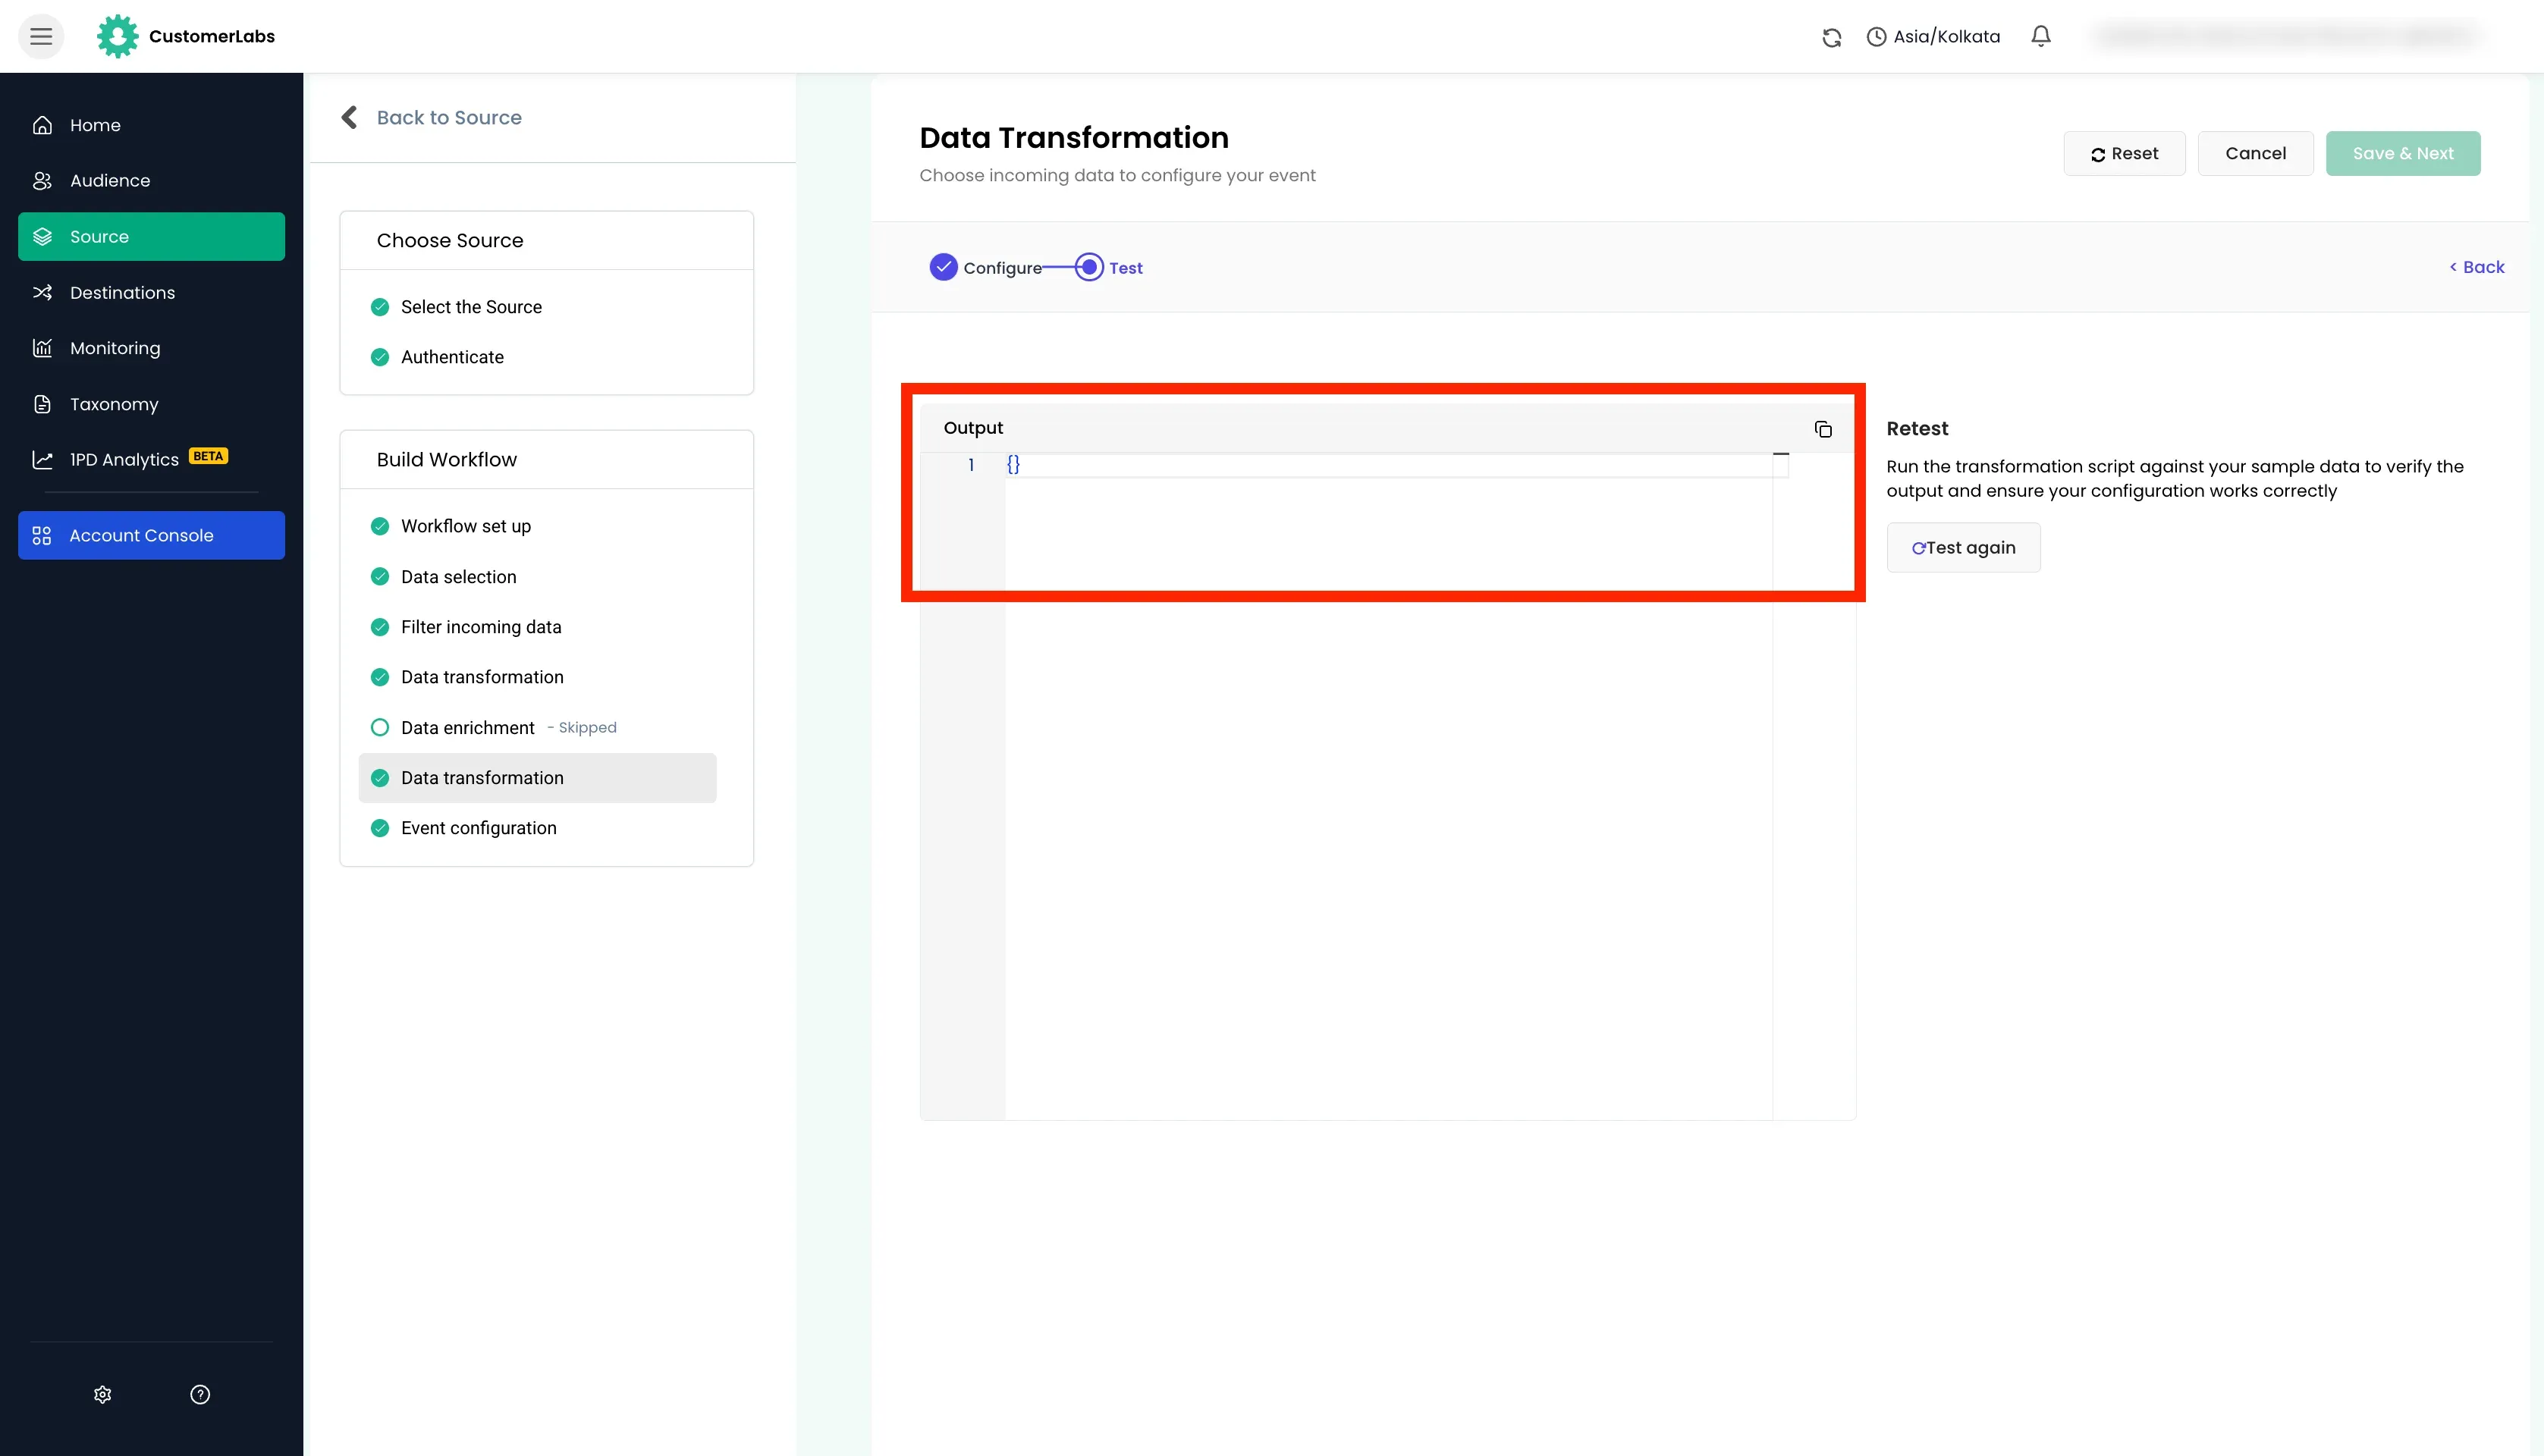
Here, when the transformation was tested for value 2, the payload was returned as empty.
Data Enrichment
Section titled “Data Enrichment”Data enrichment is used to add additional context to the payload received from the source platform.
Common Use cases and examples
Section titled “Common Use cases and examples”- The payload received only partial data, the identifier such as
emailcan be sent to your CRM to fetch the complete data. - You are using any other services where additional data is stored and you want to fetch the data from that service in the payload.
- A request for credit facility was submitted by user and you want to fetch the credit score of the user before triggering the event.
Data enrichment values
Section titled “Data enrichment values”method: HTTP method (GET/POST) for the enrichment API callurl: Endpoint of the external data providerQuery Parameters: Pass identifiers likeemail=ordomain=to the APIHeaders: Header data usually contains Authentication tokensData: Request body — typically containing the event payload fields
Testing the data enrichment
Section titled “Testing the data enrichment”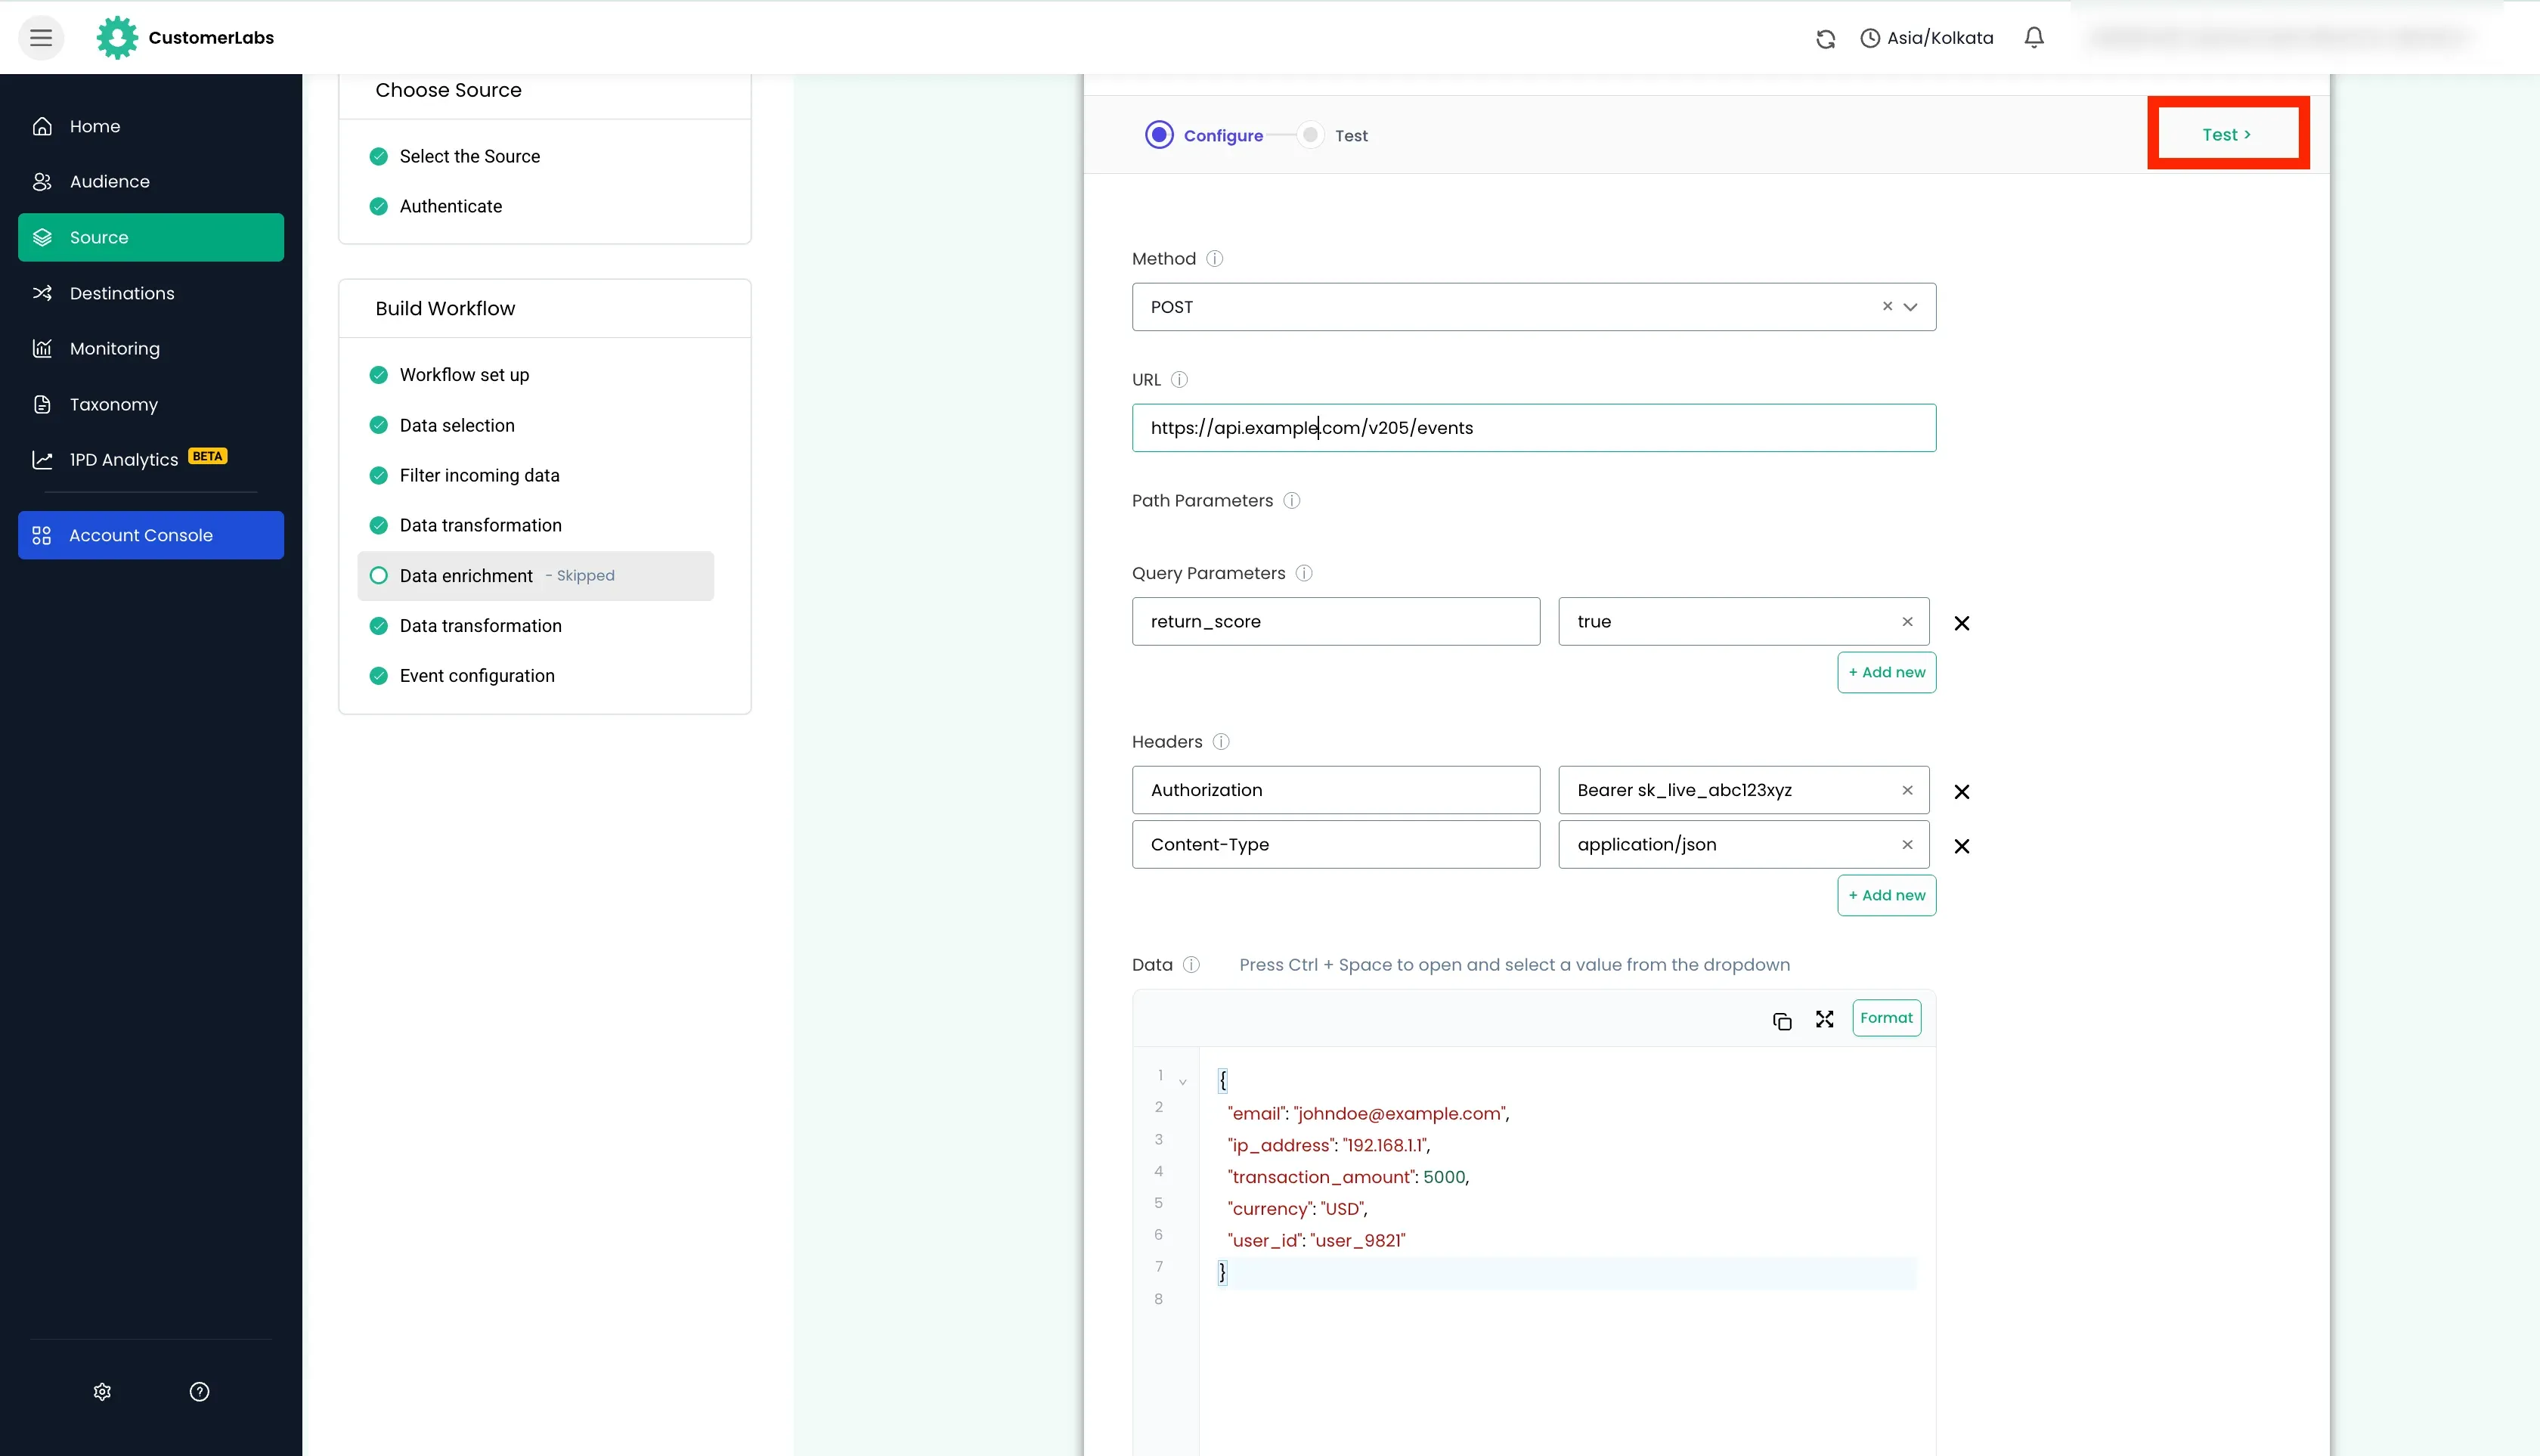
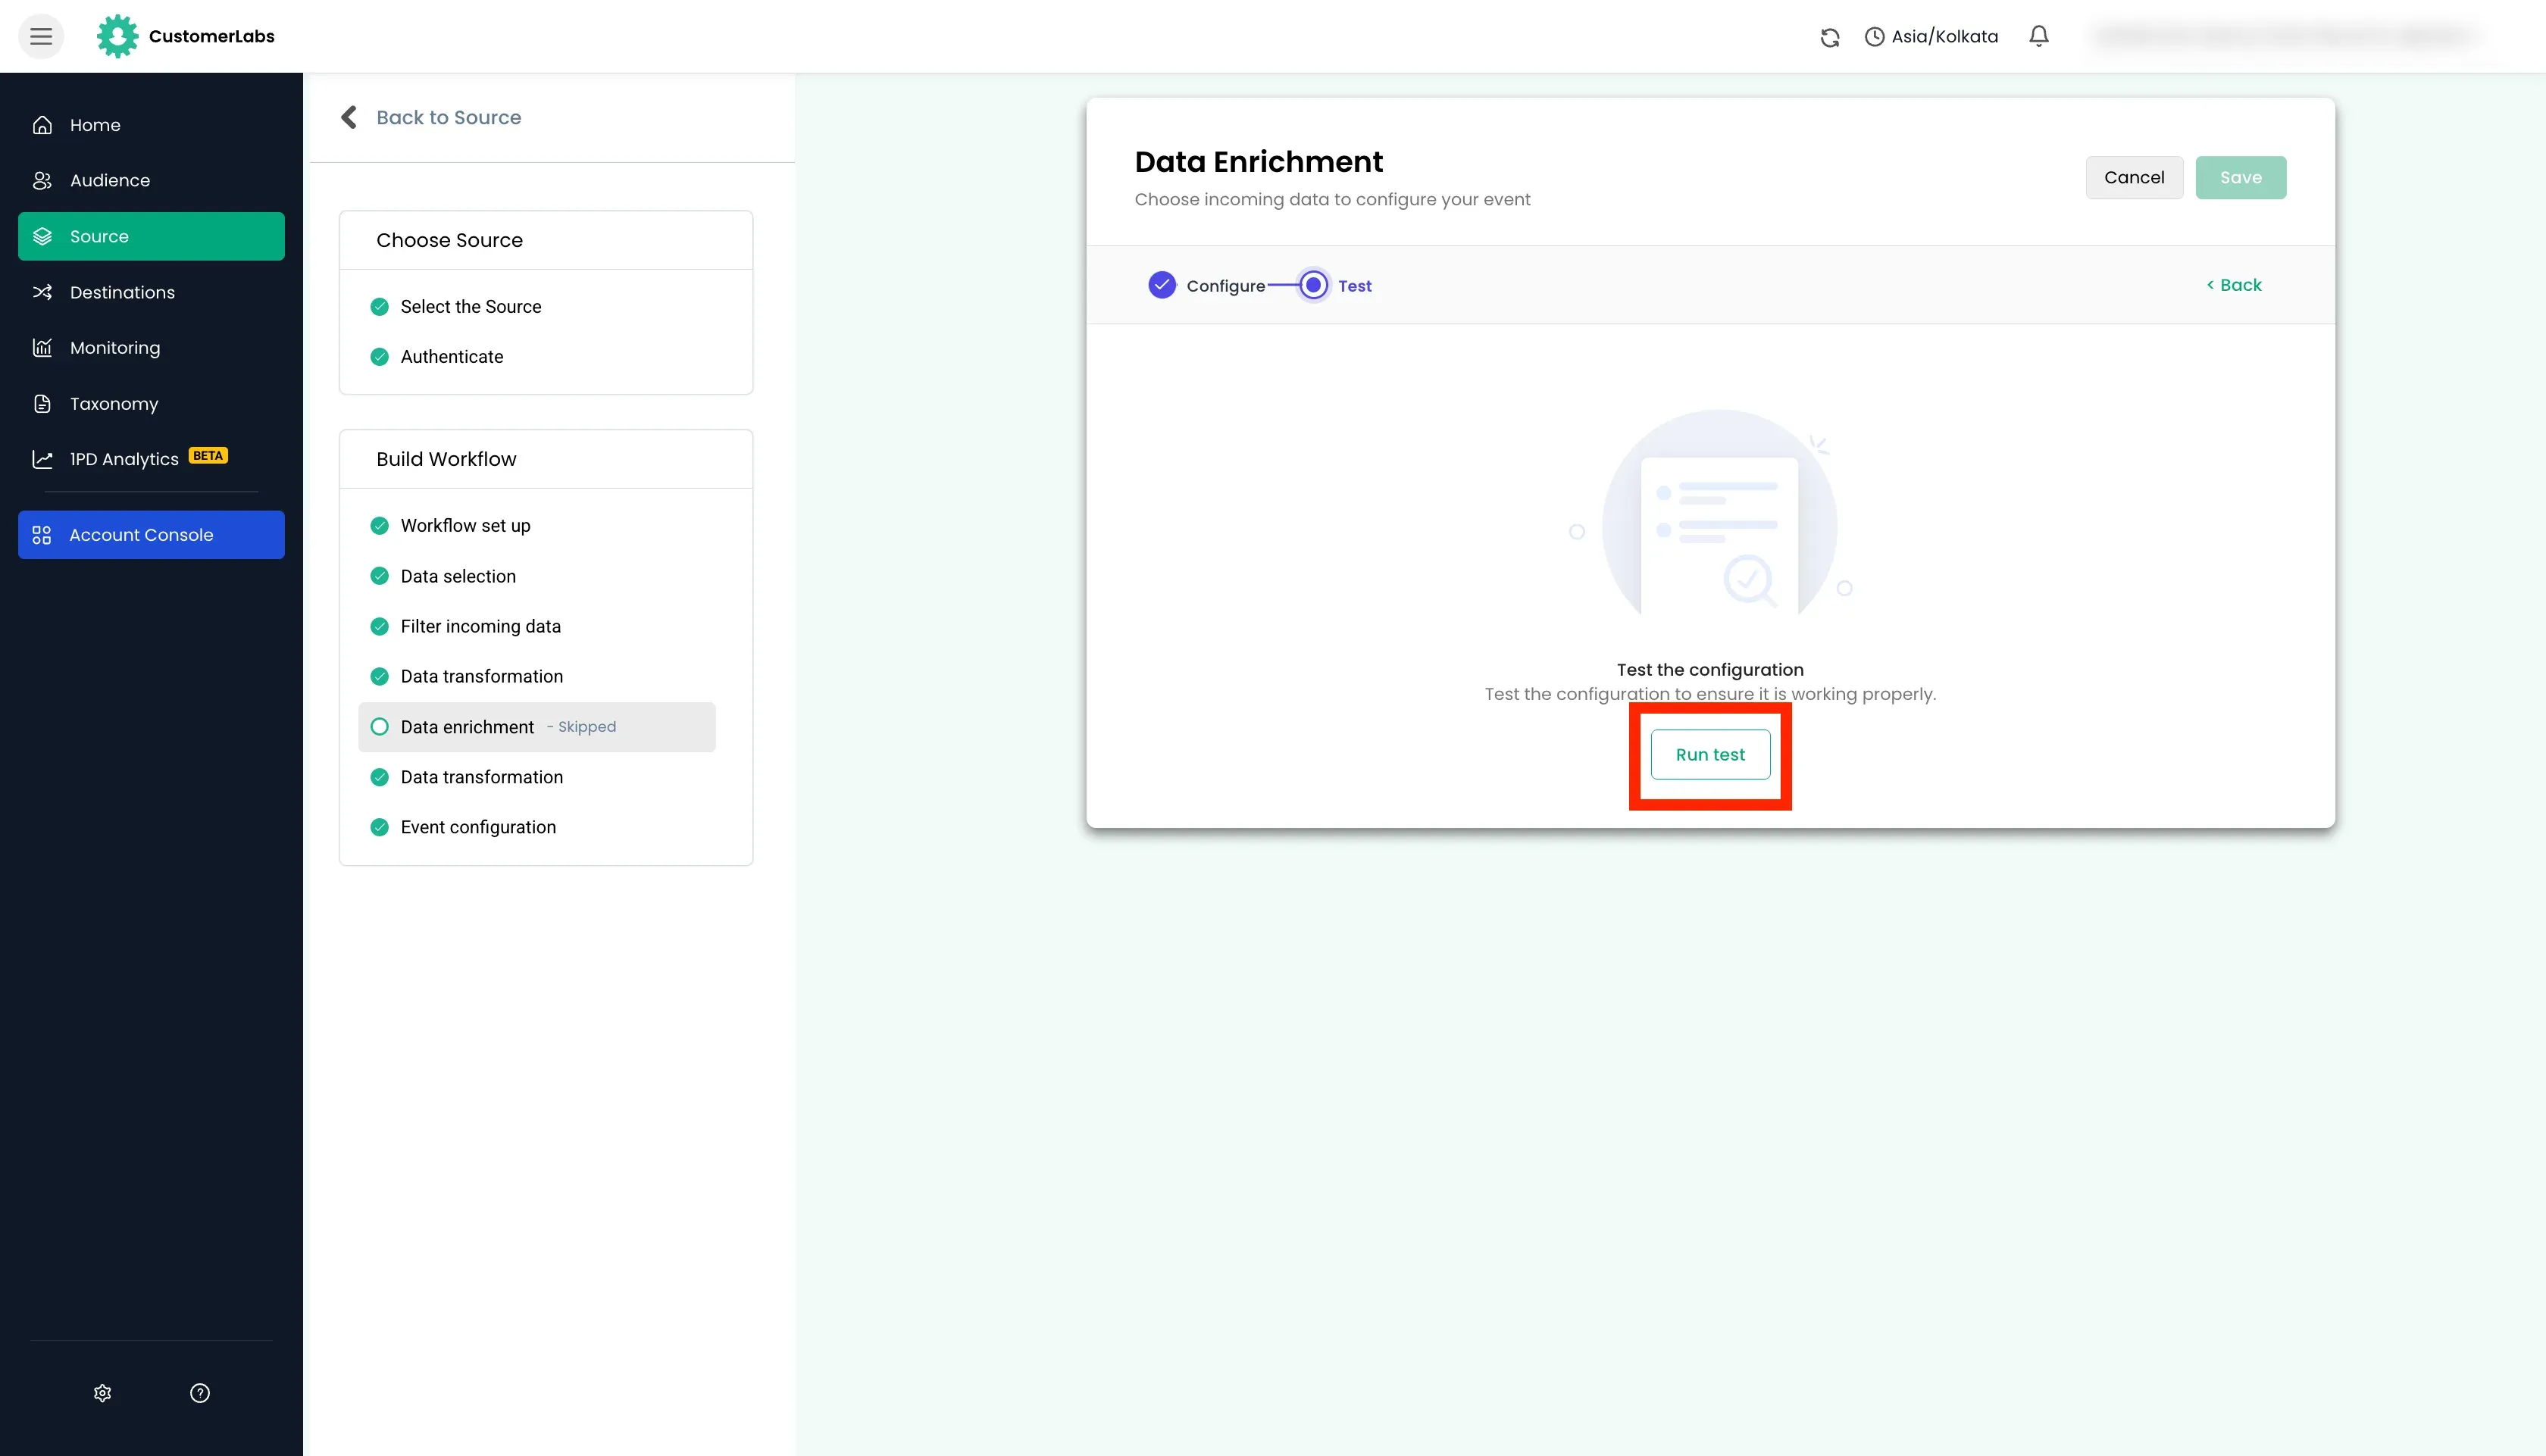
The response from the external server gets appended to the original payload data. Click “Save” button to append the enriched data to the original payload.