If you want the GA4 purchase event on Shopify to record every order correctly in 2026, you need a custom pixel under Settings → Customer Events. Theme code and the Additional Scripts field no longer reach checkout, and from 26 August 2026 they stop firing entirely on non-Plus stores.
Your add-to-cart events look fine and product views look fine. Only the purchase event is missing — or Google Analytics reports roughly half the orders Shopify shows.
That exact pattern is the most-repeated complaint on the Shopify Community right now, and the thread titles barely change from one market to the next: “GA4 suddenly stopped tracking purchases.” “Missing sales in Google Analytics when connected via the Google & YouTube app.” “Purchase not tracked correctly.” Merchants describe watching add-to-cart and view-item arrive perfectly while the one event that carries revenue never shows up — which is usually the first sign that Shopify GA4 ecommerce tracking needs a second look, not a full rebuild.
The short answer on the GA4 purchase event on Shopify in 2026: it has to run through a custom pixel under Settings → Customer Events. Theme code and the Additional Scripts field no longer reach checkout, and from 26 August 2026 they stop firing entirely on non-Plus stores — silently, with no error and no prompt.
This guide walks through Shopify Google Analytics conversion tracking end to end — what changed, how to set it up correctly, and how to verify it’s actually working.
If you operate in regions with strict privacy regulations (like the EU, UK, or Quebec), user consent rejections will naturally suppress browser tracking. However, the core technical failures below apply to every store regardless of location.
What changed for Shopify GA4 tracking in 2026
The three changes, in order of urgency
Three dated changes landed between July and August 2026. Together they moved the purchase event from something you install to something you have to reconcile.
26 August 2026 — checkout.liquid and Additional Scripts stop firing. For stores on Basic, Shopify and Advanced plans, checkout.liquid, the Additional Scripts field and script tags on the Thank You and Order Status pages stop working. Shopify Plus stores passed this deadline on 28 August 2025. The failure is silent: no error, no warning, just missing orders. Shopify’s upgrade guide documents the migration path.
July 2026 — Shopify started sending purchases to GA4 server-side. Any store with the Google & YouTube app installed now has its purchase event pushed from Shopify’s servers to GA4 through Google’s Data Manager API, bypassing the browser entirely. It activated automatically, with no setup step and no opt-in.
17 August 2026 — the native integration gained four events. The Google & YouTube app added view_item_list, view_cart, remove_from_cart and add_shipping_info, as reported by PPC Land. Only the purchase event travels server-side; every upper-funnel event still depends on the browser.
The practical consequence is worth stating plainly, because most guides have not caught up with it yet. The default failure mode has flipped. For years the problem was missing purchases. Now, if you run the Google & YouTube app alongside your own purchase tag, the more likely problem is the same order counted twice.
Two rules for 2026 setup
-
Pick ONE browser-side method. Running the Google & YouTube app alongside a manual gtag snippet or GTM tag is the leading cause of duplicated or missing ecommerce events on Shopify.
-
Do not build anything new on theme code for checkout. It works for storefront pages and stops at the checkout boundary. Starting 26 August, it stops there permanently.
Fix the three ways the purchase event goes wrong
Almost every purchase event problem is one of three failures. Work through them in this order, because the first is now the most common and the cheapest to rule out.
Purchase event firing twice
Since July 2026, Shopify has been sending the purchase event to GA4 from its own servers for every store with the Google & YouTube app installed. If you also fire a purchase from a custom pixel, a GTM tag, or a third-party app, the same order arrives twice.
GA4 does not reliably deduplicate events arriving across separate channels. A stable, unique transaction_id is necessary, but the only complete fix is to ensure only one browser sender fires per order. If sessions in GA4 are roughly double what Shopify reports, or bounce rate has collapsed below 20%, you are looking at duplicate tags.
Purchase event not firing at all
Check where your tracking code lives. If the purchase event stopped without any deployment on your side, the likely cause is the 26 August 2026 cutoff: code in checkout.liquid or the Additional Scripts field no longer runs, and it fails silently.
Two Shopify-specific causes catch merchants off guard:
- Shop Pay can fire a checkout-step event instead of
purchase, so the order completes but never registers as revenue. - Orders placed through the Shop app frequently go untracked because the purchase event fires on your domain’s thank-you page, while the Shop app uses its own.
Beyond those, verify that transaction_id is present, check GA4 Data Filters under Admin → Data Collection, and ensure the event name is written in lower-case as exact purchase.
GA4 revenue does not match Shopify revenue
Expect a gap. A 10–20% difference between GA4 and Shopify is normal for browser-based tracking:
- Ad blockers and browser privacy restrictions suppress events before they fire.
- GA4 has a 24–48 hour processing lag.
- GA4 reports in UTC by default, while Shopify uses your store’s local timezone, shifting midnight orders to adjacent days.
Work through those causes before rebuilding anything. Whatever gap survives is genuine data loss, which server-side collection recovers.
Purchase is the event that carries revenue, so it’s the one this guide focuses on. Worth knowing, though: the same pixel setup extends to add-to-cart, product search, wishlist activity and product view tracking through CustomerLabs’ no-code event tracker, and to Meta Pixel and Conversions API for ad platform optimization, without a second implementation.
Set up Shopify and GA4 with CustomerLabs
The setup runs in three parts: connect the store, wire up GA4, then configure the purchase workflow. Steps follow the Shopify integration guide and the GA4 integration guide.
Step 1 — Connect your Shopify store
Follow the complete CustomerLabs Shopify Integration Doc for step-by-step app installation.
Before you start: if your store uses a one-click checkout tool — Fastrr (Shiprocket), Gokwik, Shopflo or FlexyPe — complete that tool’s own integration steps first. These platforms redirect checkout to a different domain, so bottom-funnel events need pushing to the dataLayer or the CustomerLabs webhook separately.
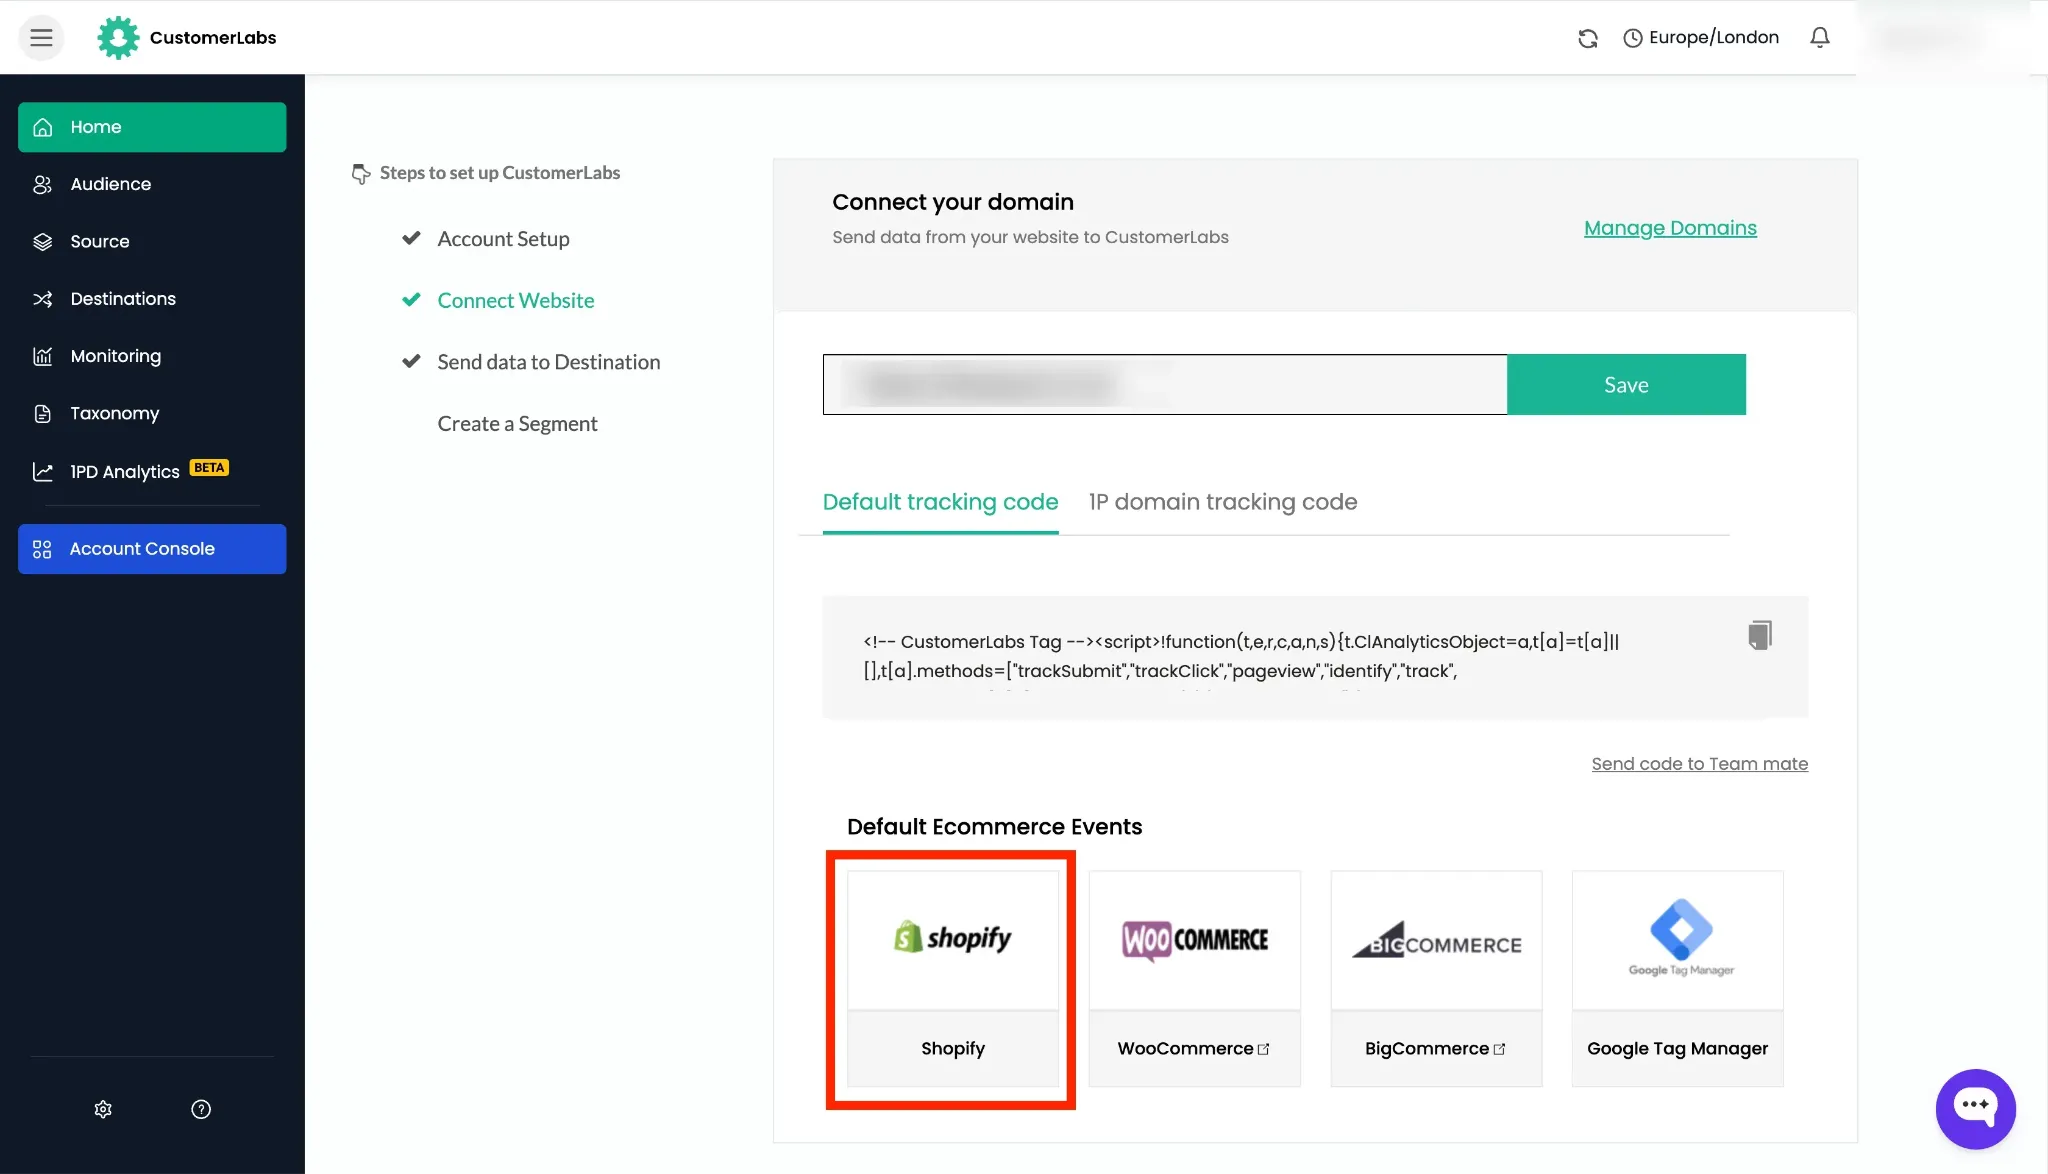
- Enable the integration. In CustomerLabs, open Default Ecommerce Events → Shopify. Click Add Domain, then copy your domain from Shopify → Domain Settings and paste it in. Click Next.
-
Install the app. Click Open Shopify App Store, install the CustomerLabs app, then authenticate with your account email and API key. The key is at CustomerLabs → Account Settings → API Key.
-
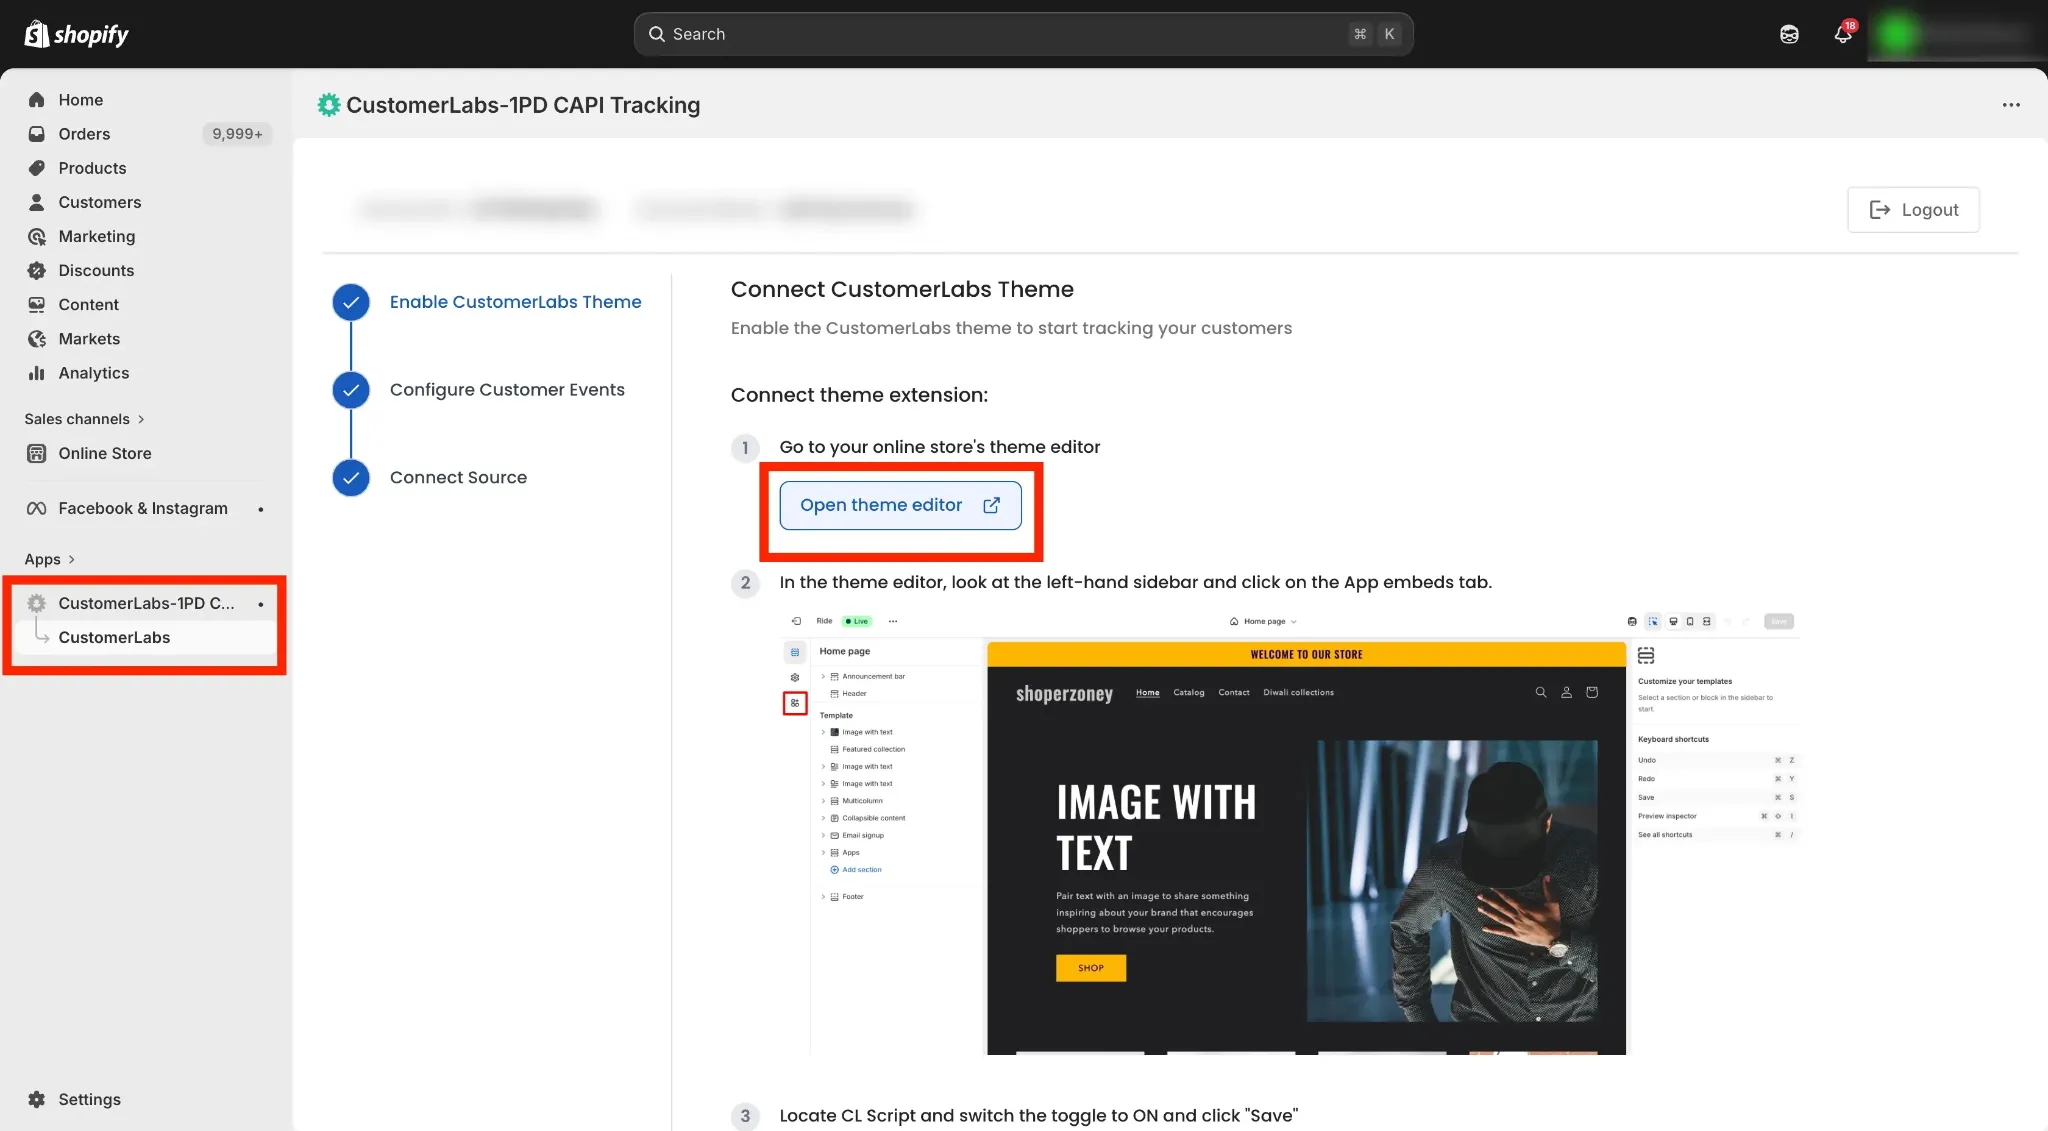
Add the theme script. Open the Theme Editor — or Online Store → Themes → Edit theme — go to App embeds, enable the CL script toggle, and Save.
-
Add product tracking. On your Default Product Page, go to Template → Add Section → Apps tab and select the CL Product block. Save.
- Add the checkout extension. Open Checkout Settings → Customize → App Embeds. Scroll to the bottom of the left sidebar and click the + on Checkout Extension, then add it to the Thank You page. Save.
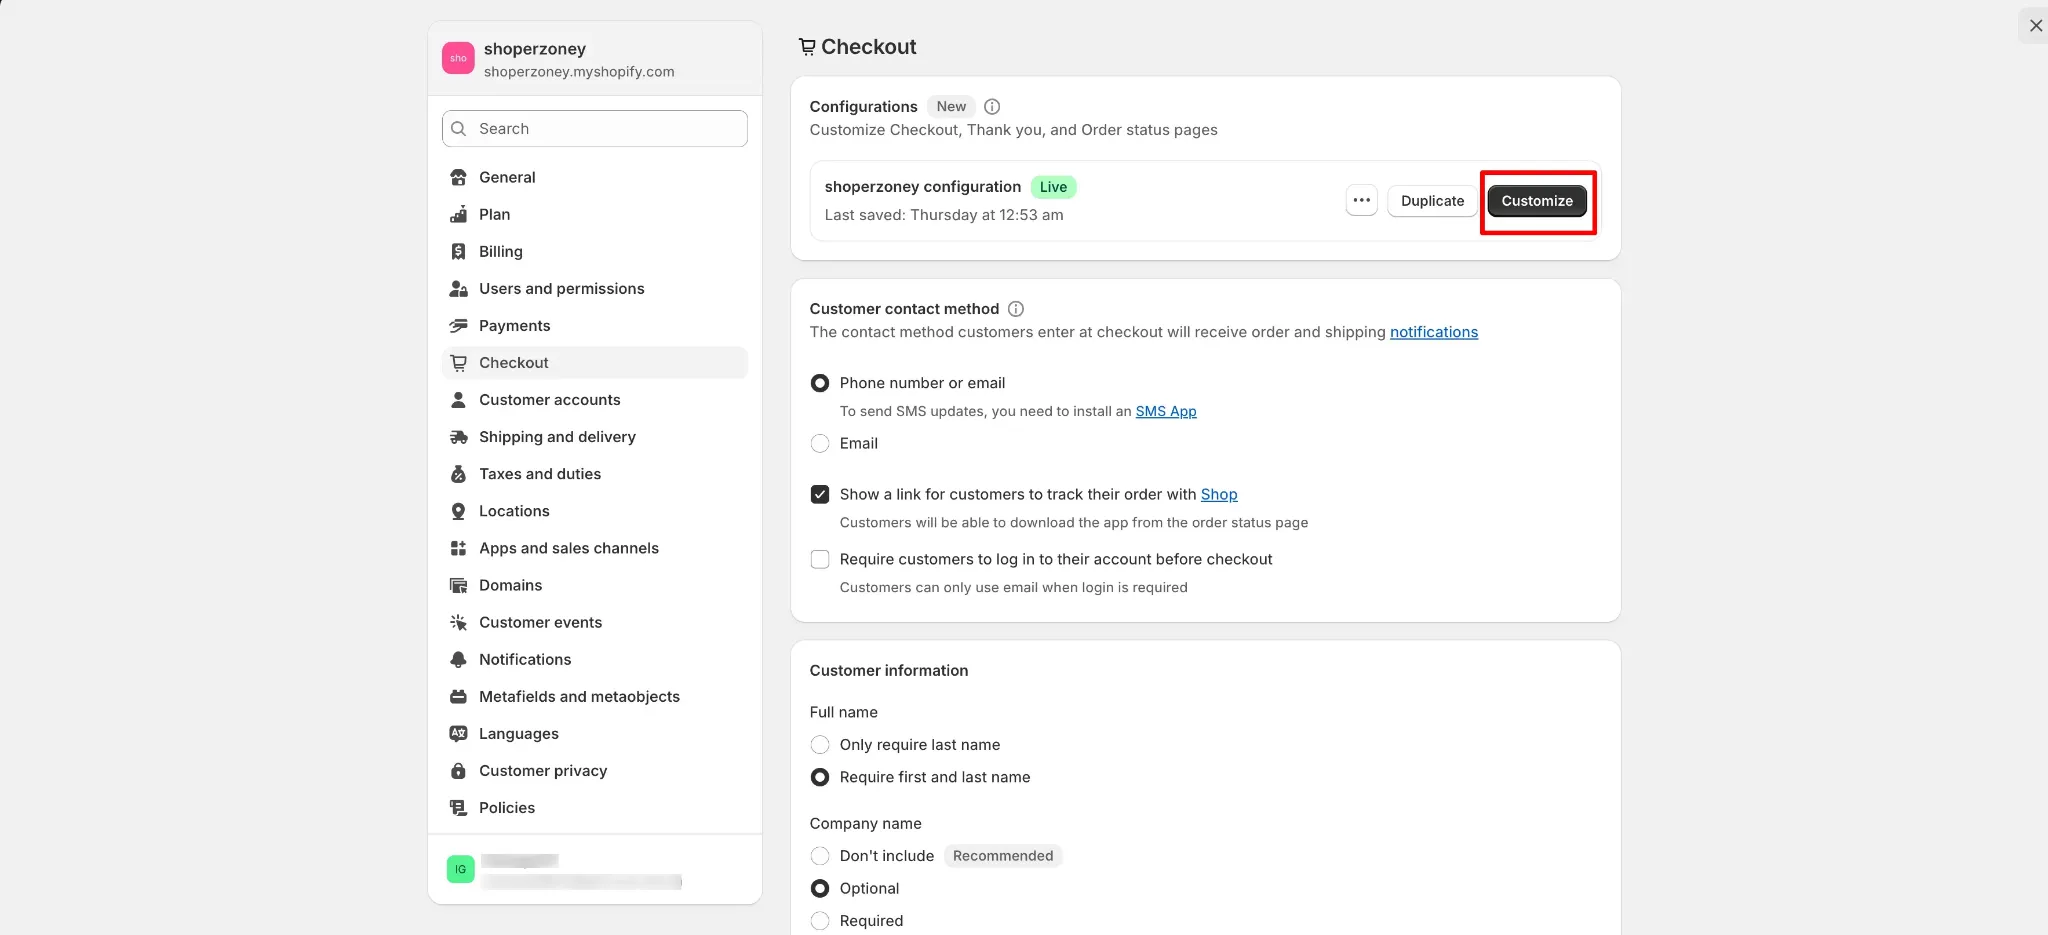
That last step matters more than it looks. The checkout extension is what reaches the post-purchase page through Shopify’s supported extensibility framework — not through checkout.liquid, which stops working on 26 August 2026.
Step 2 — Add the custom pixel
-
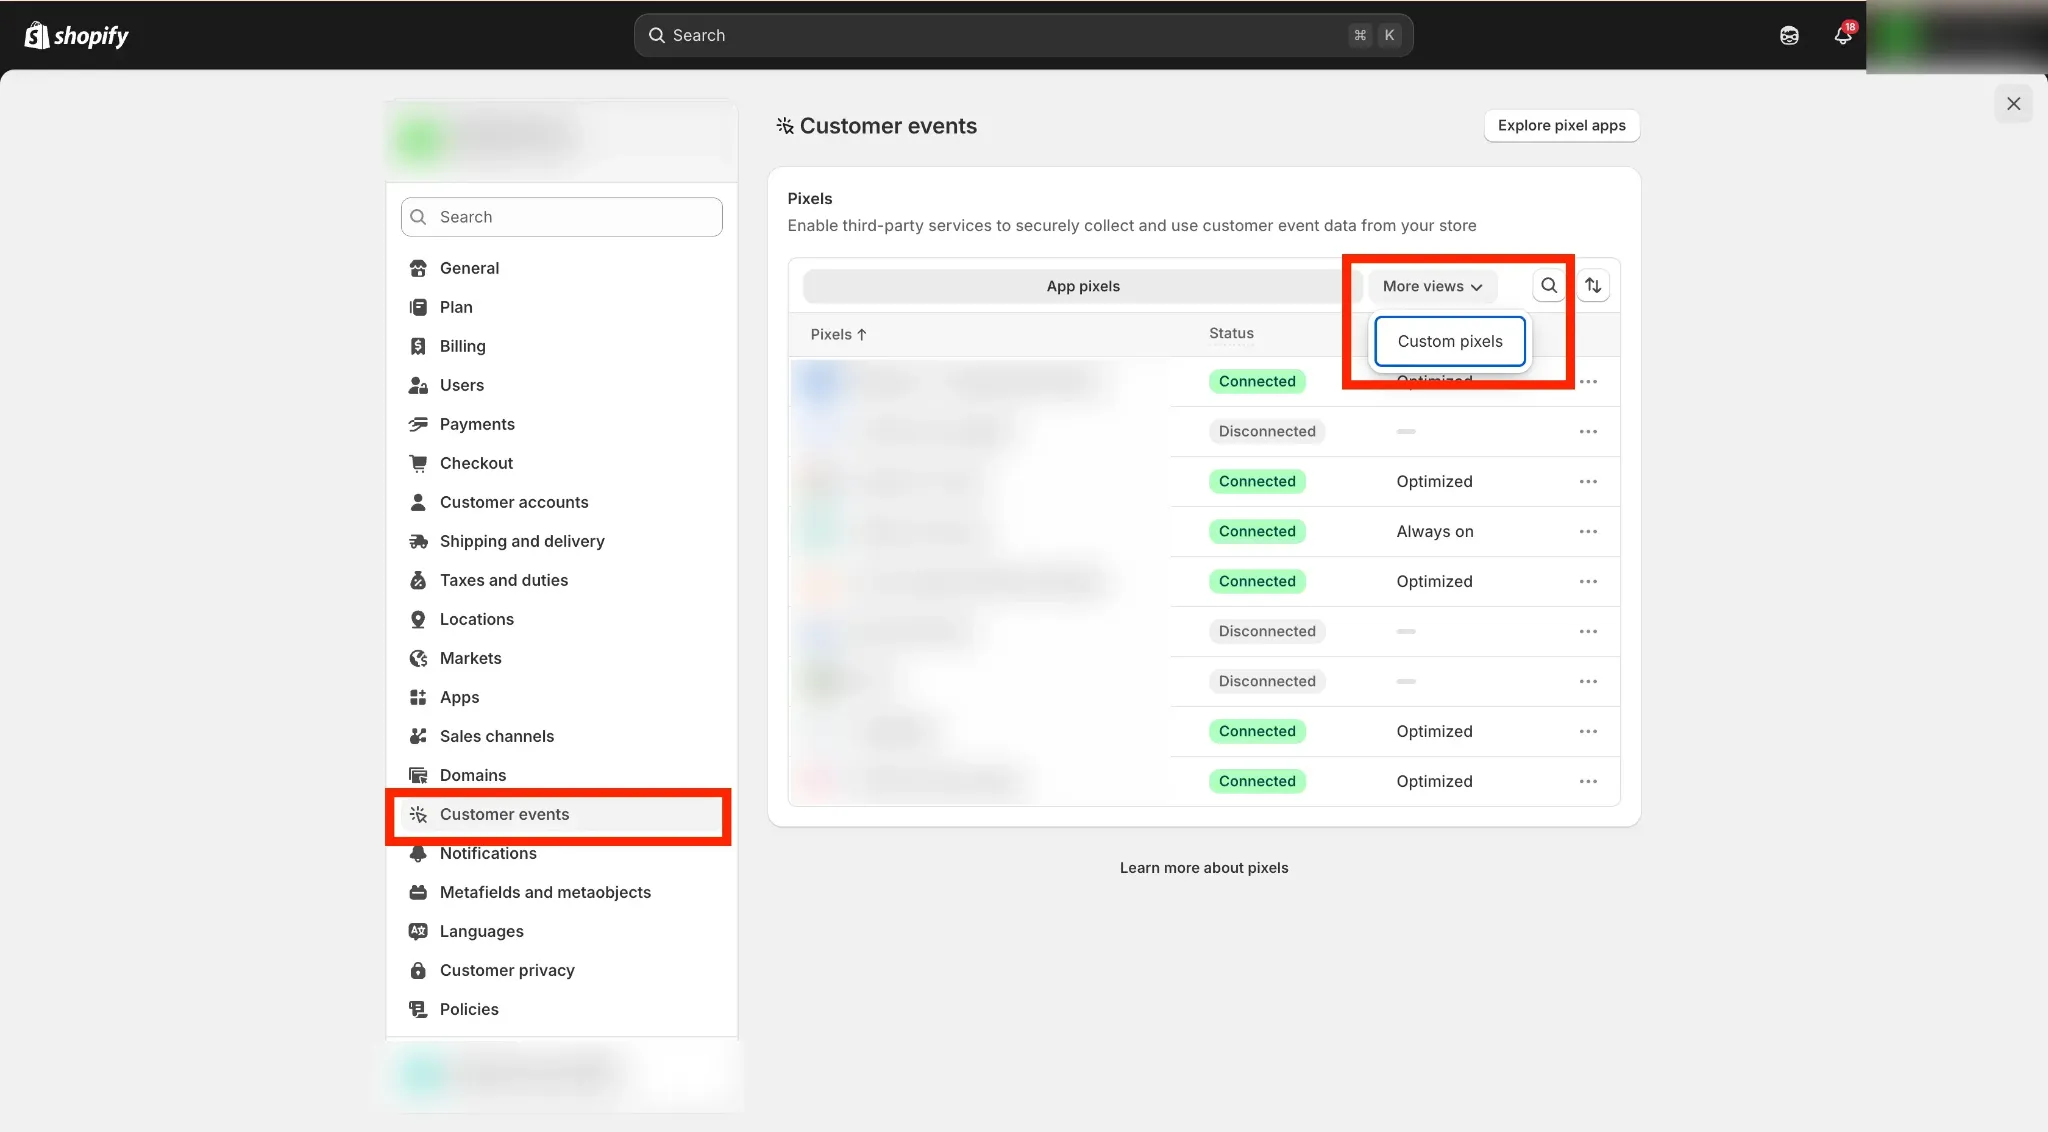
From the instructions page, copy the code and click Open Customer Events Settings.
-
Click more views → Custom Pixel → Add Custom Pixel.
-
Name it CustomerLabsPixel and paste in the snippet.
-
Scroll to lines 53 and 54 and set both to
true:
track_cart_token_on_addToCart: true,use_variant_id_as_product_id: true,- Adjust the pixel permissions if your region’s privacy laws require it, then Save and click Connect.
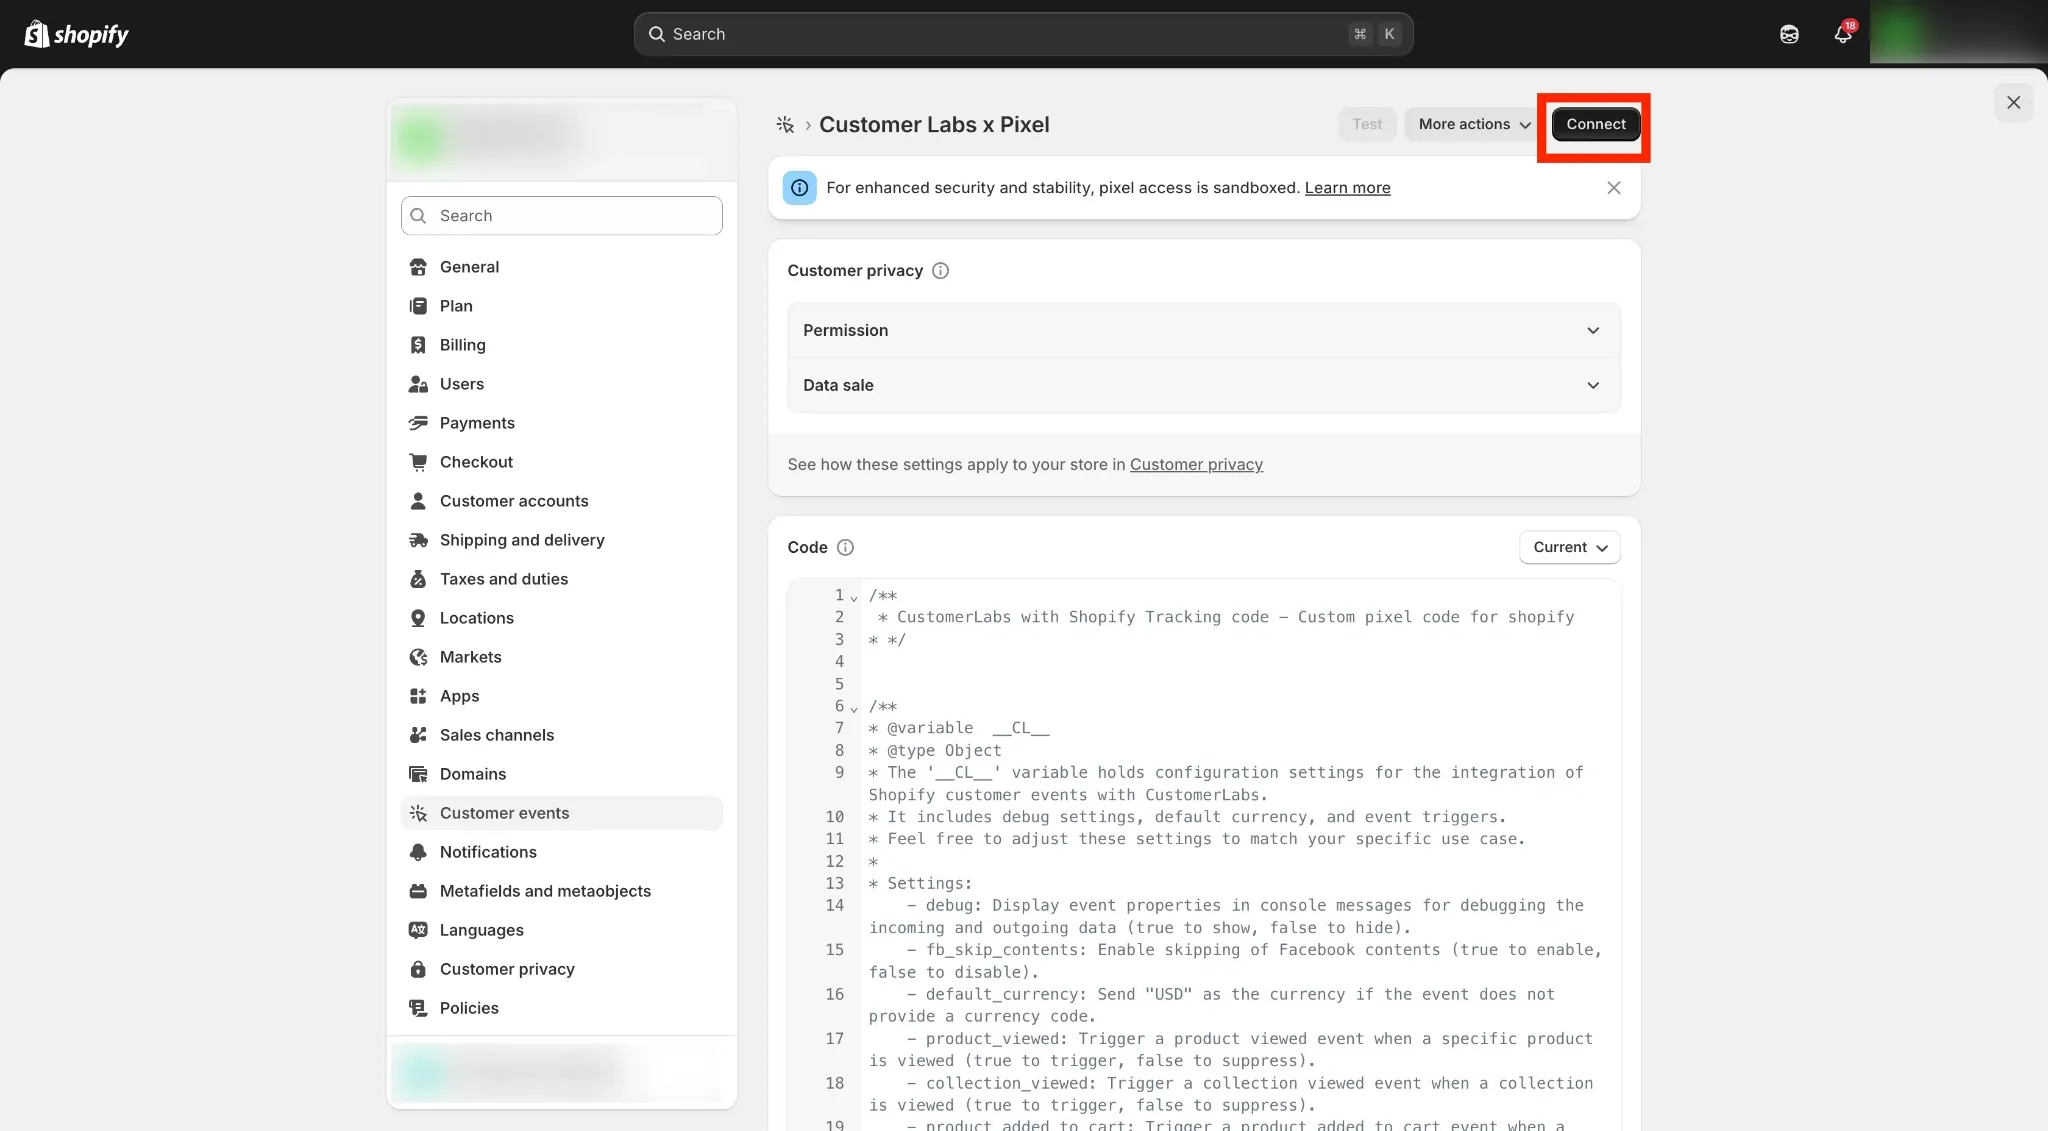
The track_cart_token_on_addToCart setting is the one that makes the purchase event work end to end. Capturing the cart token at add-to-cart is what lets the server-side purchase be matched back to the browsing session it came from.
Step 3 — Connect GA4, browser and server side
Refer to the detailed CustomerLabs Google Analytics 4 Setup Doc for API secret configuration.
Browser-side. In GA4, go to Admin → Data collection and modifications → Data Streams, add a Web stream, and copy the Measurement ID (G-XXXXXXXXXX). In CustomerLabs, open Destinations, select Google Analytics gtag, enter a Destination ID and click Save and Enable. Open Configuration settings, click Sign in with Google to authenticate, then paste the Measurement ID into Website Tracking ID under Basic Settings. Save Changes.
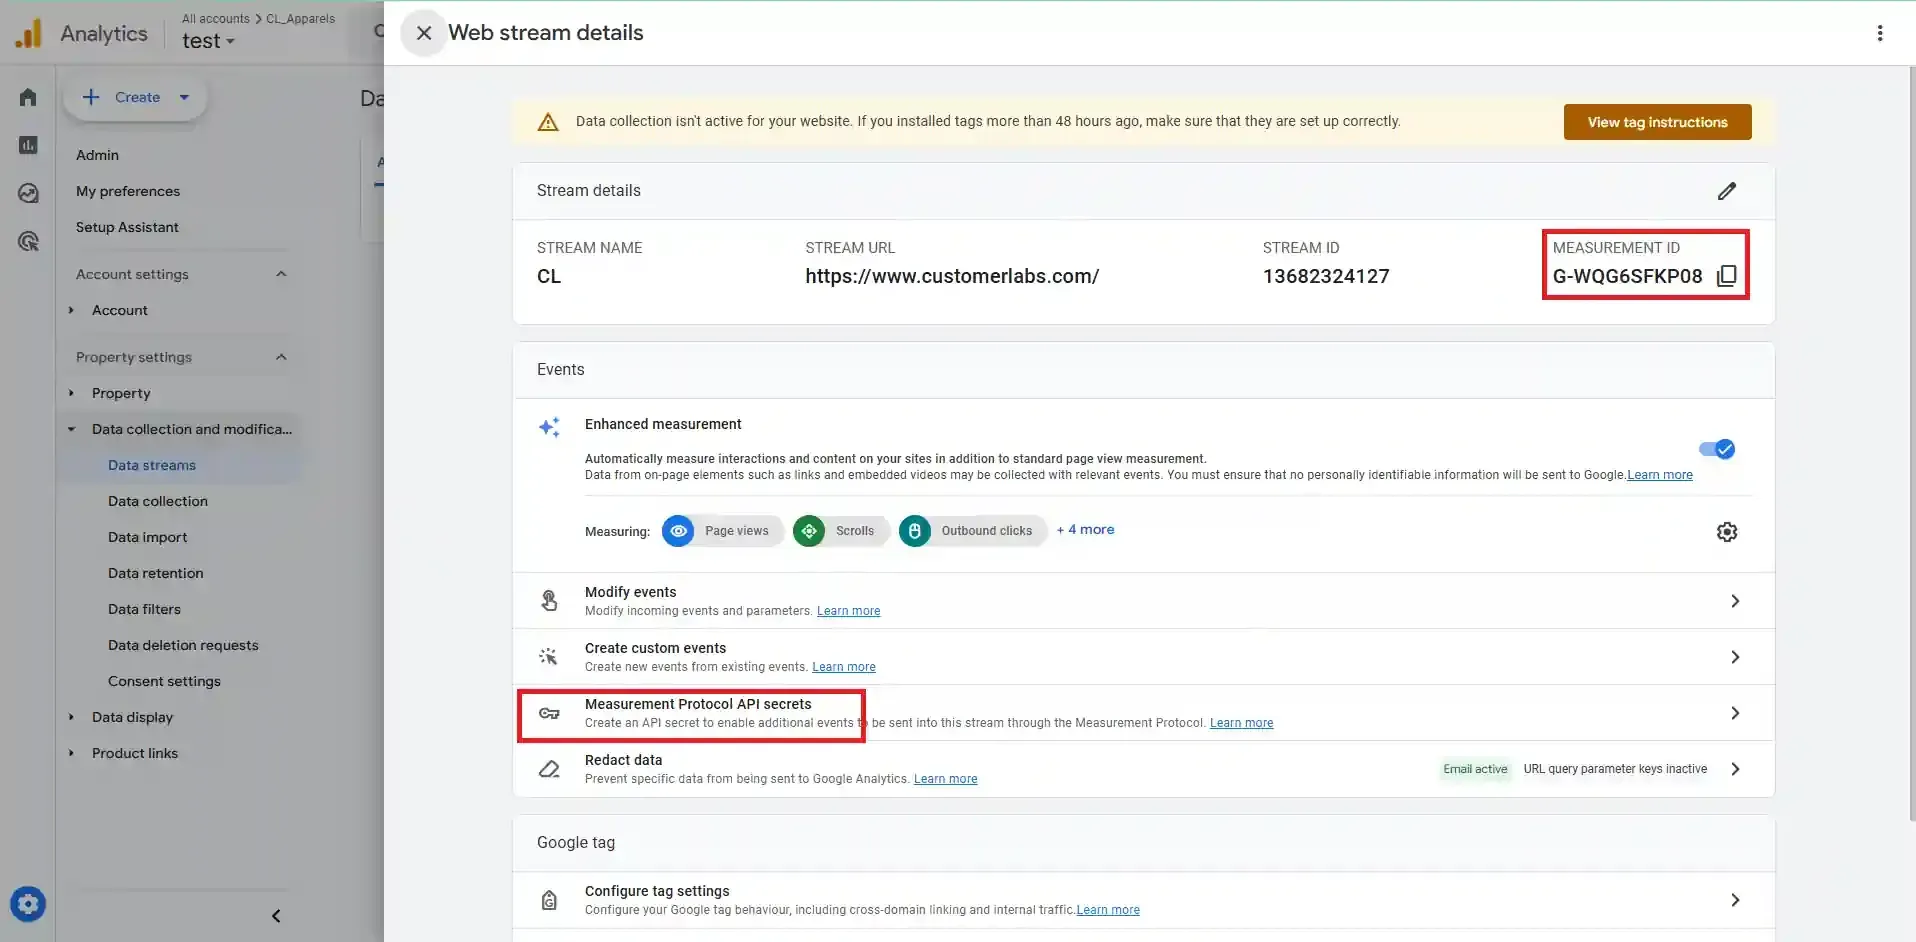
Server-side. Back in your GA4 data stream, scroll to Measurement Protocol API Secrets, accept the terms, click Create, give it a nickname, and copy the Secret Value. In CustomerLabs, return to Configuration settings → Advanced Settings, toggle on Enable GA4 Measurement Protocol, and paste the secret into API Secret. Save Changes.
Turn on Enhanced Ecommerce while you are in Advanced Settings. This sends product and transaction details to GA4 and unlocks the purchase funnel reports. It has a catch worth knowing before you save: Enhanced Ecommerce must be enabled during initial setup. Enabling it later means re-authenticating the GA4 connection first. The same screen carries User-ID Tracking — switch it on and set User Identify ID to Customerlabs user ID if you want consistent cross-session, cross-device reporting.
Step 4 — Configure the purchase workflow
Connecting the webhook auto-creates a workflow from test data. It is not finished until you check it.
-
Go to CustomerLabs → Sources, open the Shopify source, and click Edit on the
purchase_orderworkflow. -
Updating the delay is mandatory. Click Choose Sample Data and pick a sample that contains the cart token, with no null parameters.
-
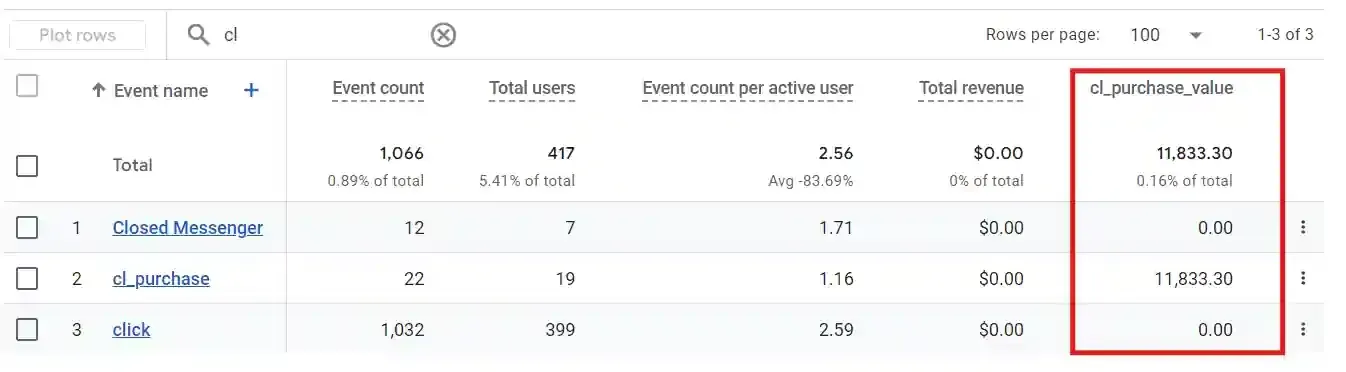
Under Event Configuration, rename the event to
cl_purchase. This is what keeps the server-side purchase distinguishable from the browser-side one — do not skip it. -
Confirm
cart_tokenis present in the sample. For Shopify Checkout it sits incart_token; for other checkout integrations it may sit innote_attributes. It starts withhWN. -
Under Identity Mapping, keep
identify_by_email,identify_by_phoneorshopify_cart_token. -
Map the rest: user traits under Map Attributes, product data (
sku,ID,variant,line_items) under Product Details, andvalue,currency,transaction_id,order_idunder Event Properties.
- Save Workflow.
Filters are optional but useful here. You can restrict to topic = order/create, drop orders where email is null, exclude a test store, capture only first-time buyers via customer__user_type = new, or isolate subscription orders by checking source_name. If you filter, name the event to match — cl_new_customer_purchase, cl_subscription_purchase.
Step 5 — Choose client-side or server-side per event
On the GA4 destination screen, click Setup Event Workflow and toggle on the events you want to send.
Never toggle the same event on for both client-side and server-side callbacks. GA4 does not de-duplicate events, so the same purchase arriving by both routes is counted twice and your revenue reports inflate. Pick one path per event.
If you are syncing audiences to GA4, enable added_to_segment under Server-side callbacks.
Consent Mode v2
If you sell into the EU or UK, configure this before you go live. Go to Destinations → Google Analytics gtag → Configuration settings → Consent Mode Configuration and toggle it on, then set defaults for analytics_storage, ad_user_data and ad_personalization — these apply before a visitor makes a choice.
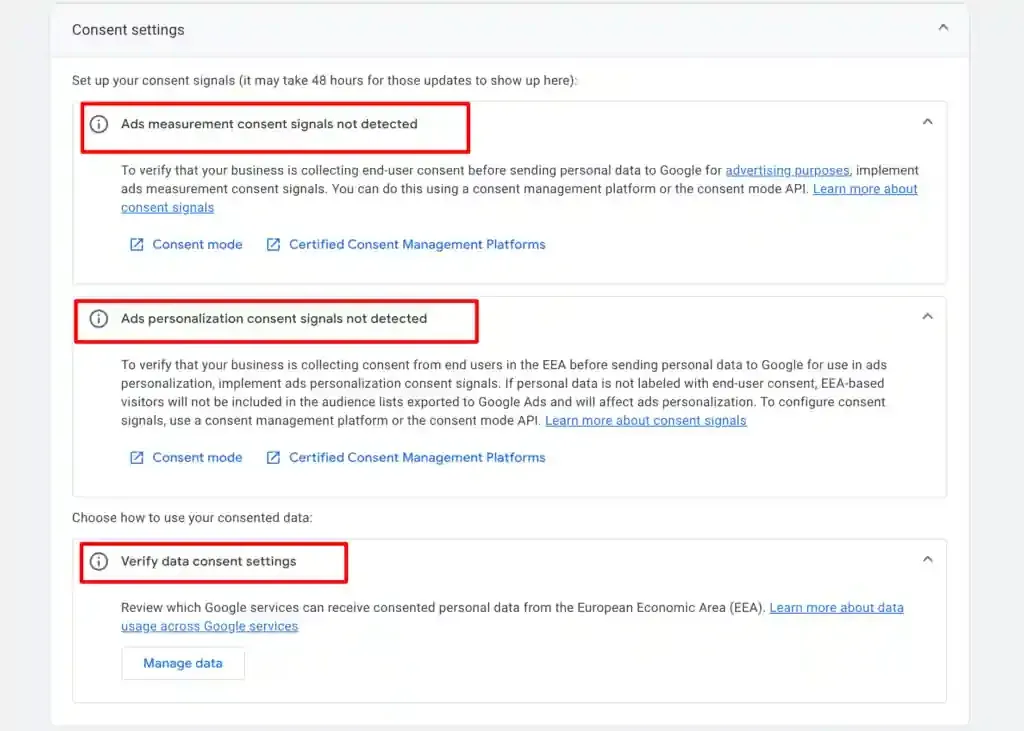
If you use a Google-certified CMP it handles initialisation for you. If you do not, toggle on Client Side Consent Initialization so CustomerLabs sets the defaults itself. Save Changes.
When someone updates their choice in your banner, pass it through:
_cl.trackConsent({ "ad_user_data": "granted", "ad_personalization": "granted", "analytics_storage": "denied"});Sending events server-side does not remove the consent requirement. The two solve different problems — one recovers data lost to technical limits, the other governs whether you were permitted to collect it.
The parameters GA4 actually requires
Four parameters must be present at event level for revenue to populate: transaction_id, value, currency, and items. Miss any one, and GA4 records the event with $0 revenue.
- Item Array: requires
item_id,item_name,price, andquantityfor each line item. - Currency Location: use ISO 4217 codes for currency and a numeric value, as set out in Google’s recommended events reference.
- Transaction ID: must be stable and unique per order to prevent duplicate counts upon page reloads.
Verify the purchase event is actually firing
Use GA4 DebugView with a real test order. Two of the tools most guides recommend do not work on Shopify, and knowing that saves hours of chasing a problem that is not there.
The GA4 Debugger Chrome extension cannot see your checkout events. Custom pixels run in a sandboxed iframe that the extension cannot inject into. The same applies to GTM preview mode: checkout events fire beyond the debugger’s reach, so an empty preview panel is not evidence of a broken setup.
A real test order is the only reliable validation. Checkout runs in a separate sandboxed context, so browsing the funnel without completing a purchase never exercises the code path you are trying to test.
The verification checklist
What to check, in order:
- In GA4, open Admin → Data display → Events and confirm
purchaseis listed. - Open DebugView, place a test order, and watch the event arrive.
- Click the
purchaseevent and open the Items tab. Each product needs at minimumitem_id,item_name,priceandquantity. - Confirm
transaction_id,valueandcurrencyare all present and populated.
If DebugView looks right but reports look wrong, give it time before changing anything. GA4 typically takes 24 to 48 hours to process Shopify data into standard reports, and a partial picture in the first few hours is normal rather than diagnostic.
Getting it right
Correct Shopify Google Analytics conversion tracking in 2026 comes down to three decisions: use a custom pixel for checkout, pick exactly one browser-side method, and give every order a stable transaction_id. Get those right and Shopify GA4 ecommerce tracking stops being something you babysit every quarter.
If you have not audited your setup since June, do it before 26 August. Anything still living in checkout.liquid or Additional Scripts stops working that day without warning, and the first sign will be a reporting gap you notice a week later.
For stores where accuracy affects real budget decisions, adding a server-side source closes the gap that browser tracking cannot. Shopify server-side tracking setup walks through that in detail, and Shopify conversion tracking complete guide covers the same problem for Meta and Google Ads.