Offline conversion tracking is the only way to close the loop and show ad platforms the real customers your campaigns are targeting. It connects your online campaign clicks to offline in-store purchases, revealing the true ROAS of your ads.
This guide walks you through the complete WooCommerce offline conversion tracking setup using CustomerLabs, Google Ads, Meta Ads, and events mapping.
If you’ve ever felt like “your ad conversions don’t match your actual sales,” this is the setup you’ve been missing.
Let me explain about the impact that your campaigns might experience if you don’t track offline conversions with the brand case study, and then we will dive into the setup.
Why Offline Conversion Tracking: The Unrated Catalyst
One of our clients, a well-known brand, came to us with a major attribution challenge. They were spending hundreds of dollars on ads and creatives every month, but the users seemed to click the ads, but the purchase never happened.
Guess why?
Because most of the purchases were happening offline, no one seemed to have noticed it, and wondered why Meta and Google did not notice these conversions.
This showed us that there is a huge attribution gap between their offline and online conversions.
Now, guess what we did?
To solve this, we built a structured way to send their offline purchase data (CRM) back to the ad platforms. So every click that did not end up with the purchase got attributed to the offline purchase, filling the gap. Finally!!!
Now, Guess How we did it?
We introduced a simple warranty claim form for every offline buyer, where we collected their email, phone number, and GCLID. Once the data came in, we matched each customer’s GCLID with the ones already captured online, allowing us to connect the dots and complete the attribution loop.
Using ID resolution, we could clearly show the brand that customers were discovering products through online ads, doing their research digitally, and then completing their purchases in offline stores. For the first time, the brand finally saw the full journey from online clicks to offline conversion.
Wow… awesome, right? I felt that too while writing this. Back to the subject.
Before we set up WooCommerce offline conversion tracking, you will have to start by connecting WooCommerce with Customerlabs.
How to Integrate WooCommerce with CustomerLabs?
Follow these steps below:
-
Sign up or log in to your CustomerLabs account.
-
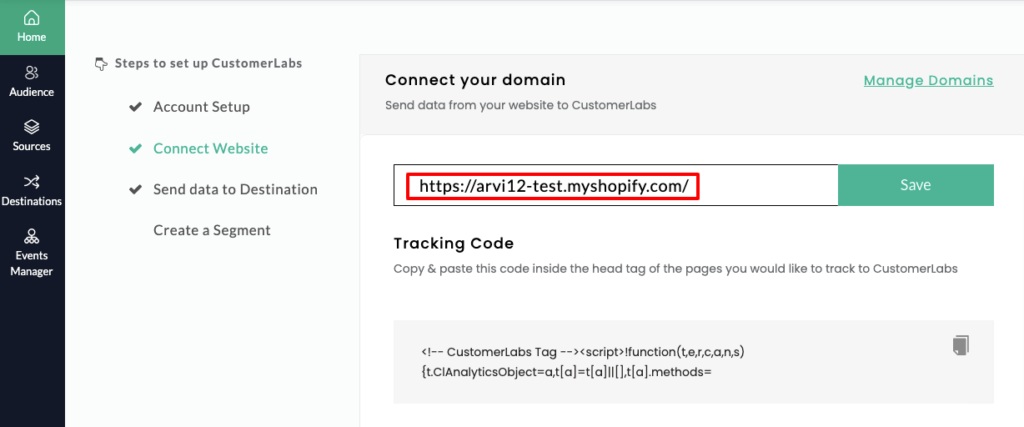
Go to the Home page → under “Connect website” → enter your website URL → click Save.
-
Once the connection is successful, log in to your WooCommerce account.
-
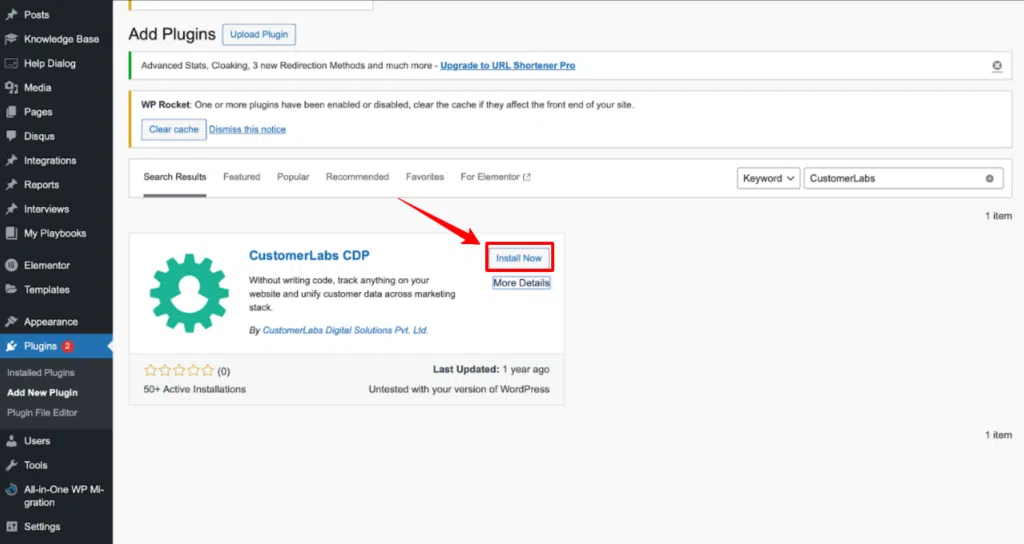
In WordPress, go to Plugins on the left panel → click Add New Plugin → search for “CustomerLabs.”

- Click on Install Now
- Now, open the CustomerLabs app and copy your “Account ID” from the section shown in the image.
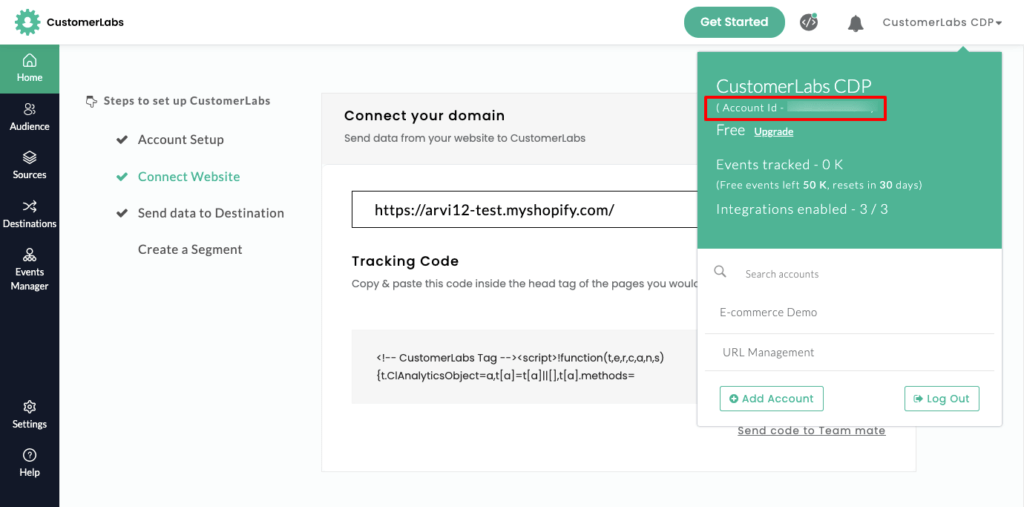
- Go to the installed CustomerLabs plugin → open Settings, and paste the copied “Account ID” into the “CustomerLabs App ID” field as shown in the image.
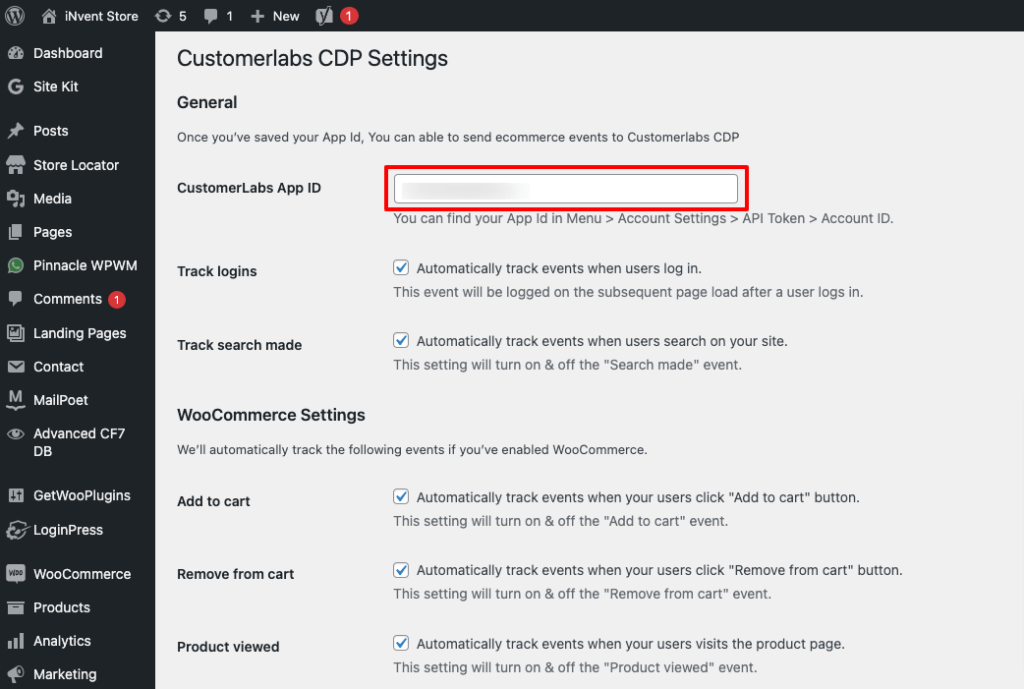
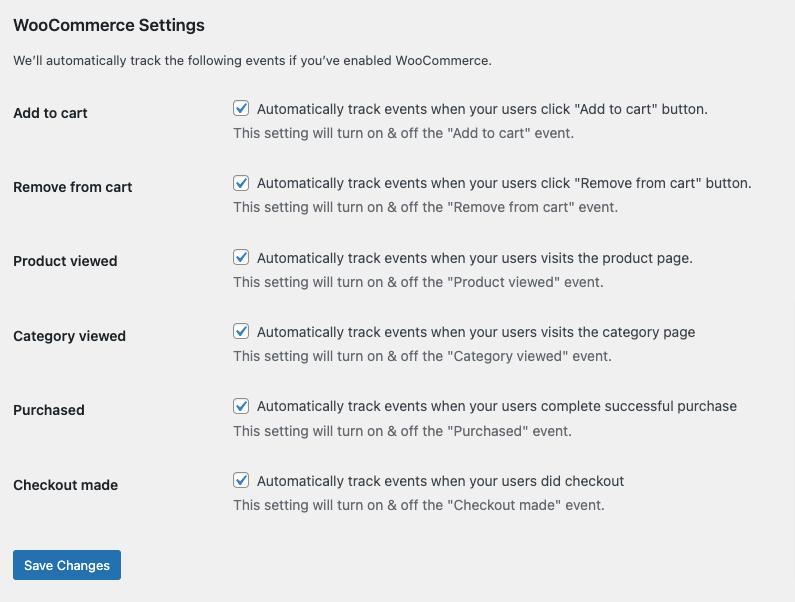
- Make sure you enable all the conversions you want CustomerLabs to track. We recommend selecting all events for the best marketing results. After selecting, don’t forget to click “Save” as shown in the image.
- Your WooCommerce site is now successfully integrated.
How to Set up WooCommerce Offline Conversion Tracking in Google Ads?
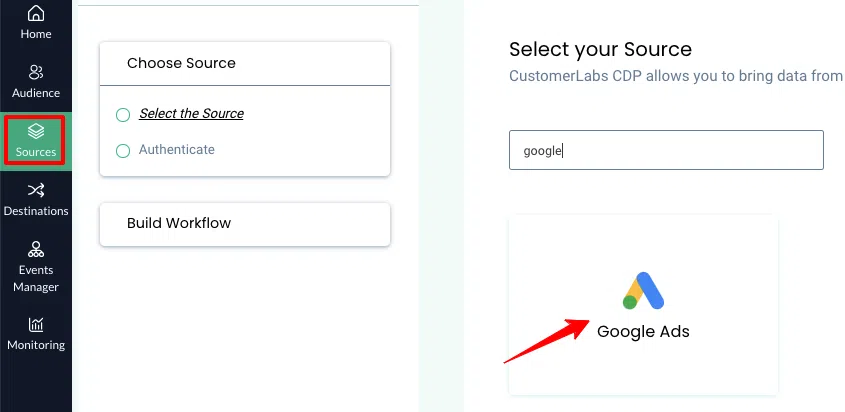
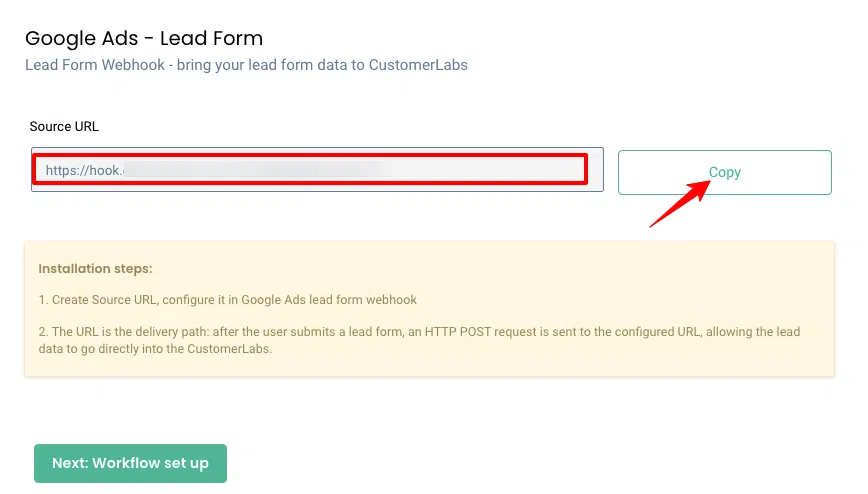
- Log in to your CustomerLabs account, go to the “Sources” section, and select Google Ads from the list of available sources.
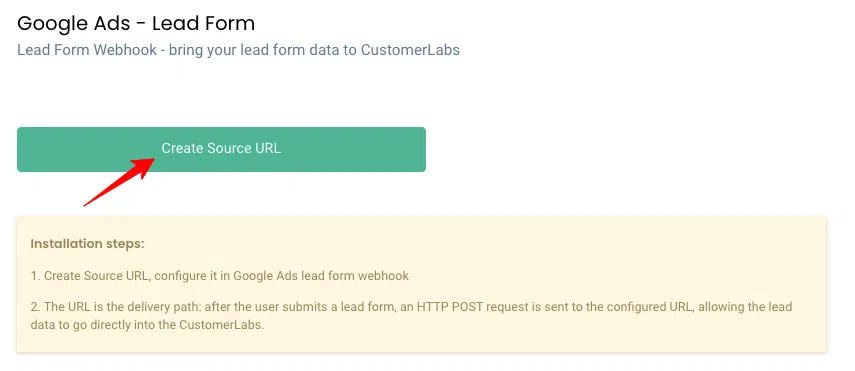
- Click “Create Source URL” and copy the link - you’ll need it in the next step.
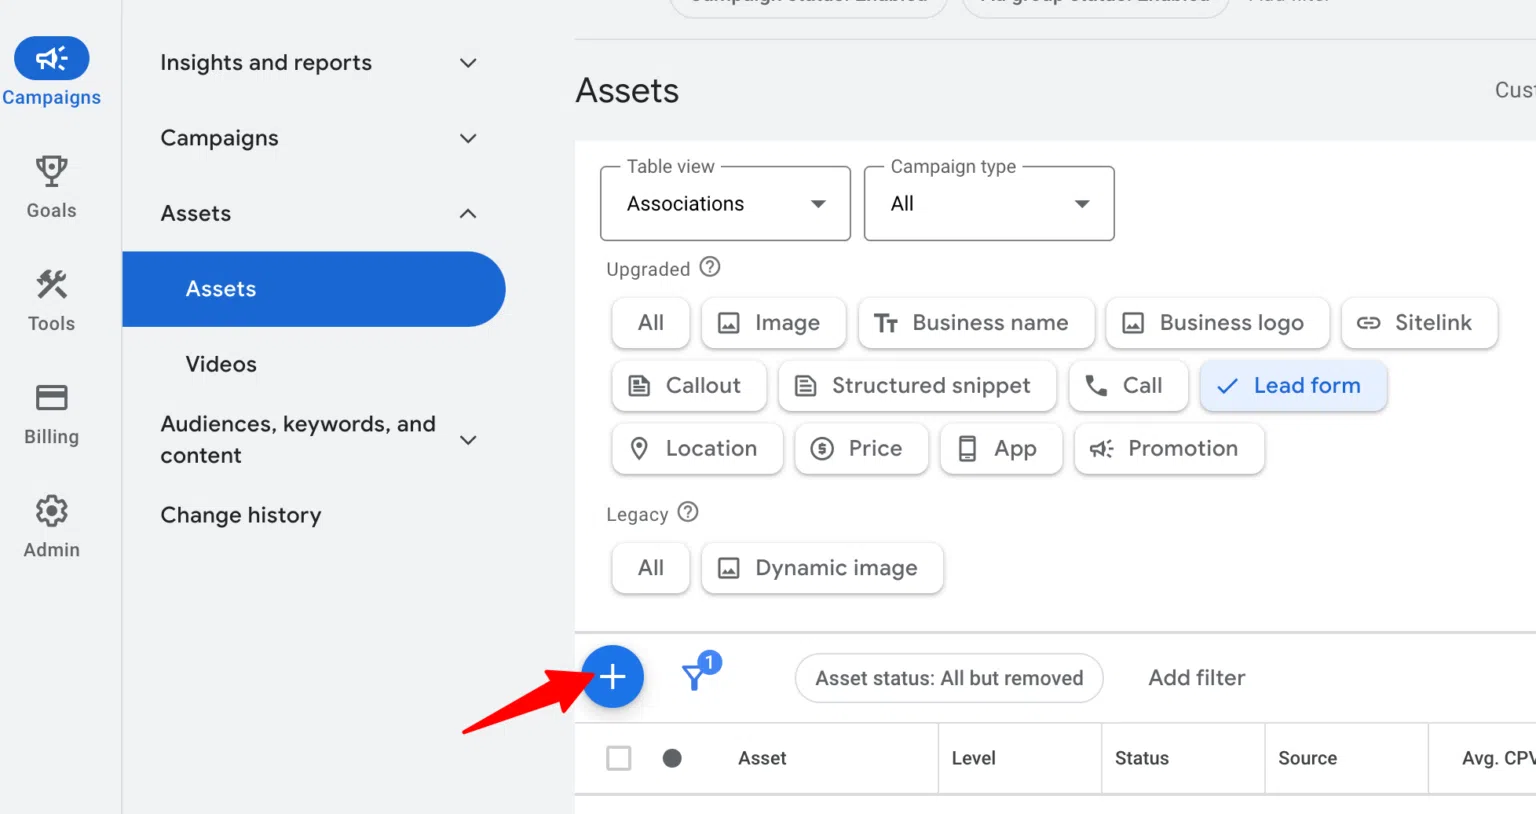
- Log in to your Google Ads account, go to Ads & Assets → Assets → Lead Form, and click the “+” icon to create a new lead form.
- Expand “Export leads from Google Ads,” then click on “Other data integration options.”
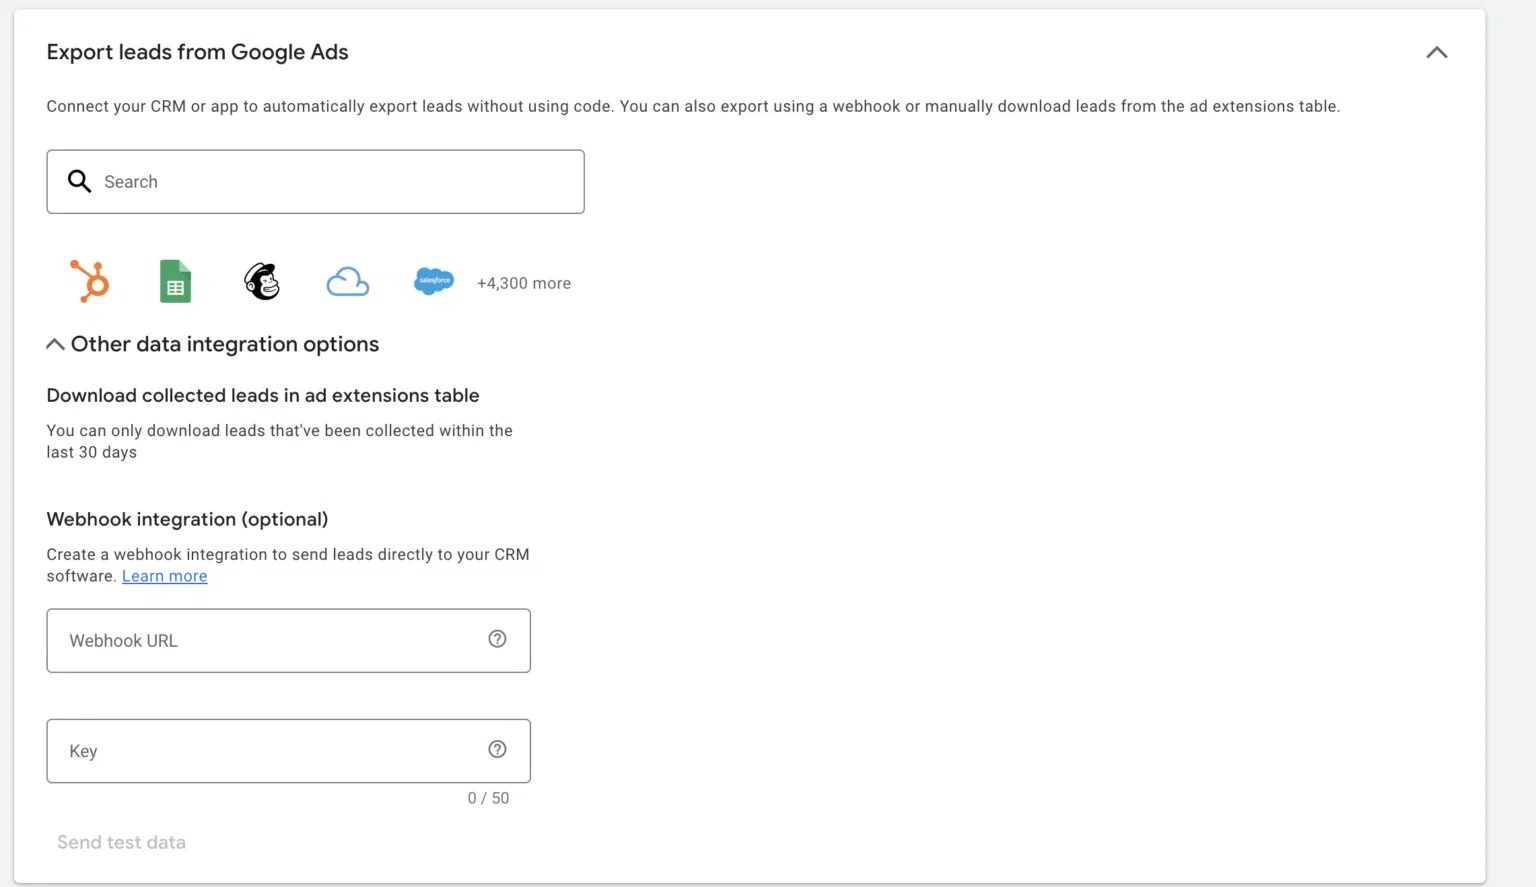
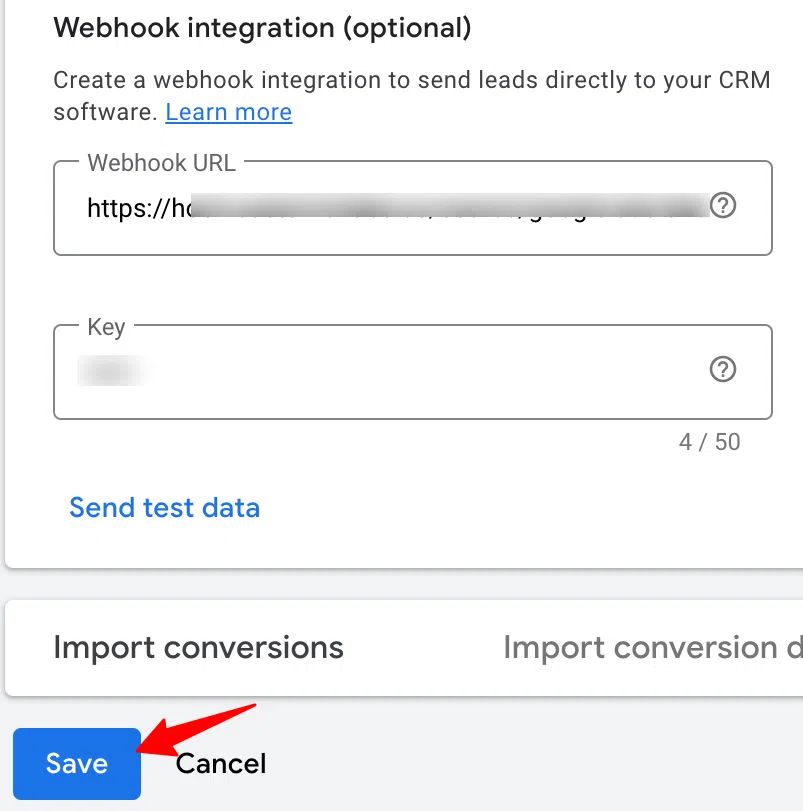
Under “Webhook integration,” paste the Source URL you copied from CustomerLabs into the Webhook URL field, then add a key name to identify this connection.
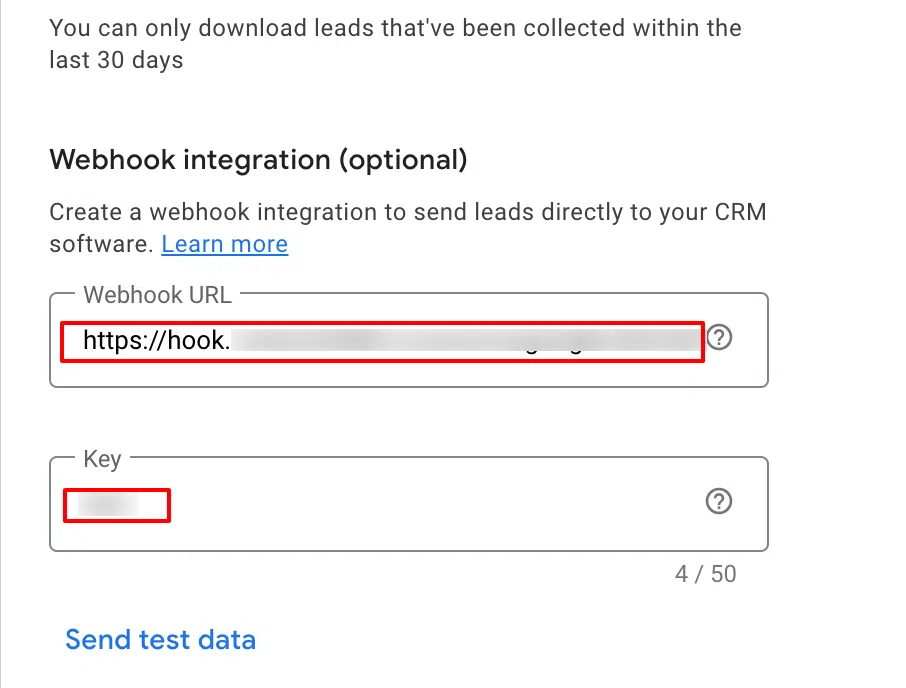
- Click “Send test data” to verify that the lead information is flowing correctly into CustomerLabs.
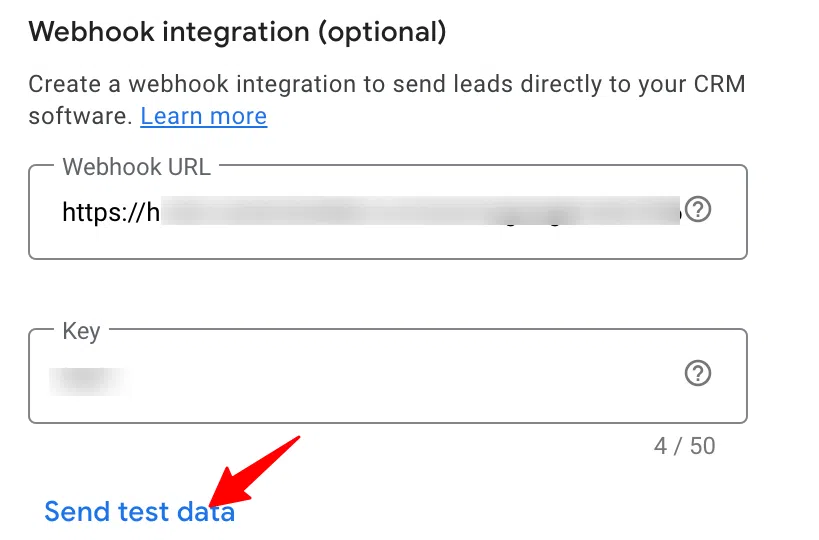
- Click “Save” to finalize and store your configuration.
- Go back to your CustomerLabs account to finish the configuration process.
Building a Workflow to Capture Lead Data from Google Ads
A workflow transforms raw Google Ads lead data into structured events. It lets you filter and modify parameters, then automatically update customer profiles in CustomerLabs 1PD Ops in real time.
- Once created, the workflow runs continuously in the background and processes all incoming data, and you can set up multiple workflows under the same source.
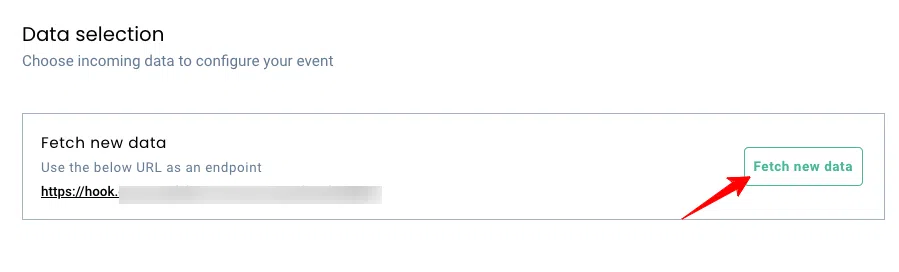
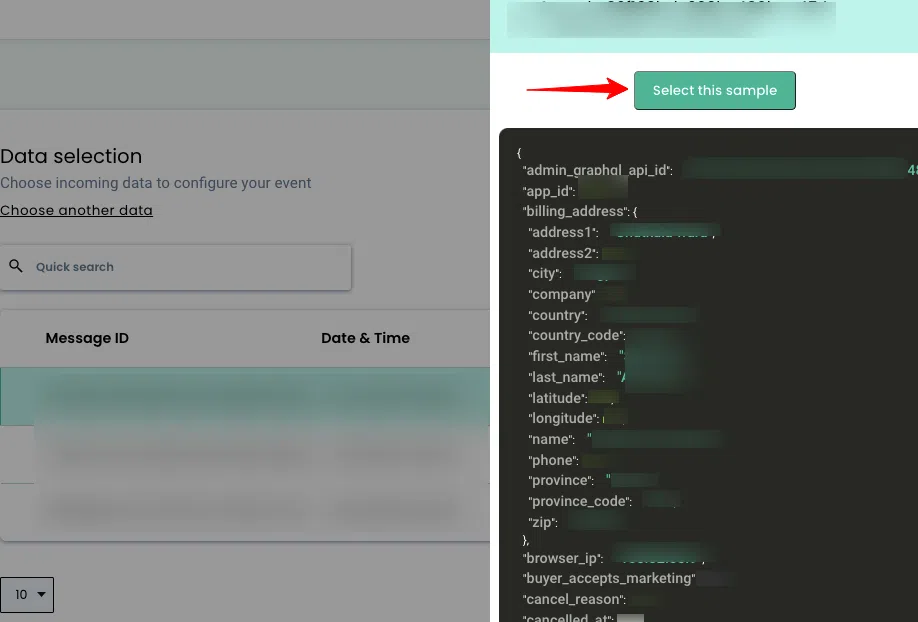
- Click “View details” to inspect the incoming data, then select the sample you want to use for building your workflow.

- The incoming sample data containing user and ad details will appear in a structured format, similar to the example shown below.
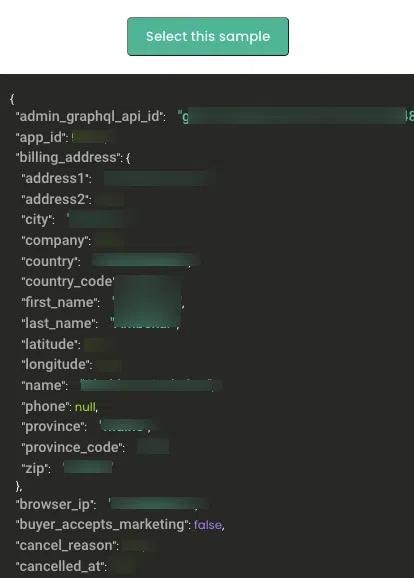
- Choose the sample that fits your use case and click “Select this sample.”
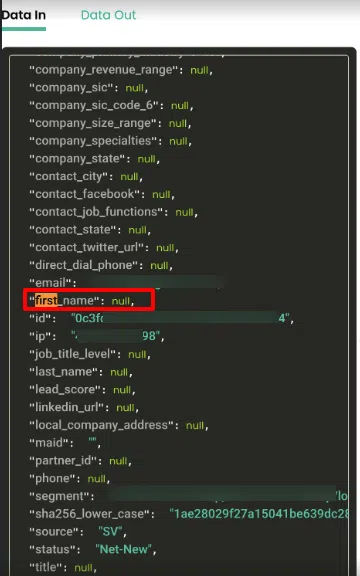
Note: When selecting a sample, ensure it doesn’t include any parameters with null values, as shown in the example image.
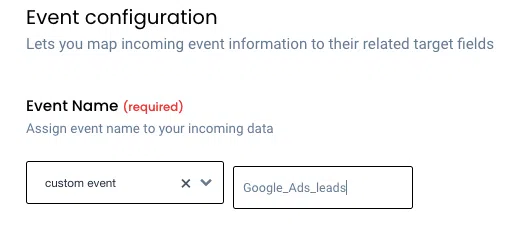
Event configuration is the final step in building your workflow. This is where you define how the incoming data will be converted into events. You can learn more about each option directly from the event configuration screen.
Choose or create an event name - Select an existing event from the dropdown or create a custom one by choosing a field and assigning it a name. This step ensures your workflow maps incoming Google Ads data to the correct event in CustomerLabs.
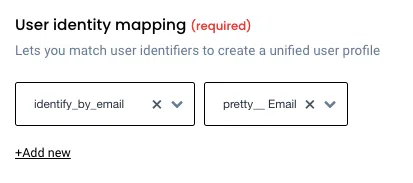
User Identity Mapping
CustomerLabs 1PD Ops lets you match incoming data to existing users using identifiers like email, phone, or other unique fields.
For example, selecting identify_by_email will map the Google Ads lead’s email to the correct user profile.
Once configured, CustomerLabs automatically unifies this data with existing profiles across your martech stack, giving you a single, consistent view of each customer
Note: You can add up to three unique user identifiers to improve data unification.
Map additional attributes - After configuring identity mapping, you can organize the remaining incoming data into two groups: User Traits (such as name, age, or location) and User External IDs (like CRM IDs, loyalty IDs, or other system-specific identifiers).
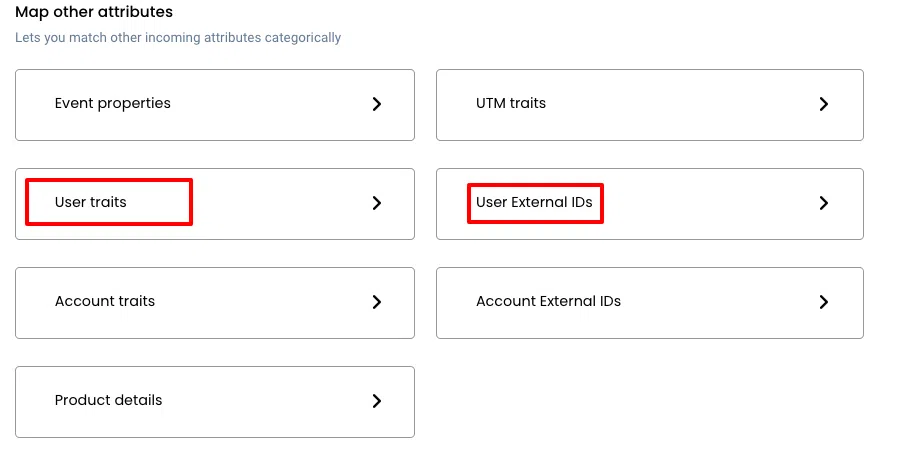
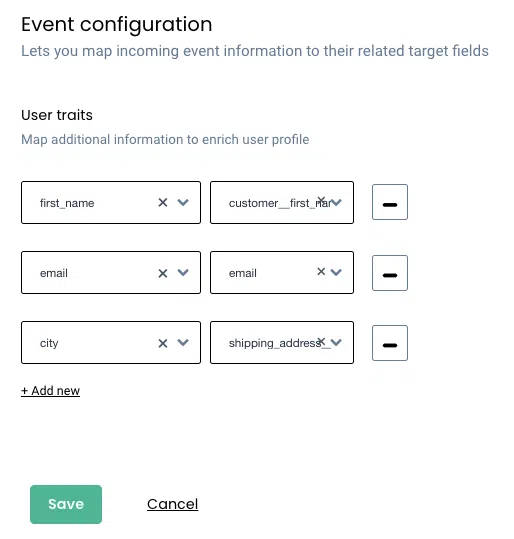
User Traits
User traits are attributes that describe an individual user, such as first name, last name, city, state, company, zip code, and other similar details.
If you want these details to be sent to your ad platforms, make sure to map them as User Traits during the event configuration step in your workflow.
User External IDs
- Unique identifiers from Google Ads, such as lead_id, can be mapped as User External IDs. These IDs help CustomerLabs accurately track and unify users across different systems.
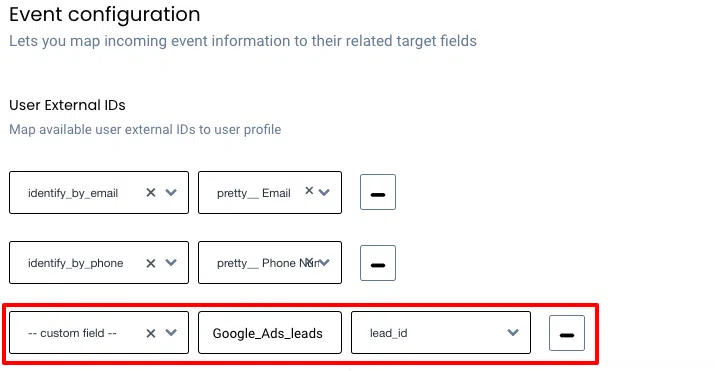
Note: These external IDs are added to the 360° user profiles and ensure accurate targeting when syncing data back to Google Ads, significantly improving audience match rates.
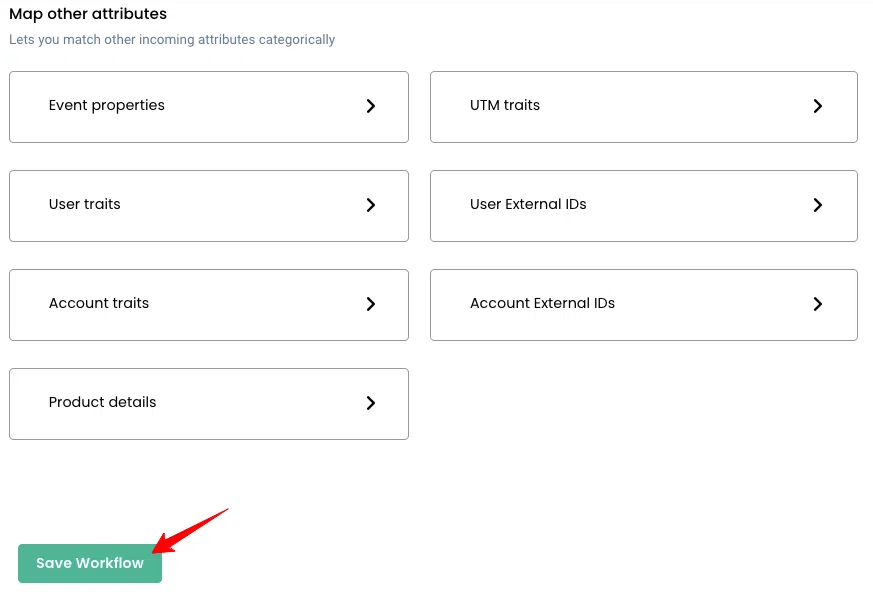
- Click “Save Workflow” to finalize and store your workflow configuration.
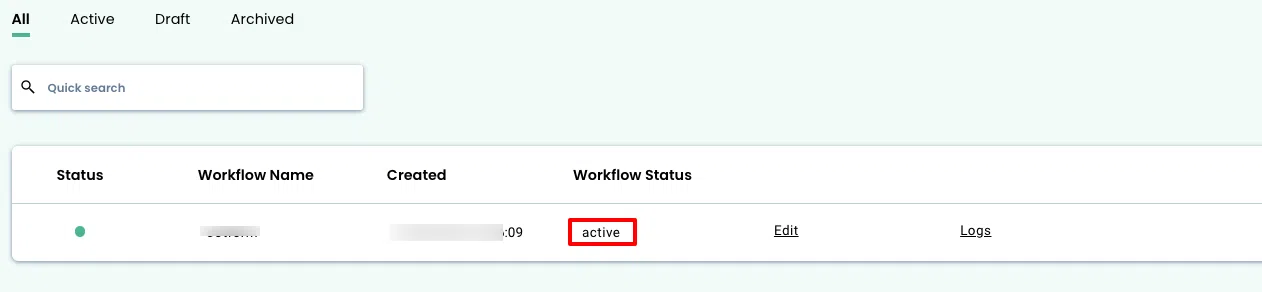
- Go to Sources → Google Ads and check the Workflow Status column to confirm that your workflow is active.
Now, let’s move into the setup of Facebook offline conversion tracking.
How to Set up WooCommerce Facebook Offline Conversion Tracking?
By implementing WooCommerce Facebook Offline Conversion tracking with CustomerLabs, you can send all offline events tracked directly to Facebook through server-side APIs.
This helps Facebook match those offline conversions back to the people who interacted with your ads, giving you accurate attribution and a clearer view of your campaign’s impact.
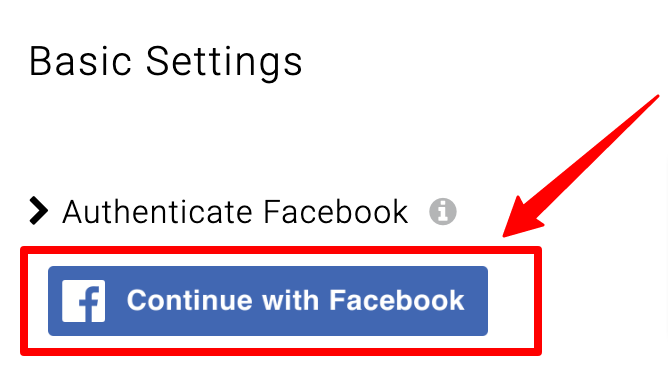
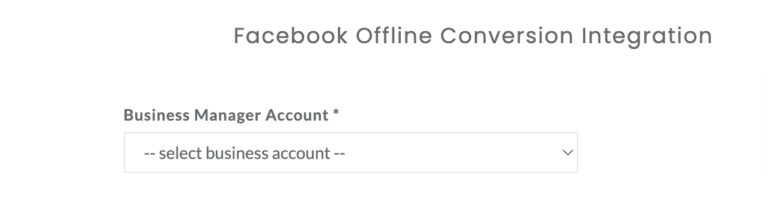
Authenticate Facebook Account
To integrate Facebook Offline Conversions, you must have admin access to your Facebook Business Manager account so you can create a system user.
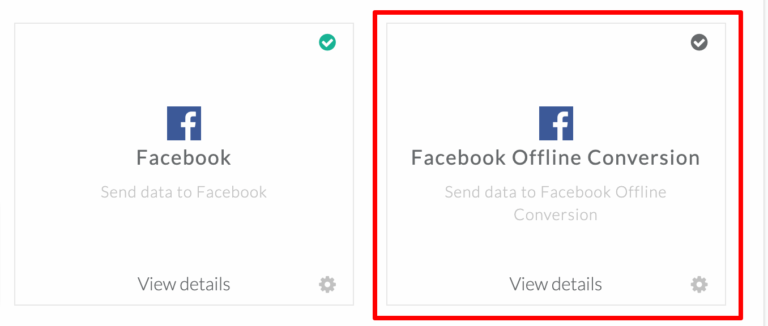
- In your CustomerLabs account, go to Destinations → Facebook Offline Conversion.
- Click the “Connect with Facebook” button to authenticate your account.
- Select your Business Manager account.
Note: You’ll only be able to choose an account if you have admin access
- Select your Business Asset Group
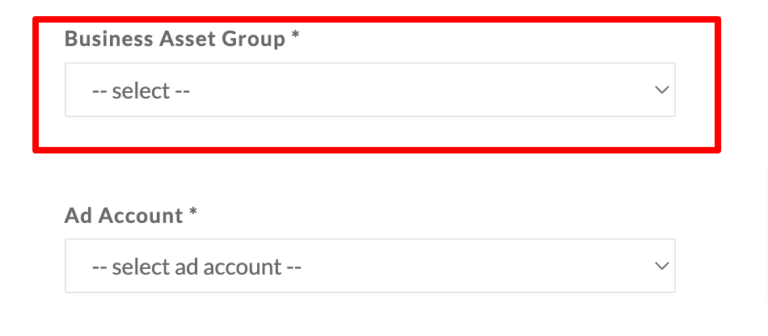
Note:
If you don’t have a Business Asset Group, create one to authorize CustomerLabs to add a system user. This ensures CustomerLabs continues to work smoothly, even if there are updates or changes like password resets that would normally interrupt Facebook authentication.
Connect Your Asset Group and Ads Account
A Business Asset Group is simply a collection of assets (Pages, Ad Accounts, Pixels, Instagram accounts, etc.) managed by your business admins to grant access collectively to specific people.
You can click here to learn how to create an asset group.
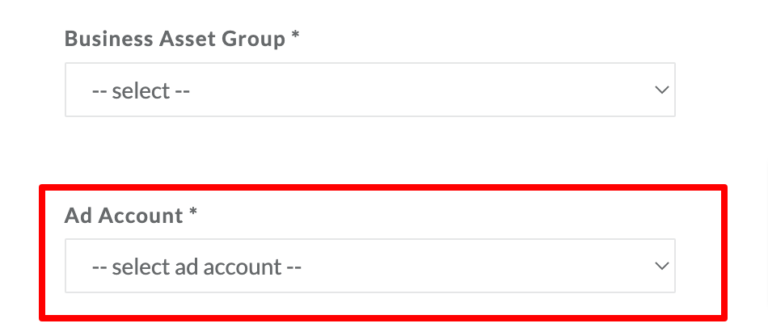
When creating the asset group, you can start by adding your Ad Account as one of the assets.
- Select the Ad Account you want to connect
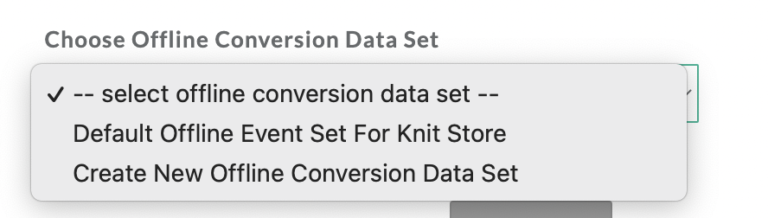
- Choose pixel
![]()
-
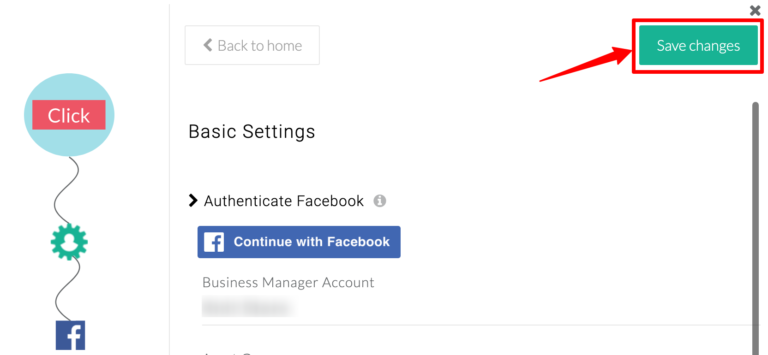
Select the Offline Conversions Data Set from the dropdown.
-
If you need a new one, click “Create New Offline Conversion Data Set” and enter a name to create it.
- Click “Submit,” then click “Save Changes” to finalize the setup.
Advanced Settings for Facebook Account
- Enter a name in the Upload Tag field. This helps you identify and differentiate offline conversion uploads from various sources.
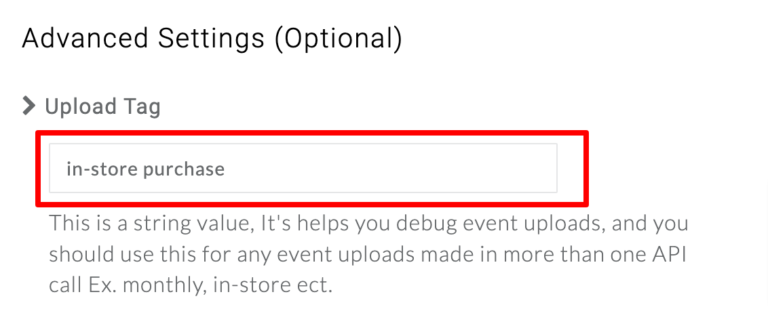
- Click “Save Changes” to apply and store your settings.
Facebook Field Mappings
Fields like email, phone number, first name, last name, date of birth, and others must be mapped to Facebook’s match keys when sending event data.
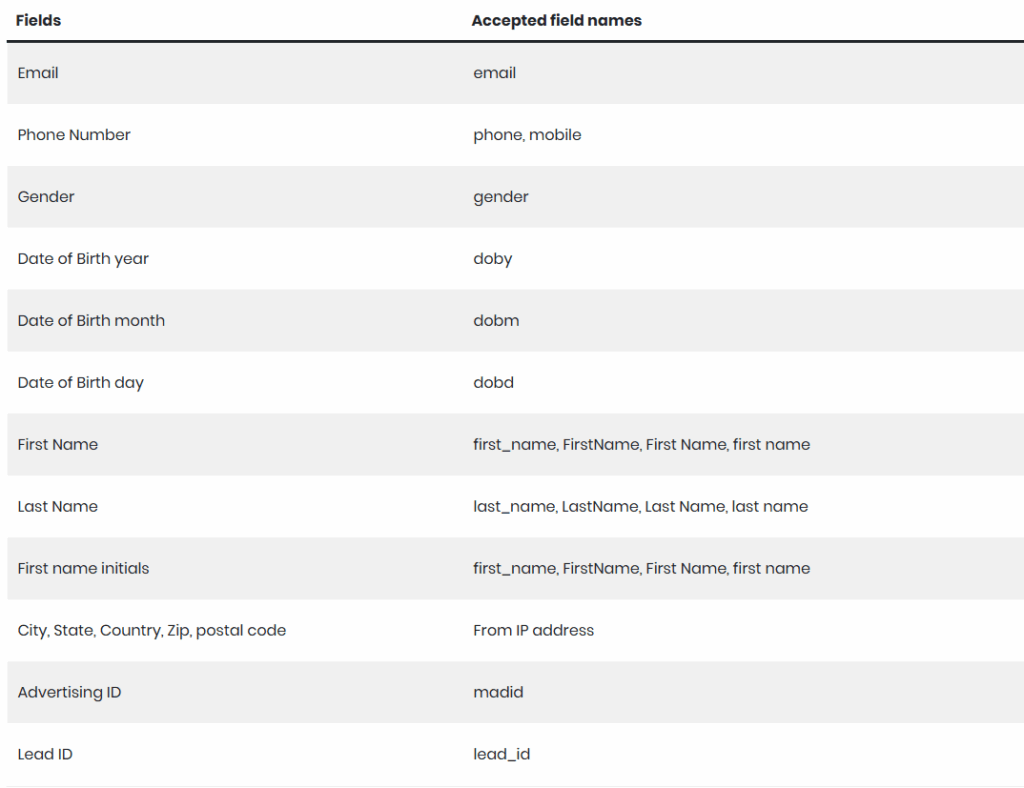
By default, CustomerLabs automatically maps some fields to the correct Facebook match keys, but only if the field names follow the accepted naming format shown in the table below.
If your field names don’t match the accepted list, you’ll need to manually map them to the correct match keys using the dropdown options.
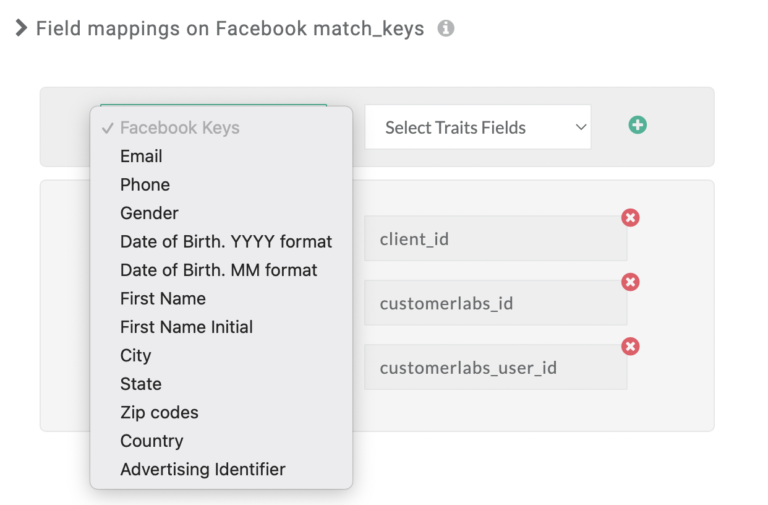
Fields other than the ones listed above must be manually mapped to the correct Facebook match keys in the Field Mappings section.
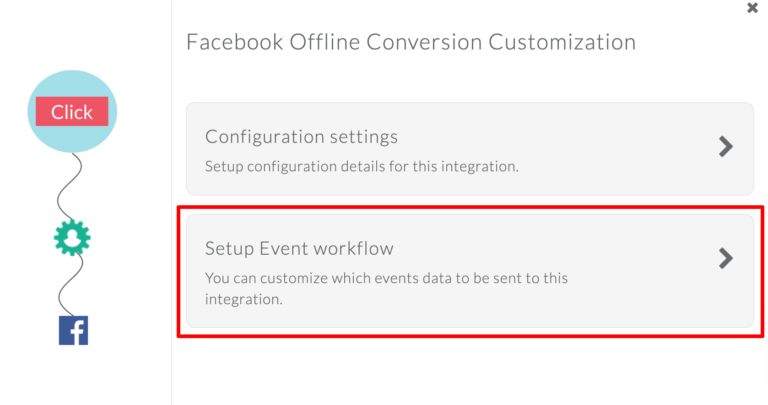
Event Workflow Setup
You can send events from CustomerLabs to Facebook Offline Conversions by configuring the Event Workflow Setup.
- In CustomerLabs, go to Destinations → Facebook Offline Conversion → Setup Event Workflow.
- Turn on the toggle for the offline events you want to send to Facebook, then click “Save Changes.”
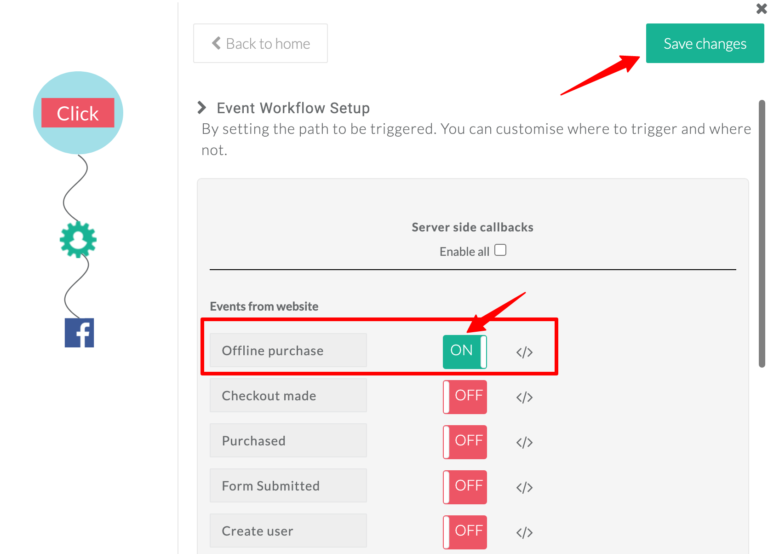
Note: Offline event uploads require user details like email, phone number, or name. Since many website events (such as Add to Cart or Page View) don’t contain these identifiers, avoid sending them as offline conversion events.
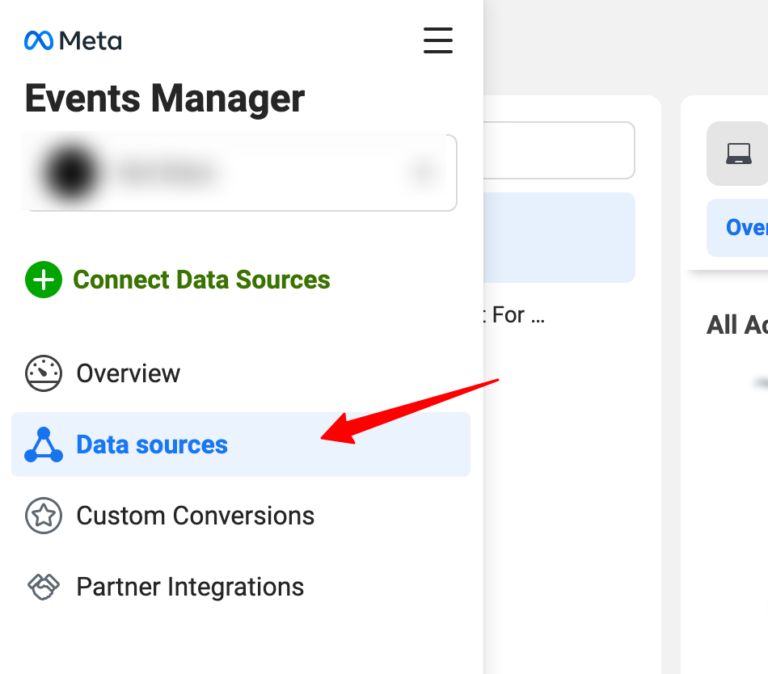
- After enabling the required events, you will begin seeing them appear in Facebook Events Manager under Data Sources → Offline Event Sets → the offline data source you created.
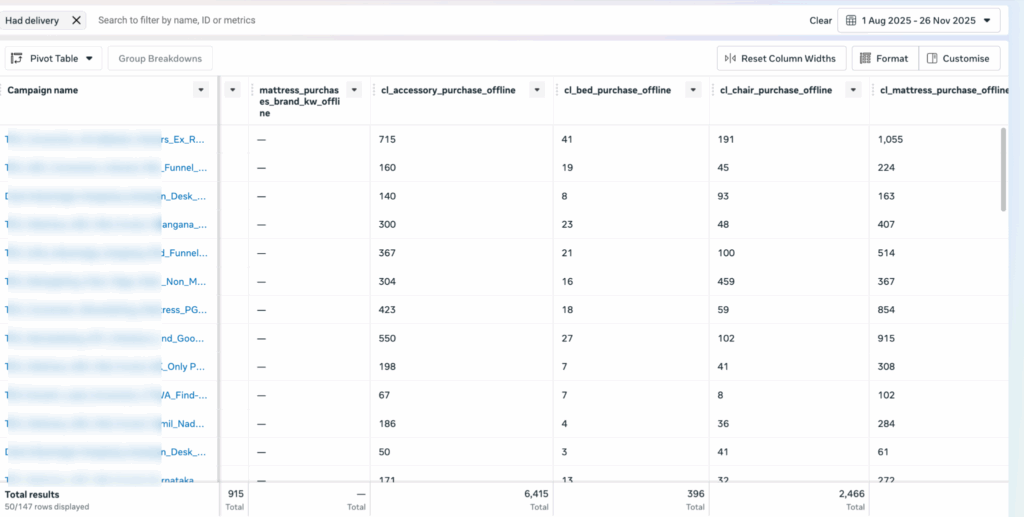
- Reports for the purchase that happened offline
Now, we have successfully set up all setups for WooCommerce offline conversion tracking for Meta and Google Ads. Let’s conclude with the benefits.
Also, check our blog on WooCommerce user tracking setup.
![]()
Conclusion
Offline conversion tracking is no longer optional; it’s the missing link that finally reveals the real impact of your Meta and Google Ads. By connecting WooCommerce sales, warranty form data, and offline store purchases back to your campaigns, brands can finally close the attribution loop and train the algorithms with complete customer journeys.
With CustomerLabs 1PD Ops, this entire process becomes seamless. You can unify online and offline data, enrich every customer profile, and send clean, high-quality signals to Meta and Google, resulting in smarter targeting, stronger match rates, and significantly better ROAS. Whether you’re tracking leads, store purchases, or high-AOV buys, CustomerLabs makes your entire marketing stack more intelligent, automated, and truly performance-driven.
If you’re ready to unlock accurate attribution and give your ads the data they deserve, CustomerLabs is the easiest and most reliable way to get there. Let your marketing finally work with complete visibility online and offline, enroll in our 14-day free trial, and for more clarity and consultation, schedule a call with us.